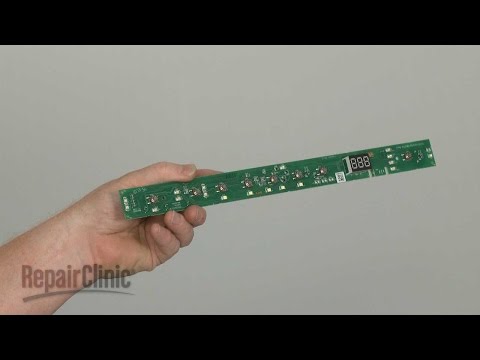
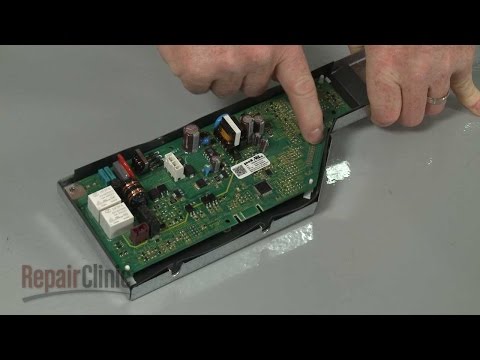
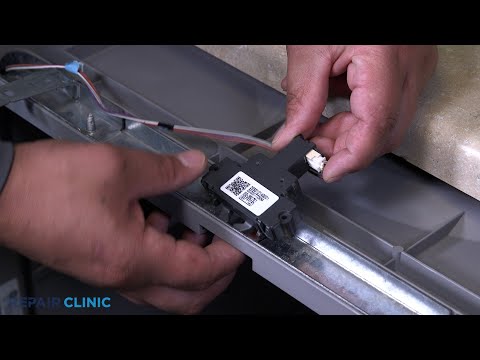
GE Dishwasher Repair - Replacing the User Interface Control Board

preview_player
Показать описание
In this video, I demostrate how to replace the user interface control board on a GE dishwasher, Model GDT695SMJ2ES. To watch my tutorial about diagnosing this problem, click the following link:

Click the link below to view the specific part that I ordered:

I am not a professional repair technician. This video is for educational purposes only, and I assume no responsibility for any repairs that you attempt on your own. Please only attempt repairs that you are comfortable performing, and always disconnect the power before working on any appliance.

Thanks for watching!

Рекомендации по теме
Комментарии
Автор

They should include a copy of the link to this video with every dishwasher sold, and Matt's address to send him a $20 bill to show appreciation for his wonderful video. Thank you, Matt.

jerryvonhandorf
Автор

Before i retired, i did probably about a 1, 000 + of these repairs, in the last 10 years . In a 40 year career working on GE products, this run of dishwashers was/ is, hands down, the biggest boondoggle they have come up with so far . This model series, has got to have the record for most Factory service bulletins, ever !

flexjay
Автор

My husband and I just finished replacing the motherboard on our GE dishwasher, thanks to you. Your instructions were so good and clear. I appreciate how you led us through the process from take apart, to replace and then put back together. Thank you!

pam
Автор

Probably the clearest and most thorough DIY video I've ever followed. A HUGE THANKS! You not only showed which parts fit together, but also *how* they fit together.

sthankin
Автор

Just a useful piece of advice - You don't have to unhook the cables. All you have to do is take out the two 1/4" hex screws at each bottom corner and slightly open the door and it will lift off the hinge assemblies. You don't even need to unhook the water or even pull the dishwasher out from the counter. Can save a bunch of time and effort by not pulling it out.

marshalltyler
Автор

Was just about to buy a new dishwasher. Other videos said nothjng about the jumpers. I told my wife it was an act of God i came across your video. Put in a new UI and nothing. Saw your video took everything apart again adjusted the jumpers. BINGO! working perfect. Thank a bunch. You saved me about 1k.

rayenr
Автор

Matt you made me look good, repaired my daughters dishwasher just like I had done it a million times. Would not have attempted this without your expertise!! Thank you for the savings and satisfaction!!

KeithRobinson-jy
Автор

Thank you for your excellent video. One thing to add (found out the hard way), if you disconnect the spring nylon cables, hook them in the parking J-hook notches provided just below the pulley. That way the spring will remain under some tension and avoid becoming disconnected from the nylon string end piece.

Bucky
Автор

There's a good thread on reddit on what causes this. We think the root cause for this problem is due to bad solder joints. The make the unit power off and on. Upon power on, the micro controller on the main board writes something to flash ram. Flash ram can only be written to so many times before it fails. Under normal conditions, dish washers dont power cycle very often, maybe a few times a year at most. But with failed solder joints and the unit turning on and off, eventually the micro controller's flash memory fails and dies. Which is why in the beginining power cycling the dish washer seems to bring it back.

Tonight i took main my board out and looked at it under a microscope and noted many many cracked solder joints. The worst was on a very small surface capacitor c910. I reflowed all the solder joints and put it back together and the dish washer is running fine now. I'll keep an eye on it.

Point being, if you are handy with soldering, and your unit still works if you unplug it/ plug it back in, worth a try to reflow solder joints to see if that will fix your problem. Since youtube doesnt let you post links, I cant post the reddit thread here, but if you google "Fix for many GE dishwasher problems with control board, UI board, current sense module".

If after some time I confirm my rework fixed this issue permenently, I'm happy to offer my services resoldering these boards for anyone who is stuck with this unfortunate issue.

svRx
Автор

Thank you! Worked for me and my gdt655ssj0ss. After a few months of the weird "random beeping" issue the dishwasher wouldn't respond. I replaced the Control Board first, but after about five minutes of looking like it was fixed, it became totally unresponsive. That's when I read (thanks to some of the responses here) that often both boards go out together. I couldn't pull the trigger right away; since I was unsure whether I should be dumping another $100 into trying to fix it myself. But I finally gave in, thanks to how simple your video made it look. And everything in this video was great, and true. I replaced my User Interface Board in 20 minutes without issue. It's been working for a month now. I can't thank you enough.

squirrelboy
Автор

Your video described the issue I was having with my dishwasher. I ordered a replacement user interface control board, followed your instructions on how to nstall it, and my dishwasher is humming away! Thank you very much!

TriciaStauber
Автор

This video and the one diagnosing the problem was excellent!! I am fairly handy and not afraid to tackle many problems around the house, but I've stayed away from most things that have boards and lots of electrical components. This video made it all very simple and was easy to follow. For about $130 and a couple of hours of my time-I'm retired, I fixed our 3 year old dishwasher. My neighbor had the same problem with their 3 year old GE dishwasher and paid close to $500 for a repairman to replace both control boards. THANK YOU!

garyandsusanhamblin
Автор

As a 67 yo woman, I found your video to be extremely helpful. A couple things I found (as I was doing this myself, without help) when removing (1) the T25 hex screws: spray on some silicone spray and let it sit for a while, (2) the inner and outer door: lay the door on its side and loosen from the bottom up. No need for a helper or for a lot of upper body strength. I also found it easier to reattach the inner and outer doors by having them flat on the countertop.

sherathecat
Автор

Matt, Thank you very much for these 2 videos, they saved me hundreds of dollars , not having to call the repairman, by being able to watch your videos and make the repair on the dishwasher .

odelldickey
Автор

Thank GOD there are guys like you out there willing to spend your time video taping tutorials like this.
Very helpful, thank you!

gordonmerrick
Автор

Thank you Matt for doing this. I have the almost exact same dishwasher (6 years old) with almost the exact same symptoms, including intermittent beeping for months. This step-by-step tutorial gave me the confidence that I could do the exchange myself. Took me about an hour and a half because I kept watching the video step by step. The dishwasher seems to be working just fine again, thanks to the help from this video. A great service Matt.

pcmiller
Автор

This video was amazingly helpful to my husband and I when we were replacing the UI board in our DDT595SSJ2SS model. We had a similar problem that you had with the random beeping that went on for about 9 months until completely died. We found your video after following a professional video that didn't have the details we needed to separate the inner and outer door. Your video came through and was what we followed for the rest of the repair and reassembly. Thank you!

meganlobaugh
Автор

I started by installing the control board at the base of the washer (didn't fix the issue). Glad I found this video. Great walkthrough and we're back in business! Thank you.

notice_fpv
Автор

Thank you for explaining about the pins! I had replaced the UI board and my dishwasher still would not work. Thought it was toast, but I was unaware of the need to change the pins. You saved me $500!!

susanfleming-ts
Автор

My dishwasher was doing the exact same thing with making random noises then all of the sudden stopped working all together. After watching this video one time, I ordered the part and since I already had an understanding of how to replace it, this only took about 35 minutes to do. Very easy!! Thank you very much for posting this How-to!!!

mattbraxton