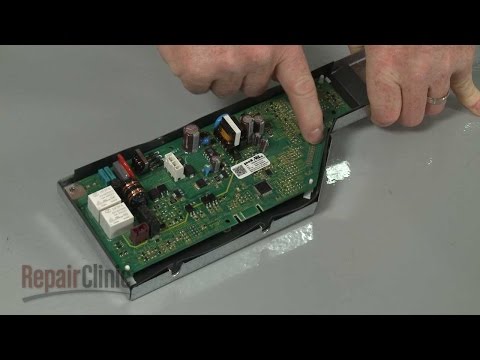
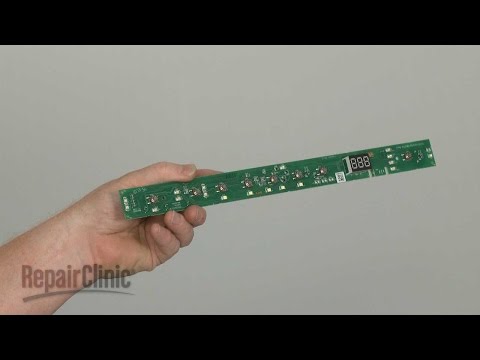
GE Dishwasher Control and Display Board Replacement WD21X10553

preview_player
Показать описание
This video provides step-by-step instructions for replacing the user interface board (control and display board) on GE dishwashers. The main reason for replacing the board is if the user interface no longer lights up or if none of the buttons functions properly.

All of the information in this user interface board replacement video is applicable to the following brands: GE

Tools used: 1/4” socket or nut driver, channel-lock pliers, 5/16” socket or nut driver, small flat-head screwdriver

Connect With Us!

Don't forget to like and comment on this video, and subscribe to our channel!
Рекомендации по теме
Комментарии
Автор

Our GE dishwasher was making random beeps for a month or so before it just stopped working. This dishwasher was a mid to upper grade GE and was only 3 years old. The controls did not show any signs of power or working. After checking all the circuits and plugs, I started researching possible solutions, These repair clinic video's are very well done and show all the possible step by step instructions. The Interface board was the cure for my dishwasher. At first the new interface board did not seem to work. But the new board contained instructions for setting the personality and arranging the pins on the board. There were 8 pins with a plastic fittings. Each fitting enclosed two pins. I had to move one of the fittings to a different arrangement per the instructions. After making this minor change, the dishwasher turned on and started working. This video along with other customers who explained what they were experiencing with their GE dishwasher really helped save me a lot of money. I live in a rural area of the South West and there are not many appliance repair companies near me. If this did not work, my wife was wanting to just purchase a new dishwasher. Thank you Repair Clinic!!

jpatten
Автор

My door was a little different, but this video was very helpful. I was able to get the job done with the guidance provided and now our dishwasher is working again. Thanks

tomgourley
Автор

This is a solid video for RnR the UI board, with the following caveat. Replacement UI boards may arrive needing jumpers set for your specific model. 4 jumpers will need to be set according to instructions that accompany the replacement board. Lastly, door hinges may come with slightly different configurations, but with a little common sense observation detaching the inner panel will become obvious.

robryerson
Автор

This video left out one very important step when replacing the display board. You need to reconfigure some pins on the back of the board to match your dishwasher model. They call is setting the personality. Instructions came with the replacement board GE sent me.

edwardsmith
Автор

This video was absolutely spot on with information for a DIY. I have absolutely no experience in appliance repair but I applied all my years of working on computers and building them in integrated systems and looked at this project I was like it was one big computer. For me that logic worked perfectly and I was able to completely rebuild the dishwasher with the new board in a very timely fashion of about two hours and that’s taken into account my total lack of experience and understanding of appliances. Thank you so very much for this great video

augustlarson
Автор

Here’s a tip if you want to avoid pulling the machine out to get access to the hinge cords. It is easy to get the cords to pop OFF the little pulleys on the front, but very difficult to get them to pop back ON those little pulleys, without having access and leverage from the side. That’s the reason to pull the machine out of the cabinet. The springs are strong and fight back. and you CANT fit both hands under there to apply enough muscle. (well I couldn't, anyway)

Here’s what you do to make it easy:

1) Get yourself a dog leash, with a nice clip. Yes, a dog leash.

2) reach back along that cord until you get to the steel spring. you are probably elbow deep when you get there.

3) clip the leash to the end of the spring, the same place where the cord is attached.

4) now you can pull on the leash and extend that spring without even putting your hands under the machine.

5) with the pressure off the cord, it is easy - oh so EASY - to just place that plastic end of the spring cord where it belongs.

6 finally, reach back in and unclip your leash.

a triumph!!

derekhart
Автор

Great video, thanks! My humble contribution: modern models (like the ZDT915SSPJ0SS) do not require the bottom hinges to be removed. 4 Tork screws have to be removed at both sides of the door and it will be released. The new board requires configuration according to the model number. It is called ¨personality¨ .This can be done using the jumpers supplied with the new version of the board, following the instructions supplied. Save jumpers not used for eventual need in the future (jumpers showing connecting only one pin can be removed). During final re-assembling pay attention to connect the 2 springs at the back (Left side only) that may have escaped/disconnected from the tension cord.

eduaraujosilva
Автор

This video solved my problem exactly. Ordered the part and followed the instructions. Thanks!

bentonpahlka
Автор

My dishwasher had been making random beeping sounds for a few weeks and then it just quit working- no lights on the user interface. I replaced the control board first but it had no effect so then I replaced the user interface board per this video and now all is good. If you're not sure which board you need perhaps start with the UI board since it is less expensive. There isn't an advantage to trying to replace both in one repair session since the teardown has almost no overlap besides removal of the bottom trim plate.

For the life of me I couldn't get the wiring cover to mate back up closely enough that it could be secured with the single screw. The area is difficult to access and it isn't easy to assess what is going on. I ended up securing it with a zip tie through the screw holes... good enough.

Anyway, thanks for this video and the one on the control board. Very helpful. I had enough play in all wires/hoses/etc. to avoid disconnecting anything and I suspect most installations are similar since leaving some play would have made the original installation easier anyway.

brianyoung
Автор

Will just add more of the same. We had some random beeping from the dishwasher off and on after 3 years ownership. Then all function of the control lights went out. Circuit breaker did not trip. Called GE and after very lengthy wait (6 hours) they called back, and finally agreed to sell me the main control board and UI panel for half price. It took a few weeks but they finally arrived. Replaced the main control board first and no change. Then followed the instructions on this video (generally) cuz mine was a slightly different model. I had some trouble interpreting the jumper diagram but finally determined to pay attention on the diagram which round pins were connected to match the diagram. For my model GDT695, the jumpers connected pins in the 1 2 and 8 position. Number 4 pin just hung off to the side or I could have just tossed it completely. Reassembled and everything worked.

donbus
Автор

Glad I found this, different GE model but still followed similar steps

Danbui
Автор

Im a tech for 25years great video, avoided this d/w didnt know how to take off.

c-ho
Автор

This video is very helpful. However, the video does skip one very important step and that is to remove the vent cap on inside part of the door. If you do not unscrew this cap the inner door will not separate from the outer door. The video shows the entire vent assembly coming off with the inner door possibly because it is a different model or maybe a demo model.

brianfox
Автор

This video really helped me, although I simply had to replace the bezel on the top of the door instead of changing out the display unit itself.

roberteckstein
Автор

This video was spot on what I needed. Thanks for helping me and my family save a lot of money hiring a tech!

jayeisenberg
Автор

Very well done. Your videos are always short and concise. Thank you

slick
Автор

Have same issue as everyone else, random beeps until it eventually dies with no display. Everyone having same issue we should class action sue them.

samegelhof
Автор

These instructions were spot on. Machine runs perfectly

amymorris
Автор

They neglected to show the set up of the jumper. Pretty critical step.

andyokeefe
Автор

I’m trying to decide if we need to replace the user interface board or the lower board. Our dishwashers upper interface panel will show no lights as if it has no power. We’ve removed the lower panel and unplugged the door wire connector and that occasionally allows us to then gain power back and run a cycle. It’s inconsistent though. Sometimes it needs to sit unplugged for a while and then we will reconnect and it will finally work. Please help! What part should I order?

tonyayork-remaxnorthwestre