filmov
tv
Implementing a PID Controller with Arduino

Показать описание
Learn how to implement a PID controller using Arduino, a popular microcontroller platform, for precise control in various applications. Follow this step-by-step guide to understand the theory behind PID control and how to practically implement it with Arduino.
---
Disclaimer/Disclosure: Some of the content was synthetically produced using various Generative AI (artificial intelligence) tools; so, there may be inaccuracies or misleading information present in the video. Please consider this before relying on the content to make any decisions or take any actions etc. If you still have any concerns, please feel free to write them in a comment. Thank you.
---
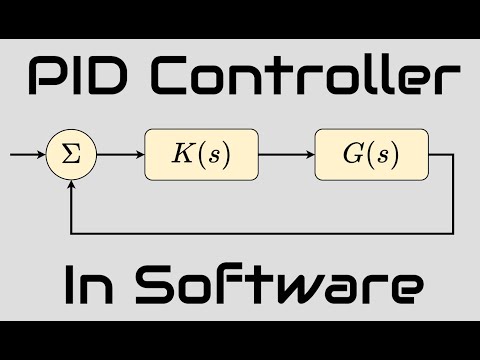
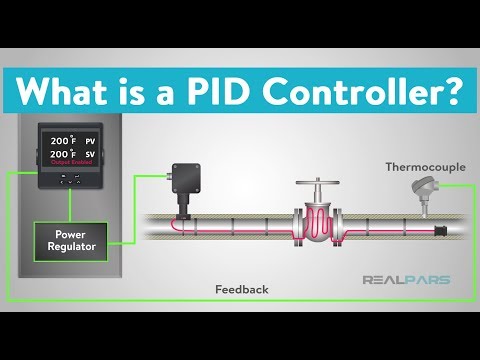
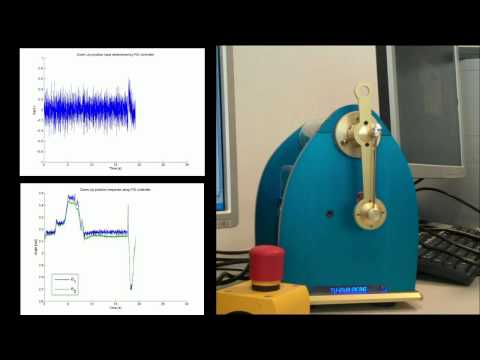
PID (Proportional-Integral-Derivative) control is a widely used technique in engineering for achieving precise control of systems. Whether it's controlling temperature, speed, position, or any other variable, PID controllers excel at maintaining a desired setpoint in various applications. In this guide, we'll explore how to implement a PID controller using Arduino, a popular microcontroller platform.
Understanding PID Control
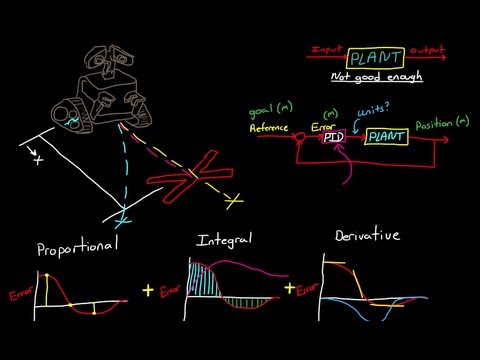
PID control operates by continuously calculating an error value as the difference between a desired setpoint and a measured process variable. The controller then adjusts the system's output based on three components: proportional (P), integral (I), and derivative (D) terms.
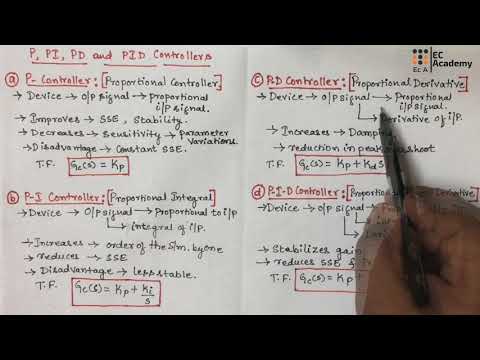
Proportional (P): This term produces an output proportional to the current error value. It responds to the present error only and can cause oscillations around the setpoint if used alone.
Integral (I): The integral term considers past errors and accumulates them over time. It helps eliminate steady-state error and brings the system to the setpoint over time.
Derivative (D): The derivative term predicts future error trends based on the rate of change of the error. It helps dampen oscillations and improve system stability.
Implementing PID Control with Arduino
To implement PID control with Arduino, follow these steps:
Connect Hardware: First, connect your Arduino board to the system you want to control. This could be a motor, heater, or any other device.
Install PID Library: Arduino provides PID library which simplifies the implementation of PID control. Install the library using Arduino IDE by navigating to Sketch -> Include Library -> Manage Libraries and search for "PID".
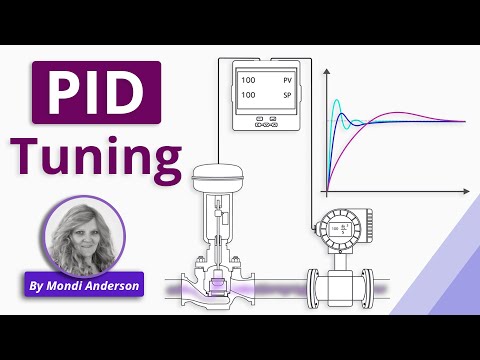
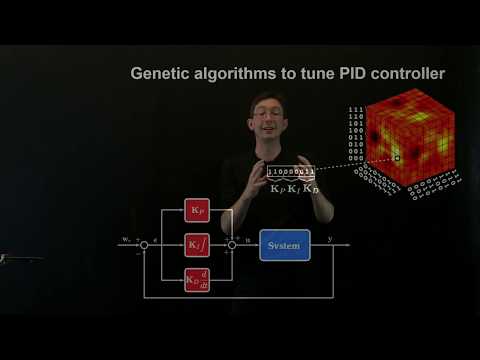
Define Parameters: Determine the PID parameters (Kp, Ki, Kd) for your specific application. These parameters need to be tuned to achieve the desired performance.
Initialize PID Controller: Create an instance of the PID controller and initialize it with the chosen parameters.
Read Sensor Input: Continuously read the sensor input (e.g., temperature, position) from the system being controlled.
Calculate PID Output: Calculate the PID output using the compute() function of the PID library, providing the current setpoint and sensor input.
Adjust System Output: Use the PID output to adjust the system's output (e.g., adjust motor speed, heater power).
Repeat Loop: Repeat this process in a loop to continuously monitor and adjust the system output based on the PID control algorithm.
Example Sketch
Here's a basic example of PID control implementation with Arduino using a hypothetical scenario of controlling the temperature of a heater:
[[See Video to Reveal this Text or Code Snippet]]
Conclusion
Implementing a PID controller with Arduino allows for precise control in various applications, ranging from temperature control to motor speed regulation. By understanding the theory behind PID control and following the steps outlined in this guide, you can effectively implement PID control in your Arduino projects.
---
Disclaimer/Disclosure: Some of the content was synthetically produced using various Generative AI (artificial intelligence) tools; so, there may be inaccuracies or misleading information present in the video. Please consider this before relying on the content to make any decisions or take any actions etc. If you still have any concerns, please feel free to write them in a comment. Thank you.
---
PID (Proportional-Integral-Derivative) control is a widely used technique in engineering for achieving precise control of systems. Whether it's controlling temperature, speed, position, or any other variable, PID controllers excel at maintaining a desired setpoint in various applications. In this guide, we'll explore how to implement a PID controller using Arduino, a popular microcontroller platform.
Understanding PID Control
PID control operates by continuously calculating an error value as the difference between a desired setpoint and a measured process variable. The controller then adjusts the system's output based on three components: proportional (P), integral (I), and derivative (D) terms.
Proportional (P): This term produces an output proportional to the current error value. It responds to the present error only and can cause oscillations around the setpoint if used alone.
Integral (I): The integral term considers past errors and accumulates them over time. It helps eliminate steady-state error and brings the system to the setpoint over time.
Derivative (D): The derivative term predicts future error trends based on the rate of change of the error. It helps dampen oscillations and improve system stability.
Implementing PID Control with Arduino
To implement PID control with Arduino, follow these steps:
Connect Hardware: First, connect your Arduino board to the system you want to control. This could be a motor, heater, or any other device.
Install PID Library: Arduino provides PID library which simplifies the implementation of PID control. Install the library using Arduino IDE by navigating to Sketch -> Include Library -> Manage Libraries and search for "PID".
Define Parameters: Determine the PID parameters (Kp, Ki, Kd) for your specific application. These parameters need to be tuned to achieve the desired performance.
Initialize PID Controller: Create an instance of the PID controller and initialize it with the chosen parameters.
Read Sensor Input: Continuously read the sensor input (e.g., temperature, position) from the system being controlled.
Calculate PID Output: Calculate the PID output using the compute() function of the PID library, providing the current setpoint and sensor input.
Adjust System Output: Use the PID output to adjust the system's output (e.g., adjust motor speed, heater power).
Repeat Loop: Repeat this process in a loop to continuously monitor and adjust the system output based on the PID control algorithm.
Example Sketch
Here's a basic example of PID control implementation with Arduino using a hypothetical scenario of controlling the temperature of a heater:
[[See Video to Reveal this Text or Code Snippet]]
Conclusion
Implementing a PID controller with Arduino allows for precise control in various applications, ranging from temperature control to motor speed regulation. By understanding the theory behind PID control and following the steps outlined in this guide, you can effectively implement PID control in your Arduino projects.
 0:20:06
 0:09:25
 0:29:51
 0:02:58
 0:05:39
 0:08:43
 0:00:46
 0:07:44
 2:13:00
 0:00:31
 0:04:51
 0:12:49
 0:18:58
 0:16:18
 0:00:19
 0:06:52
 0:18:14
 0:19:17
 0:10:52
 0:09:53
 0:05:47
 0:11:42
 0:13:12
 0:01:43