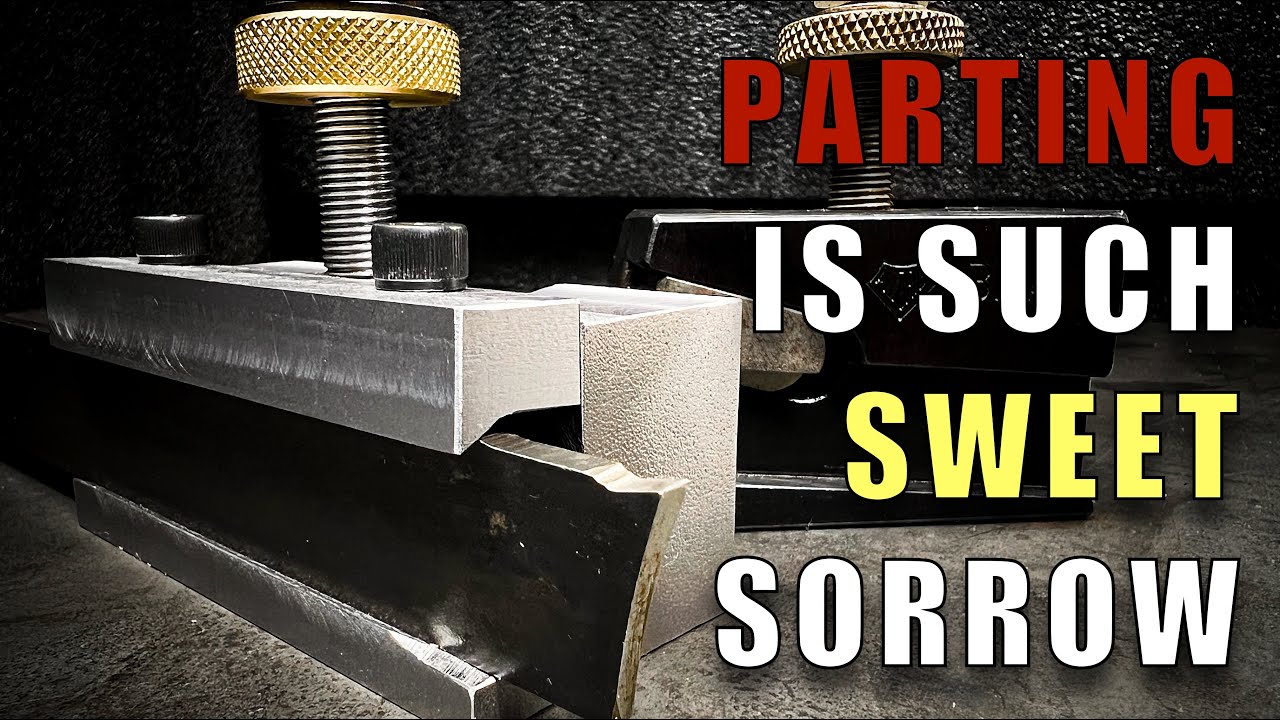
Cutoff Operations CAN be EASY

preview_player
Показать описание

For this week's project we will be finishing up the DIY shop made parting tool holder for the aloris style BXA quick change tool post.
This is a more robust, versatile, and rigid cutoff tool holder that is meant to be an improved replacement for the typical parting tool holder that comes with most aloris style tool posts.
All of the work will be done on the milling machine and will include milling, drilling, and using the dovetail cutter.
I will also briefly demonstrate the use of sub datums on the DRO as a means to keep track of multiple different features, allowing you to revisit those features as many times as you need to perform a series of separate operations on the same feature.
As always, thank you for watching and if you have any questions, criticisms, ideas, etc. please leave a comment below!

My Lathe: MSC / Prince 9517350 - 13x40 Manual Metal Lathe
My Milling Machine: Bridgeport Variable Speed Series 1 "J Head"
My other Milling Machine: Brown & Sharpe No. 2 Plain "light type" Universal Milling Machine

CREDITS:

Рекомендации по теме
Комментарии
Автор

Nice work. Appreciate that you show the mistakes. 👍🏻

voodoochild
Автор

Thanks for covering the build videos for this tool holder. It was me who originally asked if you had done a build video.
I made about 15 homemade 250-201 style holders to take 16mm and 20mm shanked tools.

I still have 2 blank holders without any tool slot milled in them which I plan to make a couple of parting/grooving blade holders from.

What I am undecided on is whether to mill the cut-off blade slot horizontal/level or include a few degrees of tilt to introduce some top rake angle into the 'T' section HSS cut-of blade as the original Aloris type have.

howardosborne
Автор

I'm sure it works very well, so it is a win.

Rustinox
Автор

9:40 They're speed holes, they make it go faster.

jimsvideos
Автор

Some seriously great shots. Thank you for your hard work.

pikeyMcBarkin
Автор

The last video you had talked about how you managed to find one of the fancy tool holders for your mill on eBay. That got me thinking hey I had 3 of those listed on eBay. Well now I have 2 and you were the guy who bought one haha. If your interested I would be willing to work something out to send the other two if you want em

Coopedupintheshop
Автор

That is great, it shows every step of how to build one of our own. I watch a video the other day that showed how to make a extension table for your table saw that you could add a router to it. It never showed how to attach the extension to the table, Anyway, very nice and easy to understand! I kind of like the idea of the guide pins, but as you said, it could just make another problem.

tomnielsen
Автор

Great video thanks and a project for me and my new to me CXA tool post cheers Paul from the UK 🇬🇧

Paul-FrancisB
Автор

I'm going to have to make myself a better cutoff blade holder. Broke a cutoff blade today (in my defense, though, I'm running a bench lathe, so I have to run things a lot faster when it comes to parting)

minilathemayhem
Автор

Very nice work, both machining and videography. While you are preaching rigidity there is another faction preaching flexture... Have you seen any of these videos?

trollforge
Автор

A few thoughts and tips, at about the 2:45 mark it appears that your getting at least some chips behind the parallel against your moving jaw. That's because there's nothing holding them against each jaw face. An old school machinist trick to fix that. If your parallels are flat enough on there non working face, add a drop or two of any oil to the rear face of the parallel that goes against each vise jaw. What that does is force out and remove any air on that side. Your then creating close to an almost perfect vacuum. And there will be roughly 15 psi per sq. in. of positive air pressure holding each parallel against each jaw face. A few dots of grease can do the same, it's just a lot harder to fully wipe off when cleaning your parallels.

Even with a dro I still either do a rough layout on the part or a paper sketch with the part dimensions and dro coordinate points already worked out from each X, Y edge found datum face. If it doesn't look right on the sketch or layout, you'll easily catch it. And that saves a large number of mistakes such as wrongly spot drilled hole locations. The few minutes it takes is imo well worth the mistake reductions it provides. For more complex parts, I'll still do a rough part layout since that reduces confusing any feature locations that may not be symmetrical to the finished parts left, right / top, bottom.

Since you already have a dro try edge finding the vises fixed jaw. Enter that into your dro as a known Y axis zero point. That saves having to constantly edge find each parts Y axis datum. If you already know the parts measured width, finding it's center or any other datum in that axis is easy with simple addition or subtraction. For most jobs that will be accurate enough. Just be aware that even the Kurt vises have varying amounts of rear deflection movement on that fixed jaw and away from that known datum point depending on the part height within the jaws, and the closing torque used to tighten the vise. If it really counts, I'll still edge find that jaw, then set up an indicator behind the fixed jaws vertical face and measure it's deflection until the vise is tight, and then make an adjustment correction for it in the dro. For multiple parts of the same dimensions, using a torque wrench each time to close the vise will still get you a repeatable datum point without further indicating that jaw.

Pete-xeil
Автор

wonderful content. thank you, cheers from Florida, Paul

ypaulbrown
Автор

What you have just made you could/will need more. I say this because other lathe owners tend to say "You can't have too maney". Should I be in your posission I would have got a hold of more mettal & made 2 or 3. Prepairing the stock (2 or 3} time wise requires a little more time as opposed to making the next later. Just an idea.

collin
Автор

I plan on making a similar tool holder...but im curious if you have any issues since the parting tool is perpendicular to the work instead of at a 5-7ish deg upward angle like the other style parting tool holders. Hope this makes sense...newb machinist here lol

lawrencesanborn
Автор

Do you find that neutral rake works better then?

Intensive_Porpoises