filmov
tv
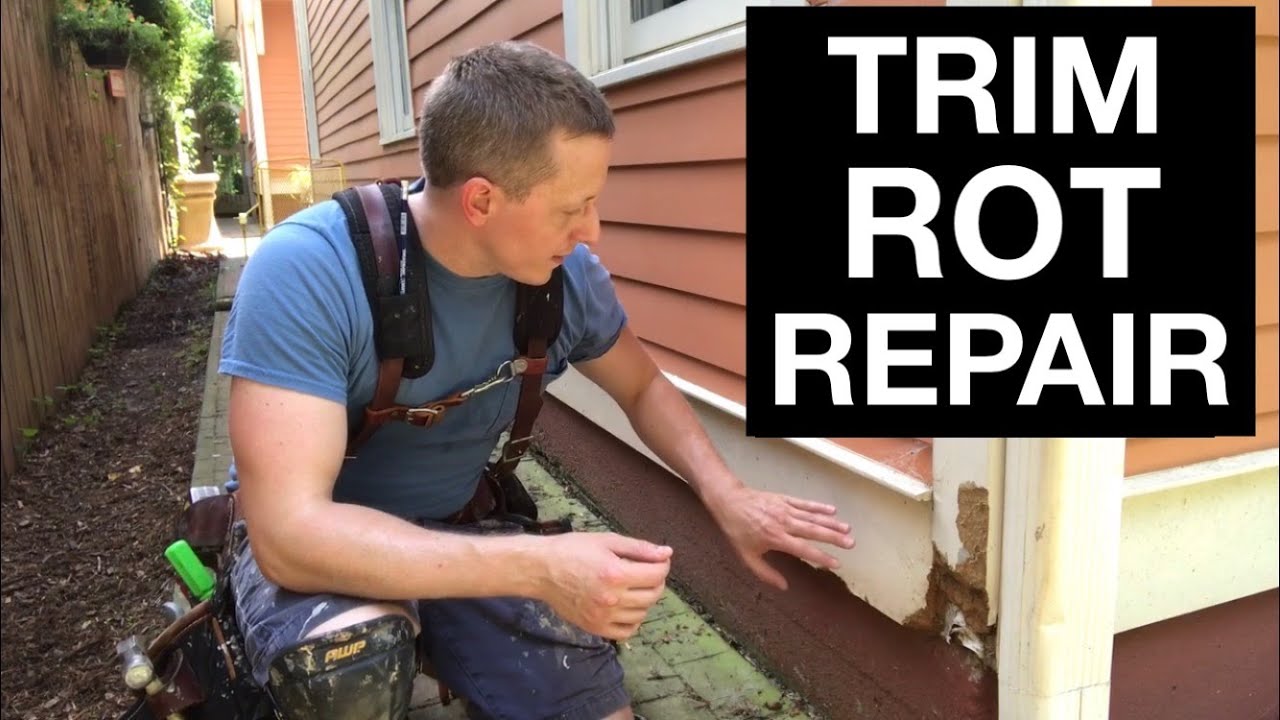
Repair Trim Rot (Skirt Board and Corner Board)
Показать описание
Check Out Our FREE GUIDE: *25 Must-Have Carpentry Tools...Under $25 Each!*
AFFILIATE TOOL LINKS:
Porter Cable Multi-tool (Great Value!):
Dewalt 20v Battery Multi-tool (My New Cordless):
Dewalt Miter Saw:
5-in-1 Painter's Tool (Best Hand Tool!):
WEN 18ga Brad Nailer (Best Price + Good Reviews):
Craftsman 6 gallon Compressor:
(These are affiliate links. When you shop through these links, we receive a small commission at NO EXTRA CHARGE TO YOU. We greatly appreciate the support!)
FOLLOW US ON INSTAGRAM:
FOLLOW US ON LINKEDIN:
Check out our other ROT-RELATED VIDEOS linked below!
Repair Rotted Door Jambs:
Fix Rotted Brickmold:
Fix Rotted Sink Cabinets:
Replace Deck Handrails:
Fix Rotted Basement Stairs:
Repair Leaning Fences:
Replace Deck Boards:
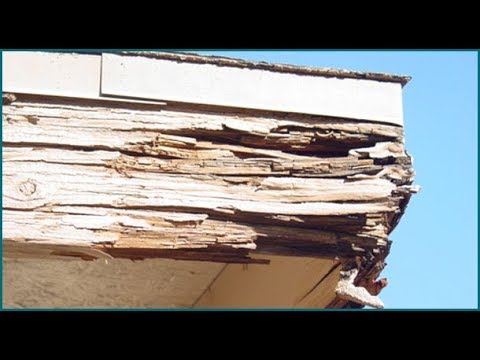
Skirt board and corner boards are areas that experience frequent trim rot. This video from The Honest Carpenter will explain how to cut out rotted portions of trim and replace them with new lumber that will be protected from future trim rot.
Tools:
Miter Saw
Oscillating Multi-tool
Brad Nailer
Compressor
Combination Square
Speed Square
Nail Puller
Hammer
Five-in-one
Materials:
Pine Trim Boards
Treated Pine Deck Board (5/4)
Caulk
Exterior Paint
Galvanized Brads
How-To:
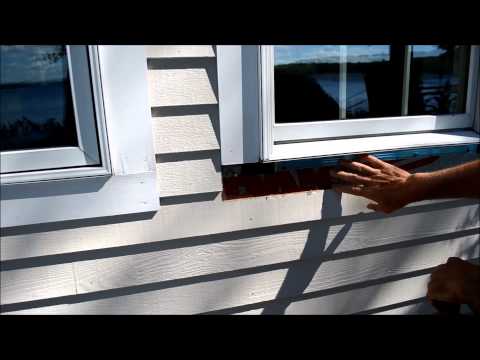
1) Mark new cut lines around trim rot with a combination square or speed square and pencil.
2) Cut through marked lines with oscillating multi-tool.
3) Remove trim rot pieces with hammer and five-in-one.
4) Measure for replacement trim piece
5) Cut replacement trim piece.
6) Attach replacement trim piece with brads
7) Paint replacement trim pieces with exterior-grade paint.
FYI: Wood rot like this is commonly a problem that begins on original trim installation. Use of inferior products, such as any form of MDF trim, and fast construction techniques will inevitably lead to trim rot. While some areas of your home are more prone to this sort of wood rot, be sure to do frequent walkarounds and self-inspections of your house. If one area is showing trim rot like this, other parts of your house may be in similar phases of rot. If caught early enough, these trim rot repairs are mostly surface remediation--you can avoid penetrative wood rot that moves beyond trim, into the sheathing and framing of your home.
If you enjoyed this video from The Honest Carpenter, be sure to hit LIKE AND SUBSCRIBE! We'll be posting many more videos in 2019.
Also, for tips, articles and tool/product links, check out The Honest Carpenter website and blog!
AFFILIATE TOOL LINKS:
Porter Cable Multi-tool (Great Value!):
Dewalt 20v Battery Multi-tool (My New Cordless):
Dewalt Miter Saw:
5-in-1 Painter's Tool (Best Hand Tool!):
WEN 18ga Brad Nailer (Best Price + Good Reviews):
Craftsman 6 gallon Compressor:
(These are affiliate links. When you shop through these links, we receive a small commission at NO EXTRA CHARGE TO YOU. We greatly appreciate the support!)
FOLLOW US ON INSTAGRAM:
FOLLOW US ON LINKEDIN:
Check out our other ROT-RELATED VIDEOS linked below!
Repair Rotted Door Jambs:
Fix Rotted Brickmold:
Fix Rotted Sink Cabinets:
Replace Deck Handrails:
Fix Rotted Basement Stairs:
Repair Leaning Fences:
Replace Deck Boards:
Skirt board and corner boards are areas that experience frequent trim rot. This video from The Honest Carpenter will explain how to cut out rotted portions of trim and replace them with new lumber that will be protected from future trim rot.
Tools:
Miter Saw
Oscillating Multi-tool
Brad Nailer
Compressor
Combination Square
Speed Square
Nail Puller
Hammer
Five-in-one
Materials:
Pine Trim Boards
Treated Pine Deck Board (5/4)
Caulk
Exterior Paint
Galvanized Brads
How-To:
1) Mark new cut lines around trim rot with a combination square or speed square and pencil.
2) Cut through marked lines with oscillating multi-tool.
3) Remove trim rot pieces with hammer and five-in-one.
4) Measure for replacement trim piece
5) Cut replacement trim piece.
6) Attach replacement trim piece with brads
7) Paint replacement trim pieces with exterior-grade paint.
FYI: Wood rot like this is commonly a problem that begins on original trim installation. Use of inferior products, such as any form of MDF trim, and fast construction techniques will inevitably lead to trim rot. While some areas of your home are more prone to this sort of wood rot, be sure to do frequent walkarounds and self-inspections of your house. If one area is showing trim rot like this, other parts of your house may be in similar phases of rot. If caught early enough, these trim rot repairs are mostly surface remediation--you can avoid penetrative wood rot that moves beyond trim, into the sheathing and framing of your home.
If you enjoyed this video from The Honest Carpenter, be sure to hit LIKE AND SUBSCRIBE! We'll be posting many more videos in 2019.
Also, for tips, articles and tool/product links, check out The Honest Carpenter website and blog!
 0:09:17
Repair Trim Rot (Skirt Board and Corner Board)
 0:10:36
THE TRUTH ABOUT WOOD ROT (You need to watch this!!)
 0:02:31
How to Repair Exterior Rotted Trim: THE ULTIMATE SOLUTION | Mr. Happy House
 0:06:21
Belly Band Board Repairs to Rotten Ends of T1-11 Siding – Part 2
 0:07:44
How to Identify and Repair Rotting Wood | Ask This Old House
 0:09:51
Fix Rotted Door Frame (Brickmold)
 0:21:18
Replacing Rotted Wood Siding | Step by Step Guide
 0:04:25
The Baseboard Repair Method That Changes Everything!!!
 0:07:39
How to Repair a Rotted Window Frame | Fix Rotted Window Sill From Outside
 0:28:03
Patching Rotted Water Damaged Wood
 0:05:55
how to repair rotted wood, rotted trim on front porch. Easy!
 0:14:38
Replace Your Rotted Wood Window Trim with PVC Vinyl Trim Boards
 0:10:22
How To Replace Damaged Siding | THE HANDYMAN
 0:11:14
Replacing your rotten wood siding!
 0:15:21
How to repair not replace exterior rotting wood on your house instructions
 0:06:05
Repairing Rotten Fascia On A House | THE HANDYMAN
 0:01:22
A common mistake made when installing wood siding on the outside of a home. Easy fix.
 0:21:21
How to Replace Rotted Bottom Door Trim | Exterior Kick Board Under Door
 0:00:13
TRIM A WINDOW WITH ME - install window trim and sill #diyhomedecor #homeimprovement
 0:11:32
How To Repair Rotted Door Jambs
 0:06:36
how to replace a rotten rim joist
 0:03:32
How to Replace Exterior Window Trim Video
 0:06:56
CRACKS ALONG SKIRTING BOARDS SOLVE PERMANENTLY
 0:03:15
Replacing rotted wood trim around front door post
Комментарии