filmov
tv
Fix Rotted Door Frame (Brickmold)

Показать описание
Check Out Our FREE GUIDE: *25 Must-Have Carpentry Tools...Under $25 Each!*
AFFILIATE TOOL LINKS:
Dewalt 20V Oscillating Multitool (My new one!):
Porter Cable Oscillating Multitool:
Replacement Oscillating Blades:
5-in-1 Painters Tool (for careful prying):
Dewalt 18ga Pneumatic Brad Nailer (highly rated):
(These are affiliate links. When you shop through these links, we receive a small commission at NO EXTRA CHARGE TO YOU. We greatly appreciate the support!)
FOLLOW US ON INSTAGRAM:
FOLLOW US ON LINKEDIN:
Check out our other ROT-RELATED VIDEOS linked below!
Repair Rotted Trim (Skirtboard):
Repair Rotted Door Jambs:
Fix Rotted Sink Cabinets:
Replace Deck Handrails:
Fix Rotted Basement Stairs:
Repair Leaning Fences:
Replace Deck Boards:
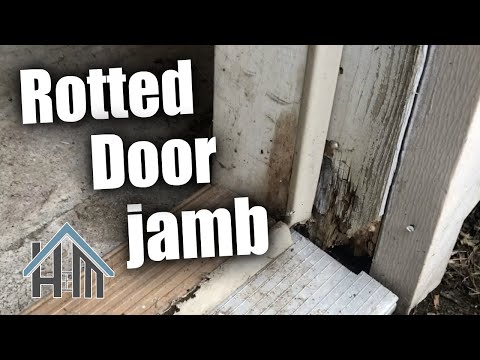
Brickmold trim casings on both doors and windows are very prone to rot. This video from The Honest Carpenter will show you how to remove and replace rotted brickmold on a door frame with simple carpentry tools!
Tools:
Oscillating Multi-tool
Utility Knife
16 oz Hammer
Brad Nailer/Compressor
Miter Saw
Six-in-One Painter's Tool
Cat's Paw (Nail Puller)
Combination Square
Caulking Gun
Materials:
PVC Brickmold
Siliconized Acrylic Latex Caulk
Galvanized Brad Nails (2")
For a detailed article about this rotted brickmold repair, check out The Honest Carpenter link below:
And, for an in-depth look at the oscillating multi-tool, including product reviews, go here!
How-To:
1) Mark a perpendicular line on the face of brickmold with a combination square and pencil.
2) Cut through marked line with oscillating multi-tool; be careful not to overcut into door jamb or siding.
3) Cut caulk lines around brickmold with utility knife.
3) Remove cut lower portion of brickmold with 5-in-1 and hammer.
4) Measure open area from lower surface up to underside of remaining brickmold.
5) Cut replacement piece of PVC brickmold (be sure to cut miter on bottom if necessary).
6) Prep area by caulking underside of existing brickmold.
7) Install new brickmold piece with galvanized brad nails.
8) Caulk perimeter of replacement.
9) Paint with exterior-grade paint.
If you enjoyed this rotted brickmold repair video, please hit LIKE AND SUBSCRIBE!
Be sure to check out The Honest Carpenter website for more tips, tricks, articles and tool links!
AFFILIATE TOOL LINKS:
Dewalt 20V Oscillating Multitool (My new one!):
Porter Cable Oscillating Multitool:
Replacement Oscillating Blades:
5-in-1 Painters Tool (for careful prying):
Dewalt 18ga Pneumatic Brad Nailer (highly rated):
(These are affiliate links. When you shop through these links, we receive a small commission at NO EXTRA CHARGE TO YOU. We greatly appreciate the support!)
FOLLOW US ON INSTAGRAM:
FOLLOW US ON LINKEDIN:
Check out our other ROT-RELATED VIDEOS linked below!
Repair Rotted Trim (Skirtboard):
Repair Rotted Door Jambs:
Fix Rotted Sink Cabinets:
Replace Deck Handrails:
Fix Rotted Basement Stairs:
Repair Leaning Fences:
Replace Deck Boards:
Brickmold trim casings on both doors and windows are very prone to rot. This video from The Honest Carpenter will show you how to remove and replace rotted brickmold on a door frame with simple carpentry tools!
Tools:
Oscillating Multi-tool
Utility Knife
16 oz Hammer
Brad Nailer/Compressor
Miter Saw
Six-in-One Painter's Tool
Cat's Paw (Nail Puller)
Combination Square
Caulking Gun
Materials:
PVC Brickmold
Siliconized Acrylic Latex Caulk
Galvanized Brad Nails (2")
For a detailed article about this rotted brickmold repair, check out The Honest Carpenter link below:
And, for an in-depth look at the oscillating multi-tool, including product reviews, go here!
How-To:
1) Mark a perpendicular line on the face of brickmold with a combination square and pencil.
2) Cut through marked line with oscillating multi-tool; be careful not to overcut into door jamb or siding.
3) Cut caulk lines around brickmold with utility knife.
3) Remove cut lower portion of brickmold with 5-in-1 and hammer.
4) Measure open area from lower surface up to underside of remaining brickmold.
5) Cut replacement piece of PVC brickmold (be sure to cut miter on bottom if necessary).
6) Prep area by caulking underside of existing brickmold.
7) Install new brickmold piece with galvanized brad nails.
8) Caulk perimeter of replacement.
9) Paint with exterior-grade paint.
If you enjoyed this rotted brickmold repair video, please hit LIKE AND SUBSCRIBE!
Be sure to check out The Honest Carpenter website for more tips, tricks, articles and tool links!
 0:09:51
Fix Rotted Door Frame (Brickmold)
 0:04:26
HOW TO REPAIR ROTTED DOOR JAMB
 0:09:10
How To Repair Rotted Door Frame #whojoedaddy
 0:11:32
How To Repair Rotted Door Jambs
 0:11:48
How to Repair a Garage Door Jamb / Trim - Replace Rotted Wood.
 0:09:23
Replacing door brick moulding
 0:06:25
How to make a rotted exterior door jamb and trim like new. Easy door rot repair.
 0:04:07
Simple Door Frame Rot Repair
 0:10:32
Repair Rotted Brick Mold & Trim Exterior Door Jamb
 0:34:58
How to Repair Rotted Door Frame and Trim on Exterior Door
 0:08:47
Exterior Brick Mold & Door Casing Repair...
 0:13:29
Installing Vinyl Door Trim on the Entry Door - Detailed Instructions
 0:10:36
THE TRUTH ABOUT WOOD ROT (You need to watch this!!)
 0:09:17
Repair Trim Rot (Skirt Board and Corner Board)
 0:07:15
How to Repair Door Frame Rot / Rotted Door Frame with FrameSaver Jamb Rot Repair Kit
 0:00:39
Rotten wood repair
 0:09:00
How To Repair Door Jambs
 0:27:57
Boss PVC Dry Rot Door Jamb Repair Kit How To #diy #how #howto
 0:15:14
Repair Replace Door Jambs Part 1
 0:03:31
How to Fix Rotted Wood with Epoxy | This Old House
 0:09:42
How to rot repair, How to use Bondo and How-to Dustin...Bonus!
 0:19:07
Replace Door Jamb with PVC and Repaired Door
 0:05:26
How to fix, repair replace rotted exterior door jamb, Easy!
 0:00:48
How To Replace Brick Mold On Doorway #shorts
Комментарии