filmov
tv
EEVblog #777 - Keithley 177 Microvolt DMM Repair

Показать описание
Come on a ride as Dave repairs an intermittent Keithley 177 Microvolt DMM, garden paths and all.
555 Timer T-Shirt:
Negative Feedback T-Shirt in the EU:
Support the EEVblog through Patreon!
EEVblog Amazon Store (Dave gets a cut):
Donations:
Projects:
Electronics Info Wiki:
555 Timer T-Shirt:
Negative Feedback T-Shirt in the EU:
Support the EEVblog through Patreon!
EEVblog Amazon Store (Dave gets a cut):
Donations:
Projects:
Electronics Info Wiki:
 0:53:39
EEVblog #777 - Keithley 177 Microvolt DMM Repair
 0:36:09
EEVblog #478 - Keithley 2015 THD Multimeter Teardown
 0:30:41
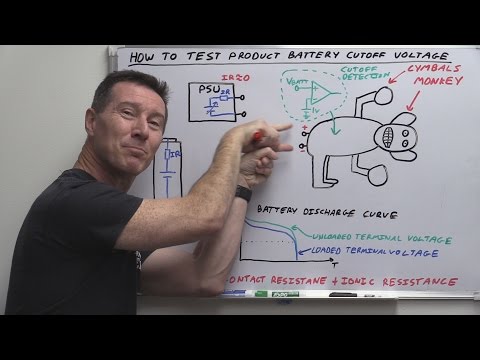
EEVblog #779 - Batteriser: How To Measure Battery Cutoff Voltage
 0:25:51
EEVblog #773 - 80W INDUAL LED Light Teardown
 0:15:53
eevBLAB #13 - Buying Youtube DISLIKES! - The Batteriser
 0:28:34
EEVblog #771 - Electronic Safe Lock Powerline Attack Part 2
 0:37:47
EEVblog #812 - Varta 15min NiMH Charger Part 2
 0:24:52
EEVblog #688 - How To Rework Solder SMD Chips - BTTF Time Circuits Repair!
 0:17:56
EEVblog #816 - Chinon Film Camera Teardown
 0:41:31
Keithley 168 DMM Teardown
 0:32:57
EEVblog #1071 - (UPDATED) Dumpster Dive HP Envy Touch PC REPAIR
 0:41:30
EEVblog #841 - Microchip MPLAB X PICkit 3 Woes
 0:20:46
EEVblog #593 - HP35670A DSA Repair Part 4 - Thermal Testing
 0:48:31
EEVblog #710 - Intercom System Repair
 0:27:06
EEVblog 1407 - Right to Repair with iFixit Founder Kyle Wiens
 0:00:34
Uncontrollable re-take
 0:10:12
eevBLAB #12 - Dailymotion vs Youtube CPM Revenue
 0:03:22
Surfing from EEVblog to Philosophy!
 1:02:46
EEVblog #982 - HP54616B 500MHz Oscilloscope REPAIR
 0:42:17
EEVblog #536 - HP35670A DSA Repair
 0:29:14
EEVblog #1067 - Analog vs Digital Multimeters!
 0:34:55
EEVblog #755 - Fluke PM2812 PSU Ebay Score
 0:11:18
EEVblog #778 - Oscilloscope Vertical Confusion
 0:16:58
Ремонт переключателя П2К
Комментарии