filmov
tv
Strain Gauge Installation Tutorial: Part 1

Показать описание
How to install strain gauges correctly? This is the questions we hear more and more.... that's why we decided to create this comprehensive guide , covering the process from A to Z.
This first part of the series covers strain gauge and surface preparation.
Strain Gauge Preparation
This video explains how to prepare your strain gauge for installation so you have it close to hand when you need it.
Firstly, ensure that the glass surface is clean by wiping it with the tissues, using first the conditioner and then neutralizer. Wipe off any access of the conditioner or neutralizer.
There are two individually packed strain gauges in the kit you receive from Datum Electronics. One by one, unpack the strain gauges and place them dull side down on a clean glass surface next to you. Put a layer of tape over each strain gauge to protect them.
Draw a line through the center of the strain gauge to make it easier, when you’re lining it up on the shaft. Put another layer of tape over the line to protect it.
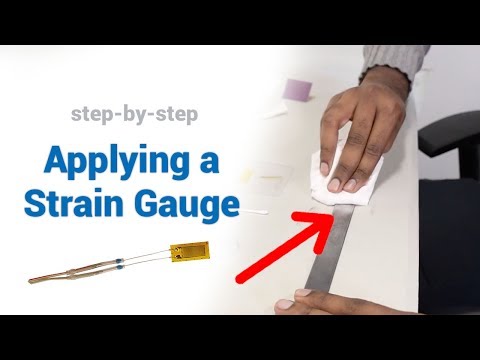
Preparation of Installation Surface
To ensure the strain gauge is bonded correctly, it is critical that surface of the strain gauge installation is clean. This video explains how to prepare the surface for bonding the strain gauge, going through each step of the process.
Firstly, draw a line on the shaft, where you aim to install the strain gauge. Then, sand the area sand paper, firstly using the 120 Grit, and then 400 Grit, wiping the area in between. When you’re happy with the sanded area, draw a line on a shaft for the strain gauge with a pen.
Before bonding the strain gauge, clean the area with cotton buds, conditioner and neutralizer, removing any contamination.
#straingauge #straingauging #shaftpowermeter #shaftpower #fueloptimisation #tutorial
This first part of the series covers strain gauge and surface preparation.
Strain Gauge Preparation
This video explains how to prepare your strain gauge for installation so you have it close to hand when you need it.
Firstly, ensure that the glass surface is clean by wiping it with the tissues, using first the conditioner and then neutralizer. Wipe off any access of the conditioner or neutralizer.
There are two individually packed strain gauges in the kit you receive from Datum Electronics. One by one, unpack the strain gauges and place them dull side down on a clean glass surface next to you. Put a layer of tape over each strain gauge to protect them.
Draw a line through the center of the strain gauge to make it easier, when you’re lining it up on the shaft. Put another layer of tape over the line to protect it.
Preparation of Installation Surface
To ensure the strain gauge is bonded correctly, it is critical that surface of the strain gauge installation is clean. This video explains how to prepare the surface for bonding the strain gauge, going through each step of the process.
Firstly, draw a line on the shaft, where you aim to install the strain gauge. Then, sand the area sand paper, firstly using the 120 Grit, and then 400 Grit, wiping the area in between. When you’re happy with the sanded area, draw a line on a shaft for the strain gauge with a pen.
Before bonding the strain gauge, clean the area with cotton buds, conditioner and neutralizer, removing any contamination.
#straingauge #straingauging #shaftpowermeter #shaftpower #fueloptimisation #tutorial
 0:11:54
 0:06:21
 0:08:03
 0:01:43
 0:04:31
 0:23:40
 0:20:27
 0:04:46
 0:03:00
 0:05:26
 0:31:26
 0:18:17
 0:07:08
 0:14:56
 0:32:00
 0:03:19
 0:17:14
 0:22:56
 0:10:50
 0:05:51
 0:03:15
 0:11:55
 0:01:20
 0:04:14