How to get PERFECT PETG prints

preview_player
Показать описание
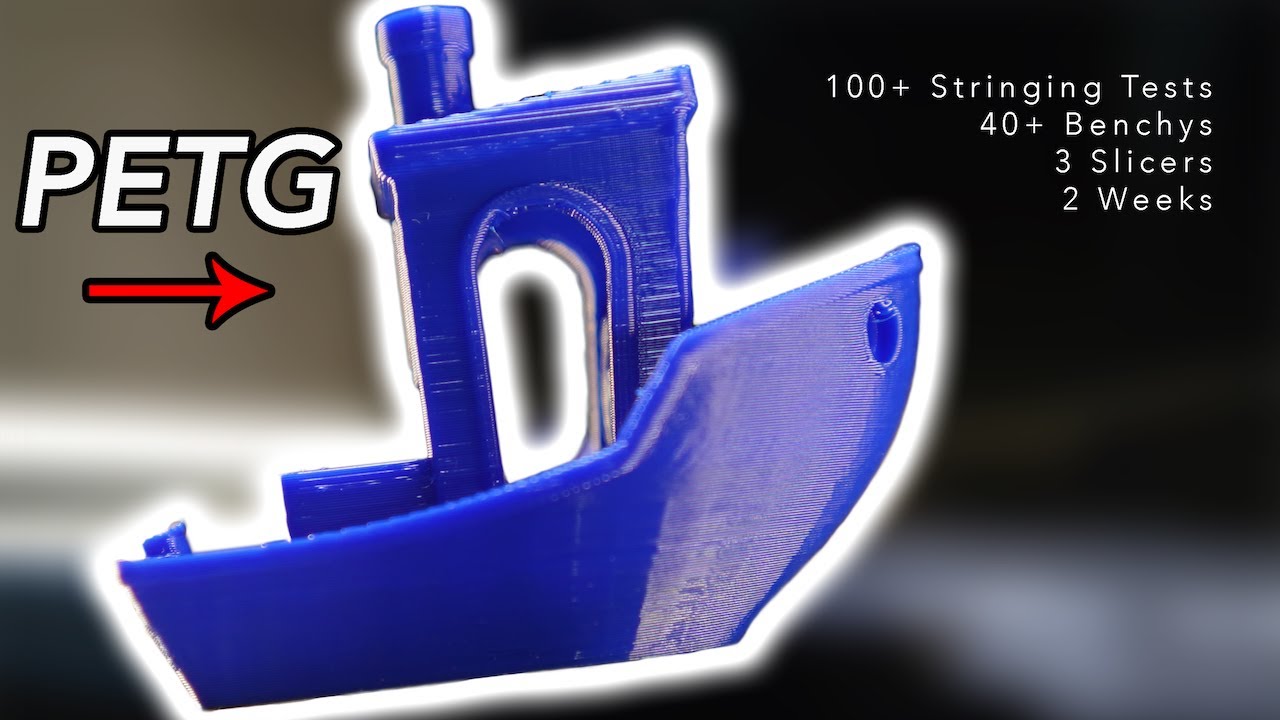
I spend the last two weeks printing non-stop to get near perfect PETG settings on my Adventurer 4 and printing a few excellent Benchy's. I will share with you my process for tuning PETG and my final settings.

🇺🇸 USA 3D Printing Gear

🇨🇦 Canada 3D Printing Gear

Intro 0:00
Experiment Background 0:50
Temperature Tuning 2:55
Retraction Tuning 4:20
Coasting Tuning 4:43
Speed Tuning 5:56
Why I Changed Slicers 6:33
Benchy Printing Time 7:38
Testing Other PETG Brands 9:59
Weird Superslicer Quirk 12:07
Switching Slicers Again! 14:15
I Did Something Crazy 14:54
Tips and Summary 17:12
Scrolling Through My Settings 18:25

Hi, my name is Daniel and I like to make stuff. My journey on Youtube began with creating things around the home with my 3D printer. I'm mainly focused on making functional items because I am relatively cheap and don't like to buy overpriced goods. Also, making my own things means that I can customize the item to my specific need. I hope that my channel inspires you to Just Make It!
Рекомендации по теме
Комментарии
Автор

Thought I'd leave a message here because of how helpful your PETG videos have been. I've been printing with PETG for a couple of years now and have never had particularly wonderful prints, always with stringing and blobs despite drying filament (and having dry boxes). After following the same steps you had taken I'm now printing beautiful PETG prints with only extremely thin stringing (like spiderweb thin) which is passable for me personally as that's pretty easy to remove with a heat gun. Thank you for the videos!! You rock!!

jaredkrivin
Автор

Not a fan of long info vids but it didn’t even cross my mind to ff or give up on yours. Your articulation of the numerous complex and largely contingent settings within these slicers as well as your visuals are incredibly valuable. The trial and error I’ve been going thru with PETG has been fruitless, frustrating and discouraging. The comprehensive context you provide here has filled so many voids in my mental “decision tree”. The speed at which you communicate all of this and jargon you use is also supportive to someone who isn’t new but no where near experienced which allows me time to digest and copy info I find I need to apply whereas with other videos I’m constantly trying to rewind multiple times and replay at various points. And replay. And replay. And am still left scratching my head.
I so appreciate your approach and hope you continue- you standout exponentially among the rest! Thank you THANK YOU!

jessicatweten
Автор

After a long struggle, I put a PETG roll in the air fryer at 85 degrees for two hours, because I was out of ideas. It finally worked, zero problems, no stringing, blobs or other imperfections, I recommend it. Dry as a bone filament is essential, then you can test retraction settings, temperature, etc.😅

_Kensky
Автор

Awesome video. Never saw anyone walk us through the entire struggle. This is very helpful thank you

no.way.out_
Автор

We have tested hundreds of materials every year for consistency in color, extrusion, moisture, tolerance, etc.. The three manufacturers that have stood out and given the most consistent results are direct purchases from Prusament, 3DXtech, and Atomic Filament.

oneheadlight
Автор

Petg is very sensitive to ambient air temp in around the fan intake. Fan speed should be reduced in colder rooms. Also the when printing higher prints off the hot build plate the intake air gets colder so the cooling increases at the same fan speed. So getting a warm stable air temp around the printer is a good starting point.

impuls
Автор

The key to printing PETG is to get your flow rate absolutely dialled in.
To do this you need to calibrate your esteps or rotational distance if you use Klipper. Then you need to print a single wall hollow cube and compare the wall thickness to the one requested in your slicer. Walls to thick, over extrusion, reduce your flow rate. To thin, then it's the opposite. Look up teaching techs guide for printer tuning on this. Flow rate will need to be tuned for each roll of filament due to variations in diameter between rolls effecting extrusion volume.
Estep and flow rate calibration is critical for PETG as over extrusion is what causes the filament to build up on the nozzle over time causing stinging, layer shifts and small features failing due to the build up of filament on the nozzle interfering with the extrusion path.
After that it's a matter of tuning your retraction and your part cooling relative to the print speed. Getting your cooling right is also very important. To low and you make PETG more prone to string. To high and as the extrusion is layed down it will have a whitish haze. It should be glossy. Translucent PETG is good for tuning cooling as it looses it's translucency with over cooling.
In my experience coasting made things worse and I just used wipe. I also use S3d.
You should also tune your bridge setting as this will make a huge difference to your overhangs. I think mine are set to 10mm3 area, 2.00 expansion, 95% flow, 100% speed. This works well but could probably be improved upon. PETG has poor bridging properties so you need to set your bridge trigger low which is why mine is at 10mm3. Useful for 1st layer top with low infill percentages.
I might just upload my S3d profile so you can compare. Way to much to type here.

ashleywhitehead
Автор

Thanks for this video Daniel. I appreciate how you broke the problem down to individual variables and optimized each.

starckmad
Автор

I appreciate the work you put into this. Very concise presentation of complex issues and your voice is comfortable to listen to. I just got my first Ender Neo and ran a roll of PLA and a half roll of PetG through it so far working on a prototype of an invention. Thanks.

roberthosking
Автор

I’ve printed two things with black overture filament and they are mint on pla settings
😊😊😊

offsetprintz
Автор

Hi daniel, I've commented on another video of yours but just wanted to reiterate the content you're producing for the adventurer 4 is second to none.

Ordering a second one is a pretty extreme form of printer tuning lol

wtfmimshag
Автор

Ordered my first spool of PETG today and will be tweaking my printer so I can print a helmet chin mount for my GoPro. I have an Ender 3 Pro, Microswiss Direct drive, MS full metal hot end 4.2.2 board, BLT etc. Normally runs fine but I'm thinking I'm in for a bit of a learning curve lol

ChrisLee-UK
Автор

Thank you! You're the first person i've seen who really elaborates on experiments rather than giving basic advices.
Will try some of that on my Dreamer. Unfortunately, Dreamers have only one cooling choice: 100% or none (as well as several other lacks) but your video is enough to get started.
Also, never heard of Superslicer, shall give it a go.

Shenfdrive
Автор

Thanks for the informative video. I've been 3D printing since we had to build our own 3D printers because they weren't consumer items, but I've only recently started to print in PETG. As the video was wrapping up I was heading to the comments section to suggest that you put your optimized settings in the video description but that's where the video showed the slicer settings across many screens so we can pause the video and see all of the slicer settings.

LibertyEver
Автор

Been running Anycubic Mega X for size and if you add a dual gear or mod them they are great cheap printers. I have clear petg dialed for large items and thin wall settings at 233c The fast way to test is use support lines holding a hangmans post the single layer support is max transparency on petg so adjust as it builds with heat settings watching the walls..

rider
Автор

About to start printing with PETG and I found this vid really interesting, thanks Daniel.

trickyhickyincolour
Автор

Thanks for sharing, great info. I'm going to try PETG for the first time today

Hatchmade
Автор

I have been trying to learn PETG (kinda hard not to play with all the different material options hahahahah)

I've been having grief with flashprint and I might have to give superslicer a shot
Between this and your other videos, your advice has been so helpful setting up my profiles properly

Especially with PETG - but across the board great work man
So glad the algorithm recommended you - underrated as hell

BirnieMac
Автор

Built my Prusa, put some Prusament PETG on it and it produced a perfect benchy on the first run! No messing about, just worked.

bigjdk
Автор

Just for another point of reference. I have printed about 50 spools of PETG filament over the past two years on two different printers. Switching between whichever was cheapest at the time between Overture, Polymaker, Duramic, Inland and eSun. Of those, eSun seemed to absorb the most moisture. But all have worked well for me once I had my printer working properly. I wouldn't personally buy anything cheaper than those brands and I really didn't like the Matterhackers Build Series PETG. For me the biggest differences were ditching the PTFE lined Creality clone hotend with a bowden tube and moving to a direct drive and an all metal hotend. And second, making absolutely sure my first layer was good, not too close and not too far. Too close and you end up with lots of blobs and problems with later layers because of the pressure build up in the nozzle. Also, I use 100% fan after the first layer.

davidsherrick
join shbcf.ru