filmov
tv
3D Print Not Sticking? 9 Ways to Get Perfect Bed Adhesion
Показать описание
The first layer is the most important in 3D printing. If it does not adhere properly, the print will not succeed and the time and filament spent will be wasted. However, there are many ways to increase print bed adhesion.
🧠 Here is the link to my 3D printing course:
🔗 Buy Magigoo:
🔗 Buy a PEI print bed in different sizes:
⏱ Timestamps:
00:00 Intro
00:15 Clean the print bed
00:30 Level the print bed
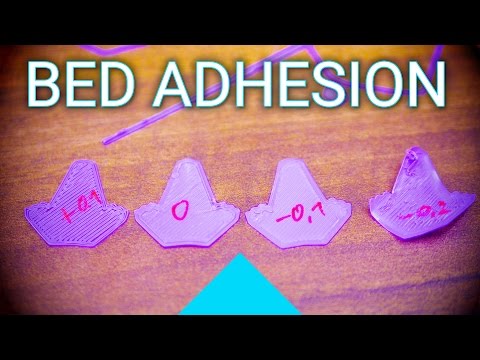
01:08 Reduce the z-offset
01:58 Print the first layer slower
02:29 Do not cool the first layer
02:42 Increase the print bed temperature
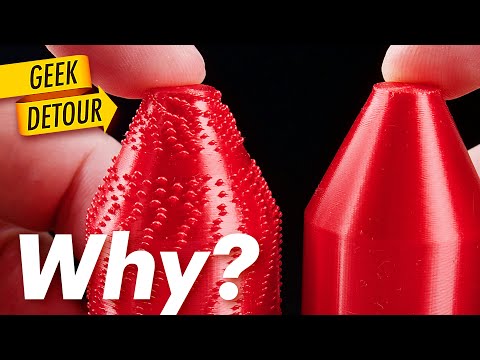
03:00 Print higher and thicker lines
03:37 Print mouse ears or a raft
04:35 Apply salt/sugar solution
05:09 Apply adhesive
06:02 Use different print bed
06:30 Outro
Disclosure: Links marked with * are Affiliate Links. I earn from qualifying purchases if you decide to make a purchase through these links – at no additional cost for you!
#3Dprinting #DIY #3Dprinter
🧠 Here is the link to my 3D printing course:
🔗 Buy Magigoo:
🔗 Buy a PEI print bed in different sizes:
⏱ Timestamps:
00:00 Intro
00:15 Clean the print bed
00:30 Level the print bed
01:08 Reduce the z-offset
01:58 Print the first layer slower
02:29 Do not cool the first layer
02:42 Increase the print bed temperature
03:00 Print higher and thicker lines
03:37 Print mouse ears or a raft
04:35 Apply salt/sugar solution
05:09 Apply adhesive
06:02 Use different print bed
06:30 Outro
Disclosure: Links marked with * are Affiliate Links. I earn from qualifying purchases if you decide to make a purchase through these links – at no additional cost for you!
#3Dprinting #DIY #3Dprinter
 0:06:41
3D Print Not Sticking? 9 Ways to Get Perfect Bed Adhesion
 0:05:16
3D Print Not Sticking? 5 EASY 3D Print Bed Adhesion Tips
 0:04:47
Better First Layer and Bed Level Fixes on 3D Printers
 0:13:03
3d Printer Tips Print Not Sticking
 0:09:32
How To Make Your 3d Prints Stick Effectively - Every Method Tested
 0:04:40
BCN3D Explains: 3D print not sticking to bed
 0:04:26
Tips for 3D Printer Bed Adhesion | 5 Tips in 5 Minutes
 0:05:33
3D PRINTS NOT STICKING? WHAT IS THE AMBIENT TEMPERATURE?
 0:16:29
3D Printing Stealth TV Tray: Slicing & Extreme Print Test!
 0:05:10
Basics: 5 ways of getting your 3D prints to stick!
 0:14:04
Troubleshooting 3D Printer Issues | 10+ Common Problems 3D Printing Beginners Have!
 0:20:04
Have your 3D Prints started to suck? Watch this!
 0:24:41
Better Bed Adhesion | Making 3D Prints Stick
 0:08:23
9 3D Printing Sins...
 0:01:00
Fix a warped 3D printer bed in minutes with tape #shorts
 0:05:21
5 FAILURES & SOLUTIONS for 3d RESIN PRINTING - Are your Prints not sticking to the build plate?
 0:02:44
5 must-know 3D printing tips & tricks. (stronger and better looking prints)
 0:08:27
3D Printer Blobs: a mysterious problem you won't guess how to fix 🤔
 0:11:46
How to get PERFECT First Layers on Your 3D Printer!!
 0:15:07
How To Get The PERFECT First Layer on Your 3D Prints
 0:02:34
Warping 3D Prints? - How to solve it with a simple a quick setting - Longer LK4X
 0:24:42
Prints Sticking Too Much To The Bed?
 0:09:05
STOP Bed Leveling Between Every Print! - 3 Surprisingly Simple Fixes For Your 3d Printer
 0:01:15
FLsun SR 3D Printer-The first layer does not stick to the glass
Комментарии