filmov
tv
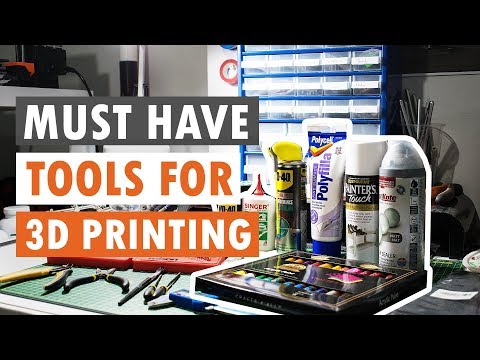
Must Have Tools For 3D Printing

Показать описание
In this video, I'm sharing the 11 must-have tools for 3D printing that have completely changed my game! From getting that first layer to stick like magic to keeping your prints super clean—I've got you covered. Some of these tools are total lifesavers, and if you're not using them yet, trust me, you’re missing out! Did I forget your favorite tool? Let me know in the comments! And if you’re looking to level up your slicer game too, check out the video I linked at the end for some quick wins. Happy printing! 😎
---------------------------------------------------------------------
Links:
Links that are marked with a * are affiliate links. This means I earn a commission on the sale but there's no extra cost to you.
---------------------------------------------------------------------
Follow me on Social:
---------------------------------------------------------------------
Buy 3D Printing Stuff With My Links:
My 3D Printing And Camera Setup:
---------------------------------------------------------------------
Chapter Markers:
00:00 - Intro
00:27 - Deburring Tool
01:22 - Liquid Build Plate Glue
02:41 - Print Bed Scraper
03:19 - Pliers & Cutters
04:20 - Scalpel Knife
05:03 - Calipers
05:31 - Microfiber Cloth & Isopropyl Alcohol
05:59 - (Ratcheting) Screwdriver & good Allen Keys
06:47 - Vacuum Bags & Pump
07:32 - Wire Brush
08:07 - Printer-Specific Tools
08:41 - Outro
---------------------------------------------------------------------
Tags:
#3dprinting
---------------------------------------------------------------------
Links:
Links that are marked with a * are affiliate links. This means I earn a commission on the sale but there's no extra cost to you.
---------------------------------------------------------------------
Follow me on Social:
---------------------------------------------------------------------
Buy 3D Printing Stuff With My Links:
My 3D Printing And Camera Setup:
---------------------------------------------------------------------
Chapter Markers:
00:00 - Intro
00:27 - Deburring Tool
01:22 - Liquid Build Plate Glue
02:41 - Print Bed Scraper
03:19 - Pliers & Cutters
04:20 - Scalpel Knife
05:03 - Calipers
05:31 - Microfiber Cloth & Isopropyl Alcohol
05:59 - (Ratcheting) Screwdriver & good Allen Keys
06:47 - Vacuum Bags & Pump
07:32 - Wire Brush
08:07 - Printer-Specific Tools
08:41 - Outro
---------------------------------------------------------------------
Tags:
#3dprinting
 0:09:35
Must Have Tools For 3D Printing
 0:00:21
3D Printing the BEST tool you need
 0:09:42
MUST-HAVE 3D printing tools for Absolute beginners!
 0:00:41
The best tools for 3d printing #3dprinting
 0:19:08
15+ 3D Printing Tools You Definitely Need
 0:15:38
12 more 3D printed tools you need for your workshop
 0:12:01
What 3D Printing Essential Tools Do You Need to Start With?!
 0:00:31
A must-have tools for 3D printing--Purge line remover #3dprint #3dprinting
 0:07:50
3 Easy 3D Printer Upgrades Every Beginner Should Try
 0:21:42
28(ish) 3D Printed Tools That Are ACTUALLY Useful!
 0:06:38
MUST HAVE Tools & Materials For 3D Printing
 0:09:49
Top 10 3D Printable Tools Every Maker Should, Like, Make
 0:08:15
The Best Tool To have For 3d Printing! NoClogger
 0:05:40
The 3D Printed Tool For 3D Printers You MUST have! - FilamentOne Profibox
 0:16:59
12 3D printed tools you need for your workshop
 0:12:38
Bambu Lab 3D Printer - Essential Accessories you want to have
 0:21:36
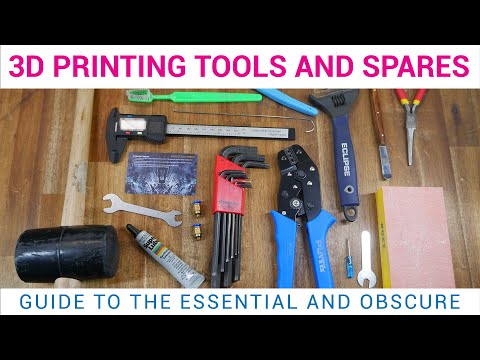
Essential (and obscure) 3D printing tools and spares
 0:10:42
7 Must-Have Accessories for 3D Printing
 0:08:06
3D-PRINT WORKSHOP - Essential Tools For 3D-Printing (Must Have)
 0:17:27
Must Have SLA Resin 3D Printing Safety, Washing, and Supplies
 0:24:02
50+ Useful 3D Prints You Never Knew You Could Print
 0:11:31
The Best Resin 3D Printer Accessories
 0:00:34
Must Have Tool (Electric Screwdriver) for 3D printer assembly & repairment
 0:04:27
13 USEFUL Things to 3D Print First - Practical Prints 2023
Комментарии