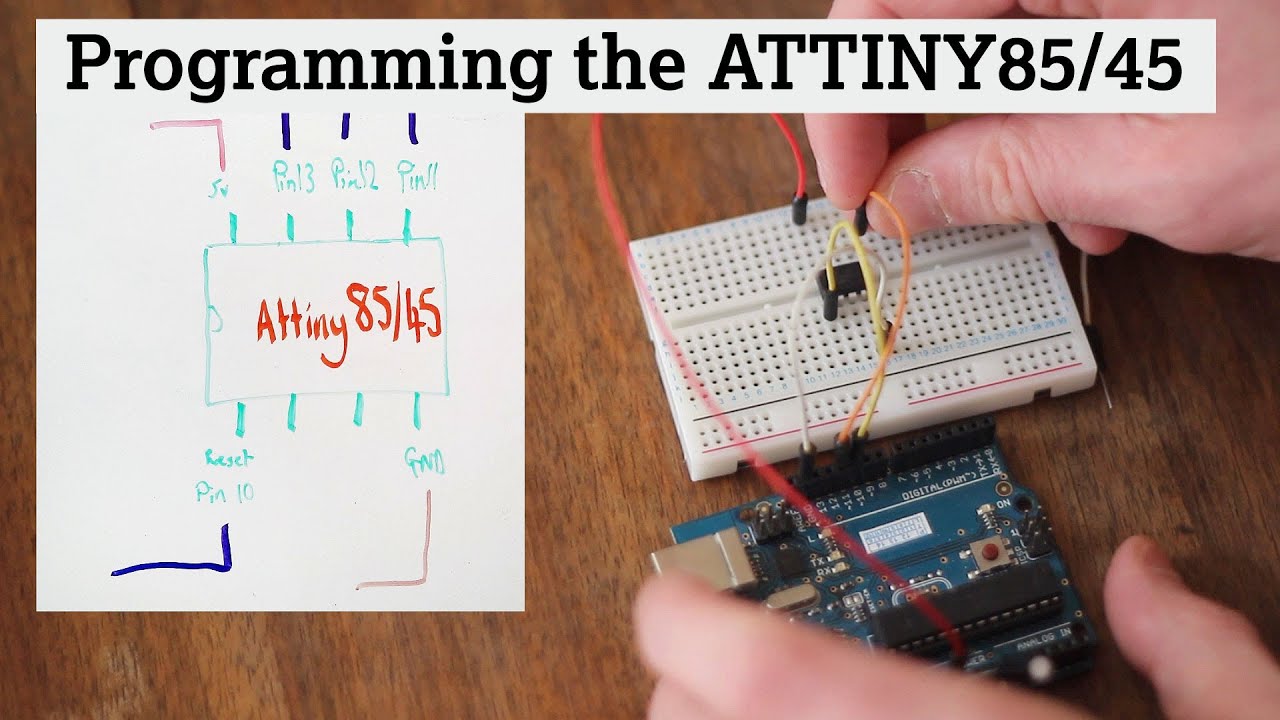
Programming an ATtiny85/45 with an Arduino UNO (Getting started)

preview_player
Показать описание


As always, comments, corrections and criticism (harsh as you like) is always welcome.

It turns out that 'Likes' and 'Shares' actually help the channel so, if you want to, please click the thumbs up or share the video.

If you want to get in contact Twitter is probably the best way @mrdavidjwatts

Рекомендации по теме
Комментарии
Автор

You should check out Eric Lamb channel He's building a real full size walking robot. Just search " Eric Lamb " It's really cool

Build_the_Future
Автор

Hello David,
just used your video to successfully program ATtiny85 after a few hiccups.
The newest (Dec 2018) ATtiny core files when loaded have slightly different drop down headers, but I still managed to get it done.
Patience and one step at a time got me there.
Note to all - do not put the capacitor into the UNO until after you have loaded the ISP sketch.

kimholland
Автор

You're my favourite person right now, the one thing I forgot to do was upload ArduinoISP to the Atmega before bootloading to the ATtiny... I swear that step wasn't included in so many tutorials I've tried.

kreme
Автор

For those using an Arduino Nano instead of an Uno, pin 10 on the Uno = D10 on the Nano. Same with
Pin 12 = D12, Pin 13 = D13.
Also, I have read that "Burn Bootloader" does not actually write a boot loader into memory, but simply sets the fuses to the right clock speed. This caused me considerable confusion initially.
At 5:00 - "The pins don't count in the normal way". In fact, it's not pin numbers of the chip that are being used, but I/O pin numbers of port-B. On the bigger chips in the range, there are more I.O lines than on the ATtiny, and they have several 8-bit I/O ports, designated Port-A, Port-B, etc, but with only 5 available pins for I/O, the ATtiny85 only has one I/O port, and that's Port B, so the "pin" numbers are PB-0, PB-1, PB-3, etc. (see the datasheet).
When I look at Tools/Board, there is no ATtiny in it. At this point, I'm stuck till I figure it out.

DownhillAllTheWay
Автор

great tutorial. In my haste I missed the whole "burn ArduinoISP" sketch first. Then later on when burning bootloader you need to set as "Arduino as ISP". Keep mind the *as* option is different! Easy to get tripped up if you're rushing. Take your time and it works great. And oh, I also didn't need the cap either. thank you!

miketony
Автор

Hi Guys. please publish the "additional boards manager url" link for the Attiny85 boards

ExorLetsGo
Автор

I been trying to get my Attiny85 to work, I 'm using a top hat board that plugs direct in the Arduino Uno and works fine as long as I have it plugged in the Arduino, when I remove all the wires a try to blink the led with my own 5v battery it does not appear to work, seems like it not transfering to ting85 memory?

I also see lots of other people are having the same problem and most of the youtube videos are done but hobbist just learning and they skip several important steps. Hope you can make a better video and show detail and go slower.

robertbryan
Автор

I like doing the same to the New Attiny 3217 or 3216 UPDI arduino capable ic's as they have 32k Flash with only 3 wire programming including 2 of the wires being + - power. So it's only 1 wire programming for the new Attinys

pauldusa
Автор

thanks but in video i can't see some of your work by improperly recording area..

GujaratiKanudo
Автор

i dont know where you bought it but i got mine for almost 5 euro including shipping

raevod
Автор

I pretty much did as instructed. But when trying the blink sketch on the attiny.. the led just stays on indefinitely

ernestosastre
Автор

Disconnecting and reconnecting the Arduino can cause issues.. It can get dirty and there is also the wear.. So your connections can be at risk.  Cleaning your connections is an option.  Also just keeping your power supply to the project off and working hot would solve the issue.

mikej
Автор

Hello.can you explain how to get one output by giving 3 inputs using ATtny 85

uvinirajapakshe
Автор

Thank you very much, I first tried all this and nothing happend except that the IC didn't want to get programmed. I then watched your Video and noticed that I had simply forgotten to program the Arduino Uno as an Arduino ISP(wasn't mentioned in other Videos/tutorials).

BattleboynLP
Автор

i was able to get the library successfully but the option to select the attiny board is not available ... it only shows the option for arduino avr

brendethedev
Автор

I noticed that you are using a capacitor.  I have tried programming it without the capacitor and it works fine.

mikej
Автор

Awesome video!!! Keep it up mate
Question: WHY does arduino reset itself? (i mean why do we actually have to connect a capacitor?)

AV-
Автор

i used 47microF and it didn't work. Prompted me to check the connection. I guessed use smaller capacitor is ok but not of higher value.

greatliar
Автор

very humble, know your stuff, clear instructions. keep it up

atharvapurohit
Автор

i can not burn bootloader ... the text

avrdude: please define PAGEL and BS2 signals in the configuration file for part ATtiny85
avrdude: Expected signature for ATtiny85 is 1E 93 0B
Double check chip, or use -F to override this check.

tanzimrahman