filmov
tv
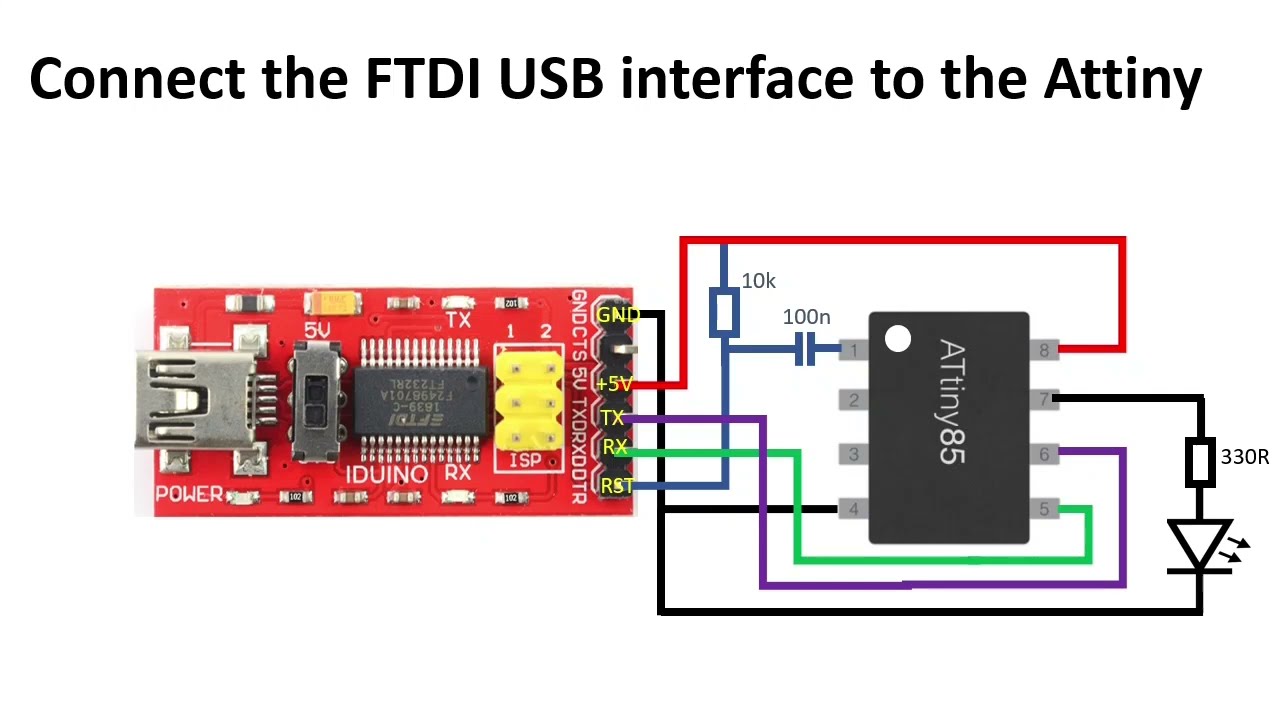
Program ATtiny85 directly via USB
Показать описание
The ATtiny 85 is a great little micro controller: Cheap, compact, but it does not offer USB programming like our trusty Arduino boards.
In this video I will show how to have best of both worlds, a USB programmable ATtiny85!
In this video we will do the following:
1. Build an ISP programmer with an Arduino
2. Add the ATtiny to the Arduino IDE
3. Burn a USB-ready bootloader in the ATtiny85
4. Upload a simple sketch to the ATtiny to see how it works!
Link for Arduino boards-manager:
Many thanks for Daniel Porry for making this possible.
Have fun!
 0:07:43
Program ATtiny85 directly via USB
 0:10:35
Programming ATtiny85 Directly Through USB | Easy Setup!
 0:13:20
Make your own DigiSpark USB!
 0:01:42
Programming ATtiny85 with USB directly without external programmer
 0:19:29
Program an ATtiny85 via USB - NEVER USE AN ARDUINO ISP AGAIN!
 0:03:06
How To Program Attiny85 microchip - Tutorial in 3min
 0:00:17
Crash PC Using USB #shorts #ytshorts #attiny85 #pchack #arduinoproject #hacking #sensor #rubberducky
 0:10:28
Programming ATtiny85 IC directly through USB using Digispark Bootloader
 0:00:30
Hack Windows 7 machine with ATtiny85 (bad USB)😳😳😮😮#hacking #windows #malware #hackit #kalilinux #hak...
 0:01:23
Electronics: Digispark Attiny85 dev-board - Program via USB or UART/serial converter?
 0:03:09
Digispark ATtiny85 with Arduino 2.0: How to program?
 0:01:42
Programming the Digistump ATTiny85 USB bootloader from Arduino
 0:20:41
How to Programming Attiny85 directly with USB digispark
 0:14:25
Bare-Metal MCU #9 - Review; ATTiny85 from scratch
 0:01:55
Programming an「 ATTINY85 」Games without an arduino - Virtual USB (Part 1)
 0:00:30
Hack Windows 7 machine with ATtiny85 (bad USB) #shorts
 0:01:44
Arduino: Is it possible to program an Attiny85 with a USB-to-TTL converter?
 0:00:20
Force brute hacker attack using Arduino USB ATtiny85 Digispark
 0:00:37
Digispark ATTiny 85 as a USB Rubber Ducky.
 0:00:16
Digispark | Attiny85 | Technology | Robotics #shorts
 0:03:24
ATtiny85 Board First Look and Review | Install Drivers & Use with Arduino IDE
 0:05:00
Now You Can Program any Kind of IC With Arduino, (AVR, STM, P-IC)
 0:07:43
ATTINY85 with an Arduino Uno & Cheap USB programmer. (NOT RECOMMENDED)
 0:13:17
What Is An ATtiny 85 & How To Program It With Your Arduino Uno
Комментарии