filmov
tv
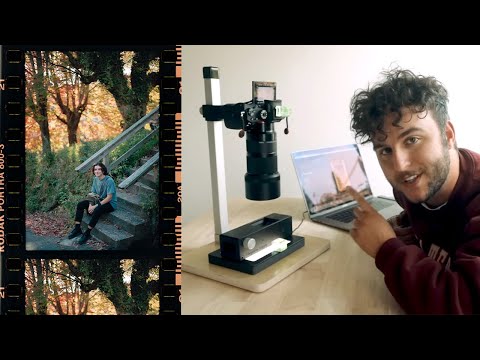
How I scan 35mm film at home (with my digital camera)

Показать описание
Today I'm showing you how I scan 35mm film with my digital camera.
Chapters:
00:00 - 00:26 - Introduction
00:26 - 01:48 - Why I chose this method
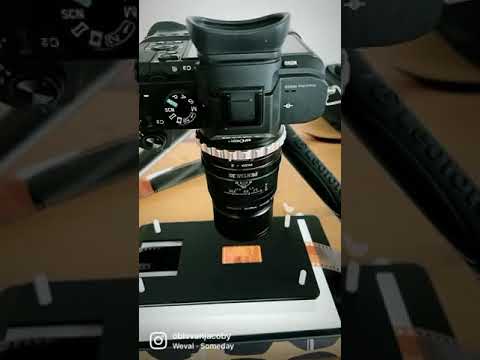
01:48 - 07:55 - What you need
07:55 - 10:29 - The scanning process
10:29 - 13:35 - Post processing
13:35 - 14:34 - The end
#filmphotography #howtoscan #tutorial
You can support me on Patreon to help make this channel sustainable. By subscribing you can gain access to Lightroom Presets, After Effects Files, extra videos (e.g. tutorials) and even physical goods :)
Music used in this video:
- Comatose - Jobii
- Daydreaming About You While Drinking a Cup of Tea - baegel
- Imprints - Dusty Decks
- Inlay - Dusty Decks
- Resting My Eyes - Timothy Infinite
- The Vault - Auxjack
- Water under the Bridge - Matt Large
Links to my Gear (USA)
My main video camera and digital photography camera
The two lenses for the camera:
My secondary digital camera for casual photography:
The two lenses I use with it:
Other gear I use to make my videos:
(all links are Amazon-Affiliate links)
For my German friends, here are the links for .de
My main video camera and digital photography camera
The two lenses for the camera:
My secondary digital camera for casual photography:
The two lenses I use with it:
Other gear I use to make my videos:
(all links are Amazon-Affiliate links)
Chapters:
00:00 - 00:26 - Introduction
00:26 - 01:48 - Why I chose this method
01:48 - 07:55 - What you need
07:55 - 10:29 - The scanning process
10:29 - 13:35 - Post processing
13:35 - 14:34 - The end
#filmphotography #howtoscan #tutorial
You can support me on Patreon to help make this channel sustainable. By subscribing you can gain access to Lightroom Presets, After Effects Files, extra videos (e.g. tutorials) and even physical goods :)
Music used in this video:
- Comatose - Jobii
- Daydreaming About You While Drinking a Cup of Tea - baegel
- Imprints - Dusty Decks
- Inlay - Dusty Decks
- Resting My Eyes - Timothy Infinite
- The Vault - Auxjack
- Water under the Bridge - Matt Large
Links to my Gear (USA)
My main video camera and digital photography camera
The two lenses for the camera:
My secondary digital camera for casual photography:
The two lenses I use with it:
Other gear I use to make my videos:
(all links are Amazon-Affiliate links)
For my German friends, here are the links for .de
My main video camera and digital photography camera
The two lenses for the camera:
My secondary digital camera for casual photography:
The two lenses I use with it:
Other gear I use to make my videos:
(all links are Amazon-Affiliate links)
 0:14:59
One of The Fastest Ways to Scan 35mm Film
 0:14:04
How to Camera Scan 35mm Film (Best Gear)
 0:07:17
How to Scan 35mm Film (Beginner Tutorial)
 0:06:02
How to Scan Your Film at Home
 0:01:01
How I Camera Scan 35mm Film: the Essential Film Holder #filmphotography
 0:14:35
How I scan 35mm film at home (with my digital camera)
 0:00:48
3 Ways To Scan 35mm Film At Home
 0:16:29
One of The Best Ways to Scan 35mm Film - VALOI easy35
 1:04:13
CM-2025-12 - La calibration de scanners à l'aide de plusieurs chartes de type IT8, École LE75...
 0:05:49
how i scan 35mm and 120 film at home (scanning with film borders, and getting better colors)
 0:10:52
the FASTEST way to scan 35mm & 120 film at home (camera scanning) // giveaway!
 0:00:54
Revealing my Film Scanning Method
 0:00:20
How to turn FILM into DIGITAL PHOTOS
 0:17:35
How I Scan & Edit Film
 0:00:37
Scanning #35mmfilm with the Kodak Slide N Scan Digital Film Scanner #shorts
 0:03:42
How I Scan 35mm Film at Home - Plustek OpticFilm 7300 & Epson V600 | Lemon Labs
 0:11:46
A Compact & Simple Way to Scan 35mm & 120 Film
 0:03:08
Scanning film negatives with the Epson V600 in 3 minutes
 0:00:34
Fastest Way to Scan 35mm Film
 0:00:11
35mm film home scanning with essential film holder, sony a7ii and pentax DA f2.8 35mm limited macro
 0:00:30
Film to Digital WITHOUT a Scanner! 🎞️
 0:00:13
summer film scans #35mm #shorts
 0:01:00
Scan 35mm Film in 60 Seconds 🎞️😱 #photography
 0:12:25
I Tried CHEAP Film Scanners so You Don’t Have to...
Комментарии