filmov
tv
How to Scan 35mm Film (Beginner Tutorial)

Показать описание
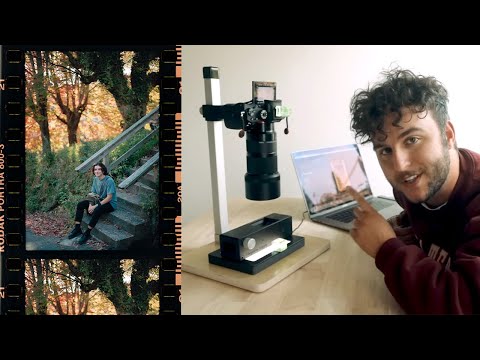
In this episode I walk you through how i scan my film, everything from preparing the film, the software and the actual scanning aspect. This video has to be the most requested video I've ever gotten so hope this one helps! Side note, please try your best to remove as much dust as possible before you scan the film hitting areas like the scanners glass, both sides of the film strips and also the film holders so you won't have to worry about it in post! If you enjoyed this video and want to support my channel, you can do so by subscribing and dropping a like on the video, till next time #MinoltaGang
Music:
SCANNING GEAR:
(NOTE: These are affiliate links)
(DISCLAIMER: This is an affiliate link, each purchase through this link will give me a commission.)
-----------------------------------------------------------
FOLLOW Me on instagram!
Instagram : @Kingjvpes
Twitter: @Kingjvpes
Follow Drew!
Instagram: Drewefren
Twitter: DeniseEfren
Follow me on Flickr!
Filming Equipment used:
Sony A7II
Manfrotto tripod
Minolta 50mm 1.7
Sony a5000
16-50 Kit lens
How to buy film camera. First time buying 35mm film, how to buy cheap cameras, 35mm Film buying guide, Film,story,first time,shooting,35mm film,develop,film is not dead, minolta,short film,vintage,darkroom,fujifilm,cannon,x-700,htsi plus,how to shoot film, kingjvpes, minolta SRt101, portra 400, Berkeley, Cal, Norcal.San Francisco, golden gate bridge, point reyes, 28mm, olympus XA, Canon autoboy, canon af35m, expired film, cheap film, best cheap film, how to shoot a film camera with a broken light meter, broken light meter, broken meter, how to light meter, agfa vista 400, tomography color 100, canon eos 3, 85mm 1.8, film camera giveaway, best films, best 35mm film, top 5 35mm film, $3 film camera, $3 Leica, Cheap leica, Free Leica, Leica, yashica mat, yashica 124, yashica mat 124, expired tri-x, Nikon f3, Canon A-1, Minolta x-700, Seattle, black and white, money, sharp, groot, street, how to develop color film, how develop black and white film, street photography tips, how to street photography, how to take photos, beginner film photography, film photography for beginners, tips for film photography, how to film photography, beginner film photography tips, free film camera.
 0:07:17
How to Scan 35mm Film (Beginner Tutorial)
 0:00:48
3 Ways To Scan 35mm Film At Home
 0:14:35
How I scan 35mm film at home (with my digital camera)
 0:01:01
How I Camera Scan 35mm Film: the Essential Film Holder #filmphotography
 0:00:20
How to turn FILM into DIGITAL PHOTOS
 0:00:54
Revealing my Film Scanning Method
 0:16:29
One of The Best Ways to Scan 35mm Film - VALOI easy35
 0:06:02
How to Scan Your Film at Home
 0:00:38
Dulu passion sekarang amsiong #35mmphotography #digicam #filmcamera #filmphotography #kodak
 0:10:52
the FASTEST way to scan 35mm & 120 film at home (camera scanning) // giveaway!
 0:00:37
Scanning #35mmfilm with the Kodak Slide N Scan Digital Film Scanner #shorts
 0:14:04
BEST GEAR to Camera Scan 35mm Film
 0:03:16
Cheapest Way To Scan Negatives 35mm Film - Film Camera Club!
 0:00:45
Easy Camera Scanning #35mmfilm #filmphotography
 0:08:01
Scanning 35mm Film With Your Phone?
 0:00:54
How I scan my 35mm Negatives 📸🎞️
 0:05:49
how i scan 35mm and 120 film at home (scanning with film borders, and getting better colors)
 0:17:35
How I Scan & Edit Film
 0:05:06
Scanning OLD Film Negatives for FREE!
 0:05:34
How I Scan My 35mm & 120 Film Negatives
 0:00:34
How 35mm Film Gets Processed At A Lab 🎞️
 0:08:49
How To Scan 35mm Film With Full Borders
 0:12:25
I Tried CHEAP Film Scanners so You Don’t Have to...
 0:00:34
Fastest Way to Scan 35mm Film
Комментарии