filmov
tv
Super Dry Your Bambu Lab AMS with These Cool 3D Prints

Показать описание
HOT And HUMID means bad news for filament, having the Bambu Lab AMS helps a lot to keep your filament protected, but there isn't much space in there for desiccant. How about we fix that in this video, and while we're at it, we're also going to find a way to make the fix universal so it doesn't only work in one condition.
I'm very happy with the X1C as well as the AMS, they've really opened up a whole new world of 3D printing options. There are however some little adjustments that can be made to make the system better. One being the way that it keeps filament dry. Those two small packets are not easy to get to, I always forget they're there and I'm not sure how much they're really doing, since my desiccant gauge was always showing that I needed to add more. So in this video we're going to use some cool design techniques to see if we can't come up with something that will keep everything Bone dry for as long as possible.
While we're at it, we can also help to weigh down some of those spools which are nearly empty to keep them in good contact with the AMS spool rollers.
Cylinder Desiccant Holder (Bambu Spools Only):
Front Desiccant Holder for AMS:
Universal Internal Spool Desiccant Holder:
Another way to support this channel indirectly is through my affiliate links (where I receive a small commission). It helps me to continue to provide high-quality content videos. Thank you for your support!
NEW MIC (I bought this)
BAMBU PRINTERS
BAMBU FILAMENT
This link brings you to Crealty's filament if you have any interest in trying that out
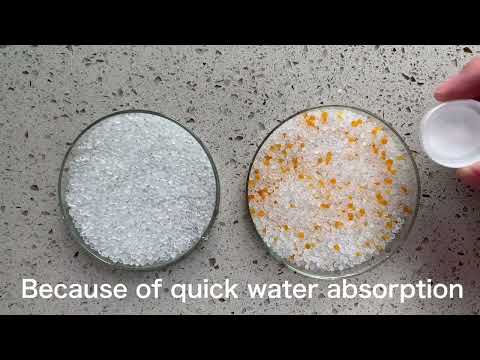
This is the color changing desiccant I showed in the video:
Thanks to everyone for supporting the channel, I'm happy to announce that I've moved to 2 days a week on Content Creation. The goal is to get to be full-time by Fall of 2023.
Thank you again to my long-time supporters of the channel on Patreon. If you're interested in supporting the channel, I'll be posting behind the scenes videos there starting next week as well as interacting directly if you have video content ideas or questions or ideas of any kind. Here is the link to join!
If you are struggling with problems and you need help, send me an email or write in the comments.
#ender3
#bambu
#3dprinting
I'm very happy with the X1C as well as the AMS, they've really opened up a whole new world of 3D printing options. There are however some little adjustments that can be made to make the system better. One being the way that it keeps filament dry. Those two small packets are not easy to get to, I always forget they're there and I'm not sure how much they're really doing, since my desiccant gauge was always showing that I needed to add more. So in this video we're going to use some cool design techniques to see if we can't come up with something that will keep everything Bone dry for as long as possible.
While we're at it, we can also help to weigh down some of those spools which are nearly empty to keep them in good contact with the AMS spool rollers.
Cylinder Desiccant Holder (Bambu Spools Only):
Front Desiccant Holder for AMS:
Universal Internal Spool Desiccant Holder:
Another way to support this channel indirectly is through my affiliate links (where I receive a small commission). It helps me to continue to provide high-quality content videos. Thank you for your support!
NEW MIC (I bought this)
BAMBU PRINTERS
BAMBU FILAMENT
This link brings you to Crealty's filament if you have any interest in trying that out
This is the color changing desiccant I showed in the video:
Thanks to everyone for supporting the channel, I'm happy to announce that I've moved to 2 days a week on Content Creation. The goal is to get to be full-time by Fall of 2023.
Thank you again to my long-time supporters of the channel on Patreon. If you're interested in supporting the channel, I'll be posting behind the scenes videos there starting next week as well as interacting directly if you have video content ideas or questions or ideas of any kind. Here is the link to join!
If you are struggling with problems and you need help, send me an email or write in the comments.
#ender3
#bambu
#3dprinting
 0:08:15
Super Dry Your Bambu Lab AMS with These Cool 3D Prints
 0:00:54
BEST BambuLab AMS dessicant solution for maximum dryness! #shorts
 0:16:17
The best upgrades for your Bambu Lab 3D printer
 0:10:46
The 10 BEST Upgrades for your Bambu Lab 3D Printer!
 0:03:54
Bambu Lab X1 3D Printer - Making the AMS Super Dry w Dryer pods Extra Silica for Carbon Fibre Nylon
 0:11:03
Bambu Lab X1 & P1S Printing TPU - Its This Easy
 0:08:19
How to turn Bambu Lab A1 Mini 3D printer into a Filament Dryer
 0:01:00
Bambulab X1C Filament Drying Function
 1:00:00
HSN | Tweak'd Haircare - All On Free Shipping 09.18.2024 - 11 PM
 0:03:52
Amazingly Simple Free Filament Dryer -You already have one!
 0:00:35
Desiccant holders for filament spools. Super useful (and fast) prints on the #bambulab #p1p
 0:12:38
Bambu Lab 3D Printer - Essential Accessories you want to have
 0:00:32
How to tell if silica gel desiccant is working?
 0:01:54
Bambu Labs P1S 3 weeks in, Esun dry box.
 0:11:59
10 Bambu Lab Maintenance Steps You MUST Do!
 0:12:56
The 3D Printer I'd buy if I started over
 0:14:11
Bambu Lab P1S Review - Please Start Here - I BEG YOU
 0:00:16
never keep a SHARK in a small aquarium. #aquarium #fishaquarium #fishing #shark
 0:15:53
Don't Ruin Your AMS!! Bambu Lab X1C 1 Year Review!
 0:01:00
3D Printed Drying Rack for Rechargeable Silica Gel Beads — Dry Reusable Desiccant
 0:00:15
BARBER CUTS OFF LICE!!!! MUST WATCH
 0:09:11
Bambu Lab A1: Does AMS lite on top RUIN print quality?
 0:01:00
Dry vs Moist TPU in 3D Printing
 0:08:52
Filament Drying Guide
Комментарии