filmov
tv
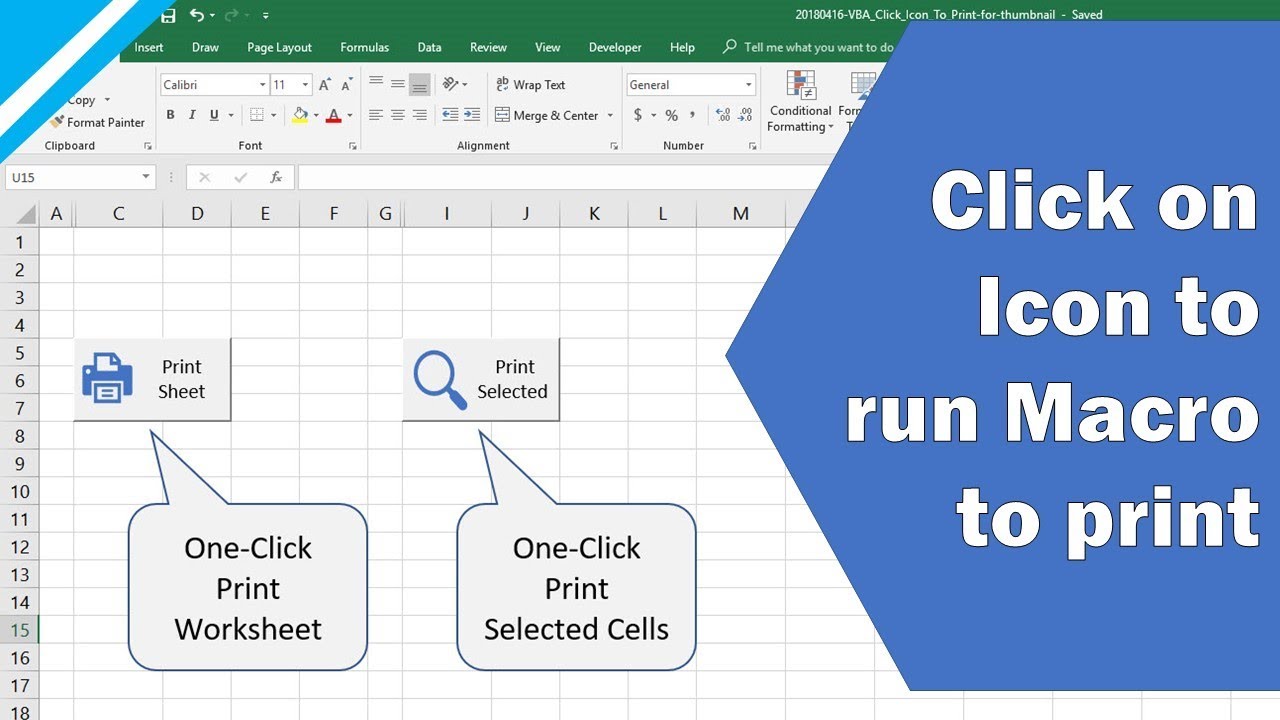
Excel VBA Tutorial: Click on icon to run print preview (or any VBA code) by assigning macro to shape
Показать описание
// FREE Excel E-book "Record Your First Macro"
// Recommended Excel Courses //
// Recommended Excel Templates //
If you are looking for pre-built, easy to use spreadsheets, check out Simple Sheets.
They have Excel templates covering cash flow planning, invoices, expense reports, personal budgets, and more!
——
// EPISODE NOTES
In this tutorial video we look at how to set up a Print Button on any Excel worksheet that launches Print Preview when it's clicked.
Of course... you could use the normal Print function (with keyboard shortcut CTRL + P) for this purpose...
... but the value of this solution is that you can assign any VBA Macro to the Button and quickly run it from a worksheet.
For example, you could run macros to:
- Send off emails
- Show help forms (with documentation for your spreadsheet)
- Run automated reporting processes
... all with the click of a button on your worksheet.
Here we use the .printout method to print the worksheet.
Note: VBA = Visual Basic for Applications (Excel's built-in scripting language)
——
// VIDEO TIMINGS
0:00 - Introduction
0:36 - Viewer Request Explained
1:33 - Overview of 7 steps
3:30 - Step 1 Insert Button (Form Control)
5:15 - Step 2 Set Button property to allow print object
5:31 - Step 3 Insert Printer Icon
6:18 - Step 4 Resize Printer Icon (and change color)
7:17 - Step 5 Group shapes together
8:08 - Step 6 Assign Macro
8:32 - Step 7 Write VBA Code
8:55 - Testing how the Print Button works
——
// DOWNLOAD WORKBOOK FOR THIS TUTORIAL
Please follow these instructions to learn from the workbook download:
▸ Open the workbook and make sure to enable macros
▸ Follow the 7 steps on worksheet "Info" to create your own Print Icon
▸ Press ALT + F11 to open the VBA Editor
▸ Use F8 to step through the code in a subroutine (one line at a time)
▸ I suggest you adapt this to your own needs... just copy and paste the code, then change the code to work for you
▸ If you have a viewer request, leave me a comment below and I'll try to solve your problem in a new video
——
// REFERENCES
Excel Version: 2016 (used in video)
——
// VISIT MY WEBSITE
For more tutorials on Microsoft Excel and VBA visit my website
Connect with me on Social Media
 0:11:02
Excel VBA Tutorial: Click on icon to run print preview (or any VBA code) by assigning macro to shape
 0:02:20
Excel VBA - Double Click
 0:14:02
Learn Excel VBA to Automate Anything
 0:02:11
Excel VBA Tutorial| How to open userform in excel vba using button click
 0:08:29
How to Create Macro Buttons in Excel Worksheets
 0:03:25
Excel VBA - Write a Simple Macro
 0:29:04
Getting Started With Excel VBA: Step By Step Tutorial For Beginners
 0:21:53
Excel VBA tutorial for beginners: The Visual Basic Editor (VBE)
 1:34:13
Aprendiendo a conectarse desde una carpeta con Power Query - Temas especiales - Sesión 56
 0:24:14
Learn How To Create Tabs in Microsoft Excel In This Easy VBA Tutorial Video
 0:10:09
How to Create & Use Excel Macros (Real world example)
 0:08:27
Button Click Increment Cell Value By 1 VBA Excel
 0:50:20
Excel Macros & VBA - Tutorial for Beginners
 0:09:17
How to Create Macros in Excel Tutorial
 0:01:25
How to Start Using VBA | Enable Visual Basic in Excel | Get Developer Tab | Programming in Excel
 2:10:31
Excel VBA Beginner Tutorial
 0:06:41
How To Execute A Python Script From Excel Using VBA | Step-by-Step Tutorial [EASY]
 0:35:41
Fully Automated Data Entry User Form in Excel - Step By Step Tutorial
 0:06:35
3 Tools for Easy VBA Programming - Excel VBA Course - VBA Quickie 3
 0:34:30
How to Create a Data Entry Form in Excel
 0:06:49
Excel Visual Basic (VBA) for Beginners - Part 1 of 4: Buttons and Macros
 0:10:35
Excel VBA Tutorial for Beginners 53 - Message Box Types and handling buttons
 0:05:52
How to Master the VBA Message Box in 6 Minutes
 0:03:34
Excel VBA - Copy Paste
Комментарии