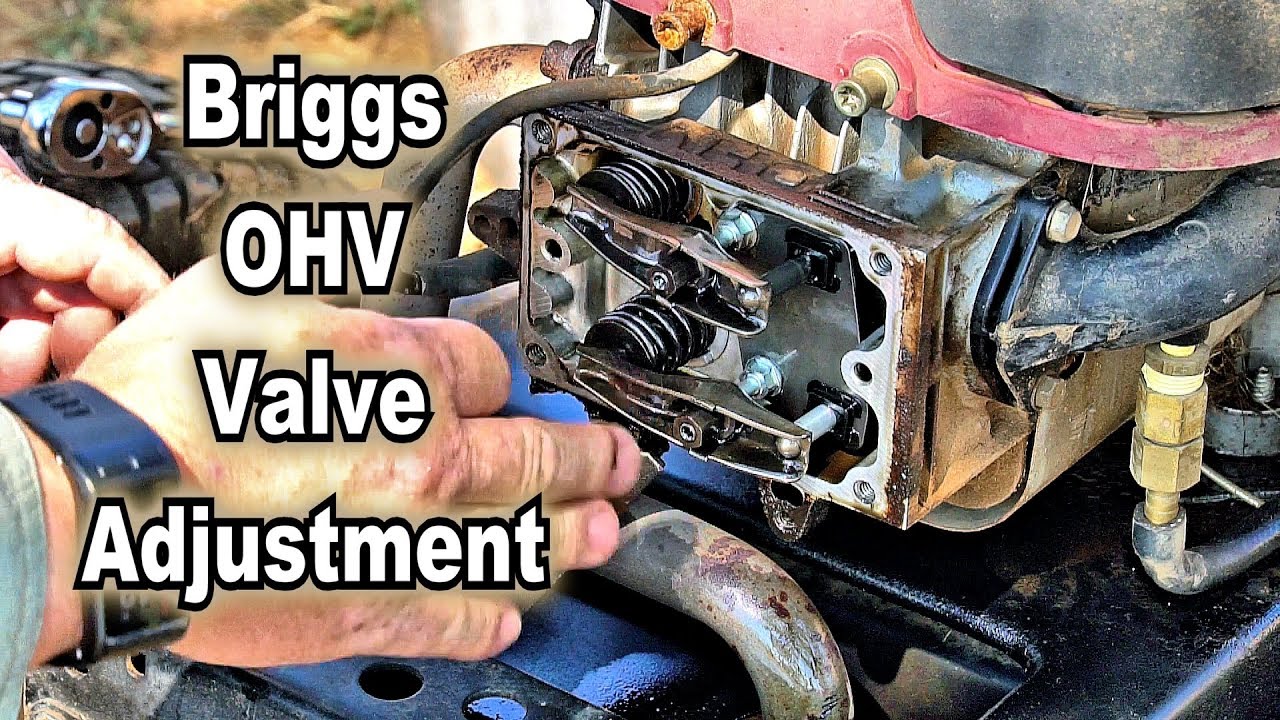
🛠️ DIY: How to adjust the valves on a Craftsman (Briggs) 17.5HP OHV Engine

preview_player
Показать описание

Click on the ⭐ SHOW MORE ⭐ button below for more information.

In this video, I show you how to adjust the valves on a Craftsman LT1000 mower with a Briggs 17.5 HP OHV Engine.

Equipment and Tools used in this video:

Recommended blades:

Connect with me on Social Media

Instructions and specifications:

The B&S 17.5HP engine is used on many models of riding lawn tractors. The mower in this video is a Craftsman LT1000, but this guide will work for all other brands and models. Here is a partial list of lawn mower brands that have this engine in one or more models:

Troy-Bilt
Husqvarna
John Deere
Poulan Pro
Ariens

This guide work for all models - except early production vertical models 110000, 120000

This video will show you step by step instructions for how to adjust the intake and exhaust valves on a Briggs & Stratton OHV motor. This video include instructions on how to determine which valves are the intake and exhaust valves, and how to find top dead center (TDC).

NOTE: Check valve clearance while the engine is cold.

1. Turn the crankshaft counterclockwise until the piston is at top dead center on the compression stroke. This prevents the compression release from holding the valves open.

2. Insert a narrow screwdriver or rod into the spark plug hole as a gauge, then slowly turn crankshaft counterclockwise until the piston has moved down the bore by 1/4” (6mm).

3. Using a feeler gauge (A, Figure 41), adjust rocker nut to obtain the clearance as listed on the bottom o this answer.

4. Hold rocker nut and tighten the rocker ball setscrew (B) to the torque valve of 45 lb-in. (5 Nm).

5. Check clearance again and re-adjust, if necessary.

6. Repeat for the other valve.

NOTE: On some models, the nut and setscrew are positioned above the pushrod ends.

Block Image
Vertical Models 110000, 120000 Early Production

1. Using a feeler gauge (A, Figure 42) adjust the locking hex nut (B) to obtain the

correct clearance as listed on the bottom of this answer.

2. Repeat for the other valve.

Block Image
- OR -

1. Loosen jam nut (A, Figure 43) at base of rocker arm stud. Then, using a feeler gauge (B), turn rocker arm screw (C) to obtain the correct clearance as listed on the bottom of this answer.

2. Hold the screw and tighten the jam nut to value 45 lb-in. (5 Nm).

3. Check clearance again and re-adjust, if necessary.

Block Image
MODEL 110000 HORIZONTAL SERIES

Valve Clearance – Intake .004 - .006 in. (.10 - .15 mm)

Valve Clearance – Exhaust .009 - .011 in. (.23 - .28 mm)

MODEL 120000 HORIZONTAL SERIES

Valve Clearance – Intake .004 - .006 in. (.10 - .15 mm)

Valve Clearance – Exhaust .009 - .011 in. (.23 - .28 mm)

MODEL 150000 HORIZONTAL SERIES

Valve Clearance – Intake .004 - .006 in. (.10 - .15 mm)

Valve Clearance – Exhaust .009 - .011 in. (.23 - .28 mm)

-----------------------------------------------------

MANUFACTURER'S DESCRIPTION:

Briggs & Stratton 31R907-0007-G1 500cc 17.5 Gross HP Engine
500cc, 17.5 horsepower
This genuine 500cc single cylinder engine offers dependable power for your equipment needs. With a power rating of 17.5 HP, this engine features a premium Dual Clean air filtration system, electric with recoil backup starter, and maintenance-free Magnetron electronic ignition. With a manufacturer limited warranty of 2 years consumer use/1 year commercial use, this engine includes a Dura-Bore cast iron cylinder sleeve, installed muffler, fuel pump, oil filter and 9 amp charging system.

Dura-Bore cast iron cylinder sleeve for extended life
Exhaust included
Overhead valve design (OHV) for cooler operation and long valve life
9 amp charging system

Consider These Factors :
Vanguard OHV engines are cast iron cylinder sleeve engines – for continuous heavy duty applications
Intek OHV engines run cooler and deliver more power, longer life and fuel economy - for more power
Standard engines are aluminum cylinder bore, side/overhead valve engines - for general consumer use
Horizontal and Vertical Shaft Engines

---------------------------------------------------------------------------

Please Note: In the event that a product used in this video has been discontinued, the product link will be replaced with a comparable product from the same manufacturer if available.


DISCLAIMER: This video and description may contain affiliate links


Thank you for visiting the jungle explorer channel.
Рекомендации по теме
Комментарии
Автор

🙏If you found this video helpful, please consider sending a couple bucks my way to say thank you by hitting the THANKS button under the video 💲❤. You can't imagine how much I would appreciate it. 🥰

thejungleexplorer
Автор

I've done many of these and the Intake is the Bottom with the Aluminum Push Rod. Top is Exhaust with Steel Push Rod. (Can always tell because one is shiny (Intake) and one is Black (Exhaust). Good rule of thumb when adjusting is TDC on compression stroke/both valves should be ready to adjust. Intake .004 and Exhaust .006. That seems to always work best.

stevieh
Автор

I am a 62 year old man and been a mechanic all my life, but don't know everything. Many how to videos talk to much and teach very little. This gentleman has hit the mark. Very good job. Please do more. The world needs a good instructor. Your it. Thank you .

samuelromano
Автор

As a rule of thumb and in this case, the "Intake Valve" has an aluminum push rod (bottom) ....where as the "Exhaust Valve" has a steel push rod (top). Good presentation...

Don_ECHOguy
Автор

The kind of video I like ... All the info you need, without any fluff & theatrics!

allanbarsema
Автор

I have had this problem for 20+ years. The last time I checked there wasn't a clear answer online (yes, it has been a long time). You have clearly solved my problem! For that I most sincerely thank you!!
I'm sure that we have learned from 75% of the comments that you had the valves reversed. Not a big deal after reading a couple comments that made the correction.
By inadvertently making the mistake (of mislabelling the valves) you have brought in MANY more comments which is very good for your channel.
Congrats!

dach
Автор

You got it BACKWARDS!
When the intake valve closes, you have a full compression stroke before it fires and the exhaust valve begins to open. In this video, as soon as the top valve closes, the bottom valve begins to open, immediately! This tells me the top is the exhaust, because on stroke 3 of the 4 stroke engine, the power stroke, as the piston begins to travel upward on the 4th stroke, the exhaust stroke, the exhaust valve is now opening. as it reaches the top of the stroke, the exhaust has been purged from the cylinder, as that exhaust valve is closing the intake valve is now beginning to open to allow a fresh charge of fuel/air mixture into the cylinder as we begin stroke 1, the intake stroke. The only time in the 4 stroke cycle that both valves rock at the same time is at the very beginning of the intake stroke. This dude is backwards! NEVER shove a metal object in the plug hole to feel the piston coming up. Always use a plastic ink pen or the eraser end of a wood pencil. Anytime you stick a chunk of steel against an aluminum piston you risk the chance of damaging the piston head. It may be ok for you or I to do this, but I don't recommend a novice to try it, and this video is intended to show a novice how to adjust the valves.

mikespeece
Автор

Top valve is exhaust with the steel push rod. The push rod is the darker color and on the right side of the rocker arm it is visible in your video.
The lower is the intake with a lighter color push rod, it's aluminum with steel ends. Verify your engine for these specifications. Mine was a 18.5 HP OHV. Intake : 0.003 to 0.005 I shoot for 0.004<on the intake. .. Exhaust: 0.005 to 0.007. This one I prefer the .007 on the high end to allow more exhaust to escape easier.
I had to go deeper into my engine to replace a blown head gasket which was making it burn lots of oil. I'm impressed on how well this engine it running after 15 years.
Sorry I didn't do a video on mine.

kevincronin
Автор

I enjoyed your video. I try to do my own repairs as they're expensive, but moreover getting them to a shop or getting someone to the country where I live is next to impossible. I do maintenance so things don't need repair, but with a 20 years old mower, it comes down to other things besides oil, plugs and filters. My starting problem became clear it's compression, so valve adjustment would be necessary. Thank you Google. You took the fear out of it for me. Another video I watched didn't make me feel as comfortable as you did. Not knocking the other guy, because when he demonstrated the starting problem, it was identical to what my mower was doing. What I liked from your video was that you were more educational. Like explaining one valve is intake and the other is exhaust. Don't know why, but that sort of thing helps me to understand the mechanics more clearly. Also, getting the piston at center. You instructed the tool needed to draw back an additional 1/4" from the spark plug hole. That had not been mentioned in the other video. Lastly, appreciated how your mower looked to have been used to mow instead of nice and showroom shiny. 😊 Mine looks like yours. I wish it was nice and shiny. Anyway, I enjoyed and learned from your video. I'll def give it a thumbs up. Wish I could give it a heart also, cause women can work on things like this and still be girly. ❤

crayonblue
Автор

Appreciate it man mower finally runs been working on it long time watched this an gapped everything to what you said an mower fired right up thanks

joshwaddell-gixw
Автор

Adjusted mine last week but i didnt go to all this trouble. Just find TDC & pop the valve cover off & knock the jam nuts loose on both valves. with your fingers run both adjusting nuts down till they bottom out. then back the bottom nuts up 1/4 turn, hold and tighten jam nuts. this will give you 3 to 4 thousands clearance on both valves. Mower will now crank easy and run great.. This will work on almost all riding mowers with a few exceptions. You will know if you have the exception cause it will backfire very loud every time you cut the mower off. if yours is the exception just give the exhaust valve another 1/4 turn out. Great video brother, always good to know the correct way of doing things .

ChrisRileyD-Everything
Автор

Thanks for this - got my engine running on the first try after following your lead

patrickalley
Автор

I always thought that the intake valve had the aluminum pushrod, and the exhaust valve was made of steel and you could tell by the looks of them which one was which. Very good video. I really liked it. Keep the good work up

alberteller
Автор

Another good rule of thumb? IF the engine doesn't want to spin over? Hard Crank? Before you go checking the valves and messing there...make sure it's not vapor locked...(you can tell because there will be gasoline in the oil from Carb flooding. Always a good idea to put shut off valve on the gas line too on older mowers.

stevieh
Автор

Dear Jungle explorer. Great video. Great example and straight to the point

SKSillSKSill
Автор

If you have hard starting it's normally the intake is loose. There is an internal compression release that pushes the intake down when cranking. Much over .004 on the intake will effect this feature resulting in hard cranking

skyjump
Автор

I have the same mower & engine ( a 2005)& the decompression mechanism on the exhaust valve linkage (internally) is suspect bad. So... gonna adjust valves first as engine only cranks to compression, then stops. New battery & starter did not solve this issue.
Thanks for the video! You da man!

jeffrandolf
Автор

He Adjusted the valves backwards and it still ran good. Good ol briggs and stratton. I've been mowing 7 acres in florida for 15 years with a 42 inch murray with the 17.5 briggs and it still runs good. If the engine only spins about 3/4 of a turn and then stops when cranking, and you think you have a weak battery, that's when the valves are usually out of adjustment. Or it could be a broke compression release thingy inside the engine. But it's probably the valves needing adjustment.🔩🔧😷🍺

donaldgreen
Автор

Awesome video!…. The explaining on exhaust and intake was soooo helpful!
Thank you soooo much!!!!

daytonaz
Автор

Thanks for in information it worked perfectly 😊

michaelanthony