filmov
tv
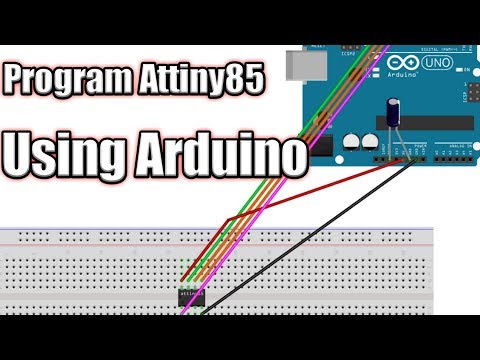
Programming ATtiny85/84 with Arduino Uno (ATTinyCore)

Показать описание
Learn how to program ATtiny micocontrollers by turning your Arudino into an ISP programmer. This tutorial covers the ISP programmable ATtiny versions like the ATtiny84, ATtiny85, etc.
These microcontrollers are tiny and cheap so it’s easy to use them in any project you can dream of. No need to buy a dedicated programmer or learn a new development environment – just use your Arduino!
You will need to download a compatible set of cores. ATTinyCore appears to be well-maintained and I strongly recommend it for ATtiny Arduino programming:
Boards manager url:
Components I used in this video:
ATtiny 84 (any ATtiny that programs with ISP will work)
As an Amazon Associate I earn from qualifying purchases.
If you found the video helpful I’d love to know! Comment below (and subscribe if you want more such tutorials).
Disclaimer:
I am not an electrical engineer. Use this information at your own risk.
#attiny #arduino #makers
 0:18:32
Programming ATtiny85/84 with Arduino Uno (ATTinyCore)
 0:03:53
How to Program ATtiny85 with an Arduino UNO
 0:06:00
Programming ATtiny85 with Arduino Uno | The Easiest way
 0:06:12
How To Program ATtiny85 Using Arduino AS ISP
 0:06:26
Programming an ATtiny85/45 with an Arduino UNO (Getting started)
 0:12:00
How To Program An ATtiny84 With Your Arduino Uno
 0:07:56
Programming ATtiny ICs with an Arduino Uno and the Arduino IDE
 0:12:07
ATTiny85 Program Using Arduino UNO
 0:04:51
How to Program Attiny85 using Arduino Uno and Arduino IDE
 0:10:09
How to Program an ATtiny with Arduino (Up to Date)
 0:04:59
Attiny85 Program and Burn Bootloader using Arduino
 0:07:00
How to Program an attiny with an Arduino Uno (With Serial Printing)
 0:16:16
Programming the Attiny84/85, Minifying the arduino (even more) [Anything Arduino] (ep3)
 0:11:36
How to Program Attiny85 Using Arduino Uno
 0:05:55
How To Program ATtiny85 Microcontroller with Arduino UNO - PART 1
 0:06:00
Easiest way to Program Different ICs with Arduino, Such as #Attiny85, #Atmega 8 So on.
 0:13:17
What Is An ATtiny 85 & How To Program It With Your Arduino Uno
 0:13:10
How to Program Attiny84 Using Arduino Uno - By CSASystems
 0:07:57
DFT_#A20 Programmateur ATtiny84 && 85 Programmation
 0:01:27
Arduino: ATtiny84 vs ATtiny85 consumption
 0:07:43
Program ATtiny85 directly via USB
 0:09:20
How To Program An Attiny85 With An Arduino Nano
 0:23:48
My First ATTINY85 Project!
 0:03:24
ATtiny85 Board First Look and Review | Install Drivers & Use with Arduino IDE
Комментарии