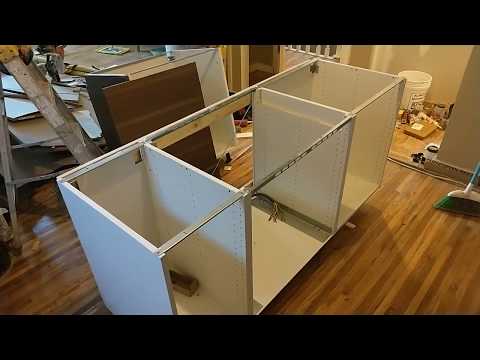
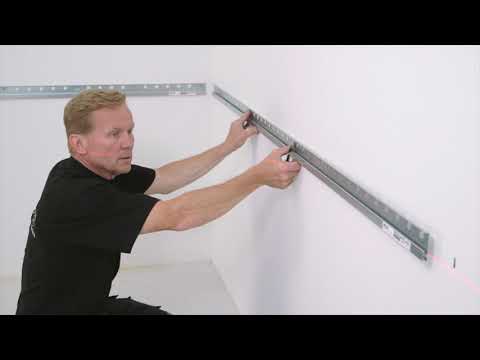
New IKEA Kitchen Island Floor Anchoring Kit - LOVE or HATE?

preview_player
Показать описание
I am making a video on the new floor anchoring frame for a kitchen island installation, but my experience is limited because I have only used it twice so far.

Have you used it?
Singe or double-row island?
What did you like?
What did you NOT like?
What is your verdict?
Please let me know in the comments.

THANKS!!

PS: before mentioned video is at least 6 weeks away, as I'm off for the next 3 weeks 😊
Travelling in Europe 🌍
Рекомендации по теме
Комментарии
Автор

I just installed one of these. I only have 2 units, a 60cm and a 40cm, but they sent me two 210cm kits which was completely overkill. I used less than half of one kit, so I'll take the other back to IKEA (if i can fit it in the car). On another note, my floor is ceramic tile on top of another layer of ceramic tile (then concrete screed) so drilling into that was a real headache. Tip for anyone in a similar situation: use a dedicated ceramic or porcelain drill bit (ideally with a diamond tip), use an SDS drill rather than a hand drill, don't use hammer action and use plenty of water to cool the surface as you go. Take your time too! I lost 2 days just installing these 2 cabinets, due to a melted bit which is now stuck in my floor forever. Thanks for all of these videos, Rannes. The advice you give is extremely useful.

tmjy
Автор

I’m tackling this today… wish the video was ready 😊

keska
Автор

My question is, how are we supposed to mount the large panels on the back of an island or a peninsula with the new mounting system? There's no provision made for a panel that goes right to the floor in any of the IKEA "literature". My best guess is that you have to cut new corner access holes at the bottoms of the cabinets and install a second set of mounting brackets to use with the new wooden channel strips. (I think we would all love to see a video of this new system being installed!)

aitken
Автор

I hate it!! I have (last two weeks) installed it for a peninsula. Why don't I like it?
1. IKEA assumes you have a flat floor. Mine varied by over 1.5cm in various places - over the length of the peninsula. I found it impossible to get the fame under the cabinets and raise it using the instructions, ie via the screw feet at each end. To solve I shimmed the frame in various spots using plastic window/door frame spacers until the frame touched the underside of the all the cabinets. Then I added one screw to each floor bracket at each end of the frame. Then I secured each cabinet onto the frame using four screws into the cabinet base. I did not put the screws through the base sides of the cabinet vertical panels - as per the instructions - as I can see no point in doing this. Then I went back and put the remaining screws in the floor brackets including the middle brackets. So for me the levelling of the frame is not optimal.
2. IKEA assume you place the frame on the floor, get it level then add your cabinets on top. If your space is limited moving a long frame around isn't easy. If like me you screwed the cabinets together ( all nice and square) before putting the frame under the cabinets you need a lot of free space to slide the frame under. Again in a small kitchen this may not be feasible and you might have to undo the cabinets and remove them to get the frame in place.
3. There are hundreds of holes in the frame just so you can cut it and screw the end pieces on using the most appropriate/ nearest hole. This can mean it's tricky placing the floor brackets in a good place so that the screw holes for the brackets don't align with the bigger pre drilled holes - because then the screws don't fit.
4. The holes in the frame provide a weakness when screwing down the cabinet. You can feel the screws falling through these holes if you are unlucky enough to pick a spot where these holes are when you screw the cabinet down.
5. The previous system seemed much easier/flexible as you could place the floor blocks where best suited to the situation and were easy to align up/down The "only" benefit I can see for this new concept is you don't need a right angle screwdriver attachment as the frame is placed along the cabinet length.
6. For my installation the peninsula is attached to a corner cabinet ( the cabinet with the carousel/ Lazy Susan, not the bi-fold doors - see I do listen to you! 🙂). Reaching under the corner cabinet to screw the frame to the floor brackets is a stretch, if like me, you placed the frame in the middle of the base of the cabinet - if I had made the frame longer ie further into the cabinet i don't think i could reach it. IKEA want me to put the frame down before the cabinets but for my build this wasn't feasible due to the need to build/hang/place the cabinets and align then to avoid various obstacles.

Next up is adding the cover panel to the back of the cabinets. IKEA changed this too. From something simple, two horizontal MDF bars fitted via brackets to each cabinet, to one flimsy timber bar at the top and metal right angle brackets that each have to be attached to the panel before jamming the lip of the bracket into the slot for the backboard. This isn't good for me at all.
I ended up buying my own pieces of moisture resistant MDF and cut them to form bars that fit into the cabinet back panel and with my own brackets I fitted the back cover panel via the previous method. In other words buy/make the components that IKEA previously supplied as the new method is just terrible IMHO.

To me IKEA changed something that was o.k. to something that is worse. But maybe I did it wrong/badly and there are better ways.

I have certainly learned a lot from you Lars, so I'm curious as to your experience.

NOELTM
Автор

I have one sitting in my garage, but I won't be using it for another few months as the house it is going in is under construction. I wasn't going to use the old style, but this looks actually useful. I was going to build a plinth that was basically exactly this, but out of plywood. Level that, attach it to the floor, then put the cabinets on top of it. My island is not fully rectangular, it's two 36" full depth cabinets on one side, a 15" facing the end that is custom cut to 18" deep, with a waterfall edge on the other end. Seating for two in-between. Using one of the 42x74 laminate island tops.

I will be very curious to see your video, I can always return it and go back to my original plan if it looks less useful than I think it will be. I am having a LOT of fun with this kitchen - I just built a trash cabinet with the electric opener and a custom insert to hold the trash and recycling bins, and a custom-topped Utrusta pullout work surface above them. It has a removable plug so you can sweep cuttings straight down into the waste bin. Also working on a 6" lower cabinet with a slideout holder for a stepladder, and another custom 18" pullout work surface in the tall pantry cabinet. Good times!

Kevin_Rhodes
Автор

I have no experience with the older systems, but my two cents are that this newer system could be sturdier and that it was tricky to adjust.

aitken
Автор

I know its not the best video where I could ask about drawers, but its one of most recent videos, so I would like to know from profesional. Is there any way to get drawer bottom without buying all drawer? Because I guess ruined drawer bottom with water doesn't come in guaranties. Maybe there is a hack, maybe it would be good topic for another video 🤔😅

Gudis
Автор

Do you ever reinforce the backs of the cabinets they feel pretty flimsy

roba
Автор

Hi sir how to fix floor can you send video i am confused please...

muneerflowflow
Автор

hi have you ever cut the height of ikea plastic kickboards? no allowance was left for flooring.

coveralljohn
Автор

I hope you finish at least one video with it, because I have to install it. The thing is that I have an island-ish, I have a peninsula, a "L" shape, and only the short part is on the wall (2 cabinets) and 3 cabinets are not on the rail.

I hope you have to say something about this.

Thanks anyway for all your videos ❤

StratiencoAlex
Автор

I didn’t know this existed. I checked the manual. It wouldn’t bring $69 worth of value to me so I won’t use it.
I think it’s meant for clients with little to no experience and try to guide them through the process of installing an island. As opposed to having them figure out how to build a 2x4 base. Planning, pick-up straight lumber, measure, cut, level, etc… lots of little skills that aren’t hard nor time consuming but that a beginner doesn’t have.
$69 for a pro, or a semi experienced DIYer isn’t worth it.

xavytex
Автор

this kit takes away any possibility to change the height after installation, . Not that you should change it afterwards but still... More importantly: I have the induction cooking plate with the integrated ventilation (which comes out at the bottom). This will NOT work with the frame. Be aware of that!

Grootjans