Make custom PCBs with the Sienci CNC and FlatCAM!

preview_player
Показать описание
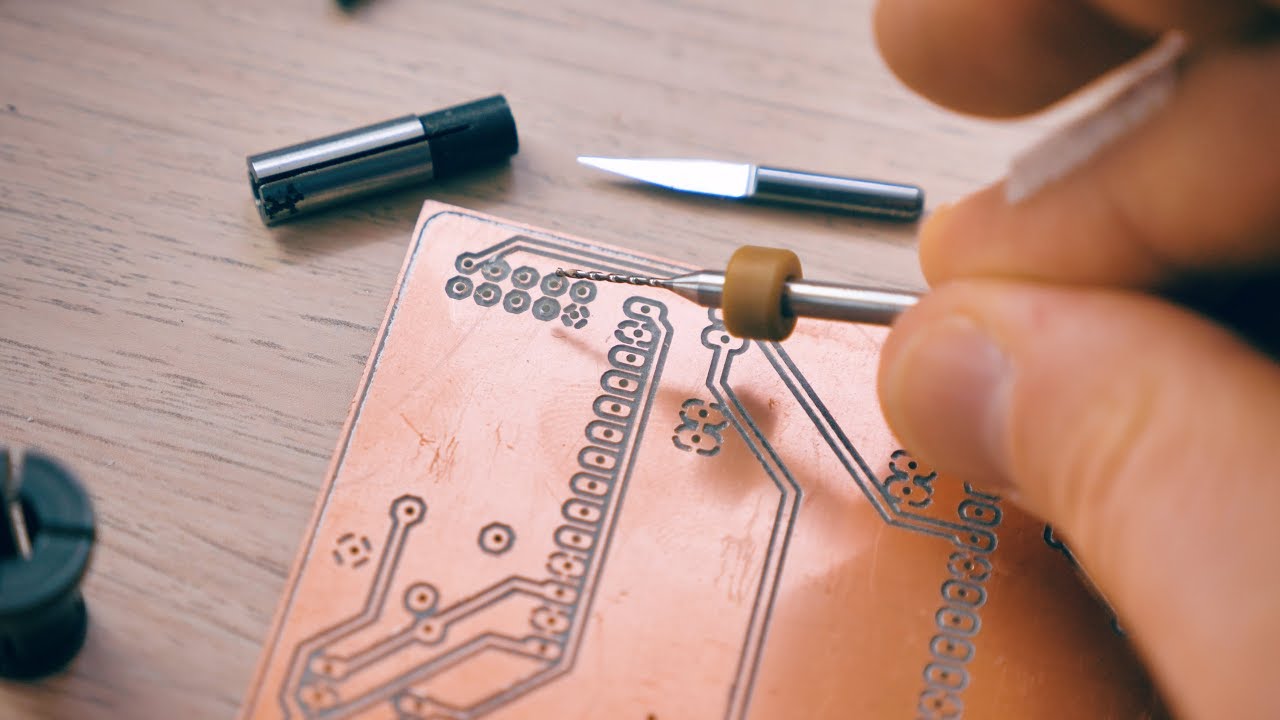
I've always wanted to make my own PCBs - and with a CNC machine, a few tool bits and a few pieces of software it's actually a super fast and straightforward process! In this video, I show how I used Eagle and FlatCam to create an isolation-routed circuit board on the Sienci Mill One, complete with a milled-out contour and all holes drilled.

Components used

Tools used

Software used

Eagle files

Product links are affiliate links - I may earn a commission on qualifying purchases (at no extra cost to you)

Рекомендации по теме
Комментарии
Автор

Sorry about the 1080p-only upload again, but YouTube is right now literally taking weeks to process 4K videos.

MadeWithLayers
Автор

I am always impressed by the improvement of quality from your first videos to your most recent ones, nicely done and thanks for for such a helpful guide!

Bajicoy
Автор

I just finnished my first project with a CNC milled PCB. It gets interesting when you do double sided PCBs because the precision you can achieve is great when aligned properly. Also I recommend to use ultrasonic cleaning of the PCBs because little copper chips may short your traces. You will be surprised how many copper chips you will find in your cleaner that potentially could short out your board.

ViciousViper
Автор

I recently bought a 3018 CNC router to make my own PCB boards. You brought up some really good pointers that I'll keep in mind as I am working on my projects.

jeffreyjhouser
Автор

I went through the same learning process using the MPCNC with the same Makita router. Instead of using Flatcam, a Eagle plugin could be used to directly generate the g-code (pcb-gcode).

As I had the same issue about the width of the milling at the first tries, I found that the 0.1mm/10° tips tend to break at the first touch with the pcb very easily, which lead to cut not with the actual tip, but with a broken edge of it causing wider cuts. I went to 0.2/30° and the result was perfect compared to the first trials, now it is easily possible to create pcbs for 0603 smd parts.

benjamindeiss
Автор

I went through the same sort of process as this with a cheap CNC3040, ran into the same issues, gave up pretty quick and crawled back to toner transfer (which I got really reliable by dipping the board in etch before attempting transfer). Kudos to you for following through to success! Now I have a K40 laser cutter, and I hope that I never have to go back.

tiger
Автор

I'm glad you are doing detailed CNC videos like this instead of just printer reviews. I'd like you see doing this on a sturdier CNC machine.

MitchD
Автор

So fun first hearing what Tom and Stefan are up to on the podcast and then actually seeing the videos
Amazing video as always
Can't help my self just binge watching a ton of your videos every time you upload something new

dorianeric
Автор

This is awesome! Thank you!! Also mentioning the pitfalls and such makes a huge difference.

VincentGroenewold
Автор

I'm an engineer, apprentice served toolmaker and an experienced CNC machinist but I have come never across your method of setting the Z height (minute 16:30) brilliant and thank you, that's my preferred method from now on.

DuncsWorkshop
Автор

Your parts stored in the IKEA container made me feel right at home. Great video too. Thank you.

fred
Автор

Thank you. I saw another video where this guy used CANDLE GRBR to operate his CNC machine. He was able to use Height Mapping that accounted for the thickness variations of the PCB material itself. That was a good idea to mill the surface flat, but you still had that SAME problem that I run into doing this.
Using Height Mapping this problem goes away.
I don't blame the "V" bit anymore, but I did just buy myself a set of 0.5 mm end mill bits. Thanks again for this great video.

SciHeartJourney
Автор

That opening seemed like quite a tongue twister! Thanks for the video!

BurninGems
Автор

Hey nice job! I have an Arduino CNC and i use flatCAM, the same method that you showcase and i have a few tips:
-With those V bits i have succeed only with 0, 3mm of isolation between traces and at most 0, 6 mm traces width
-When you drill the holes those drill bits don't align properly, so I create a pilot job of deep 0, 2mm using a V bit and the I do the drill job, that helps to ensure every hole is aligned
-I use chillipeppr instead of UGCS because you can do a Z height probing and also do a bed mesh probing to avoid non isolated traces
Greetings from Costa Rica Tom!!

robertobrenes
Автор

Hey Thomas, I've been over all this too. After uncountable failures I can tell you that the key for success is to use quality brand engraving bits! Forget the chinese bits where you pay 10 bucks for 10 of them. Good quality engraving bits costs about 10$ each. The difference on results is another planet. Oh... I guess that autoleveling is mandatory too. My CNC is homemade and looks less stiffer than yours, and still I can achieve isolation lines of 0.1mm wide for 0.05mm of depth. Cheers mate!

jesj
Автор

Good job Tom. I subscribed weeks ago but I stumbled on this PCB video by good fortune. I have a Sain Smart 3018 Pro ( I've yet to assemble ) and doing PCB's is exactly what I want to do. Thanks.

arthurdent
Автор

I knew somebody else had my idea before I did. You saved me a ton of work. Thanks!

CandyGramForMongo_
Автор

Thank you for this information. I'm currently experimenting with milling with my second Mendel, on wood with a Dremel flex shaft. It has been a great opportunity to learn material properties, tool capabilities, and basic 3-axis cnc milling. PCB milling is definitely a future project. Currently, I've been doing my milling gcode by hand and with the help of bash scripts. I'm currently running a planing operation to remove 1cm of material from a 118x60mm block of material in preparation for further milling operations. I may design and construct a wooden X carriage in this manner.

jefbed
Автор

Love the vids, been thinking about a CNC engraver for a while, was relieved to see this was one of your vids :)

slimplynth
Автор

Tom, there is a company called Elaire that makes direct metric and imperial collets for the Makita router. They are not cheap but definitely worth it, runout gets so much better.

mhe