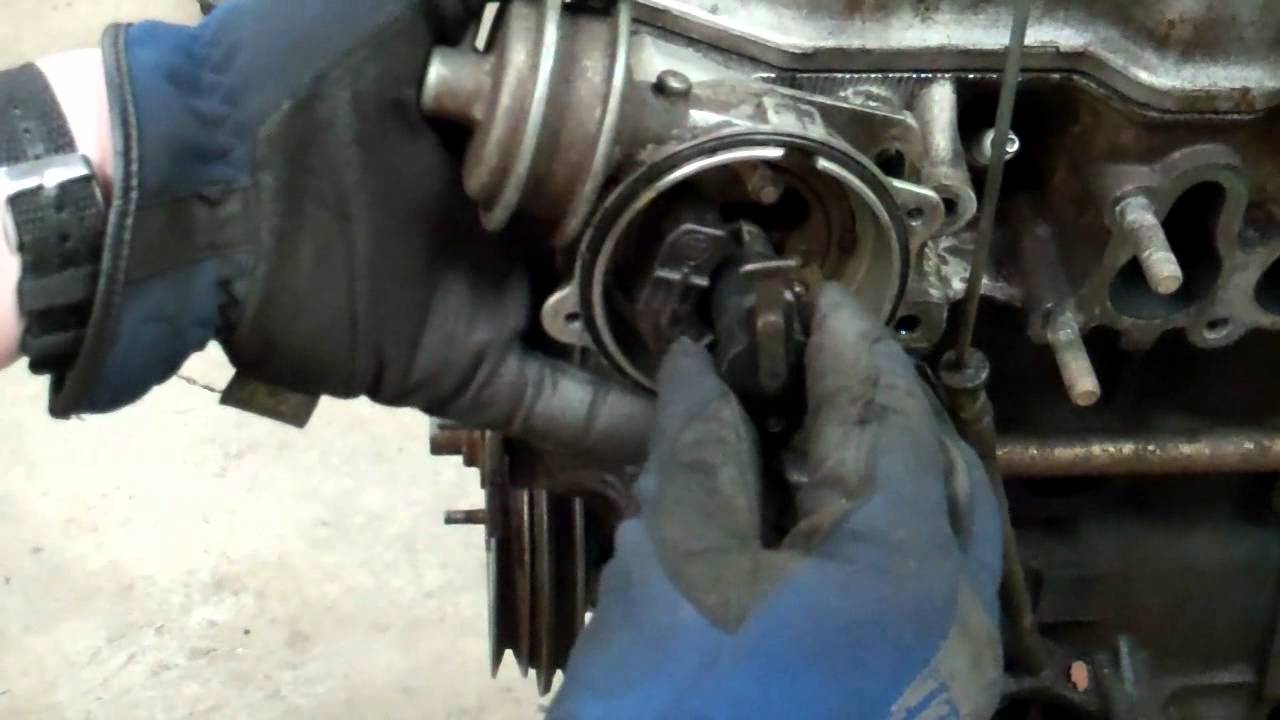
How to Remove and Install a Toyota 22R Distributor (20R & 22RE see updated video details below)

preview_player
Показать описание
****UPDATE*** In the video I say set the crankshaft to 0 degrees on the compression stroke, however, if you have a fuel injected 22R-E engine you should set it to 5 Degrees. If you have a 20R, set it to 8 degrees. If you have an EARLY 22R (1981-1983) you can also set it to 8 Degrees. The Toyota factory service manuals call for the later 22R (1984-1995) to be set to 0 degrees for distributor install. Now all those specs are for a stock engine that hasn't been rebuilt. If the head and block have been machined that's going to change the distance between the cam and the crank and mess with the timing a bit. The above specs are just for getting the distributor installed. I've never had a problem timing the early 22R's setting the crank at 0 and installing the distributor. As long as the timing chain wasn't installed off by a tooth (quite common actually), then there will be more than enough adjustment in the distributor fixing bolt slot to hit final timing with the timing light. If you get the distributor installed, but there isn't enough adjustment in the slot to hit your final timing spec you are either off a tooth between the the distributor drive gear and the cam gear, or you're timing chain is off one tooth. Refer to a service manual for final timing procedure and spec.

How to remove and Install a distributor from the 20R 22R 22RE Toyota engine series. You will still need to use a timing light after you are done to set and fine-tune the timing, but this video will show you how to remove and replace the distributor and get the inital install correct.
Рекомендации по теме
Комментарии
Автор

Quick question mate, in some videos they put the crank mark to 5 degrees instead of 0. I know, if it's injected you put it on 5 and 0 if it's carby but the guy put it on 0 with a injected motor.

MC-jfic
Автор

Dude it’s 2025 and you just saved my 22R

diazedvin
Автор

Thanks for making the above video until yesterday it appeared impossible to fix the distributor timing on the truck but after watching the above video  I got it bang on in less than a hour.
Generous You tubers like you impart  knowledge, commonsense and make the world more creative & benevolent place. Thank you once again.

atulsurma
Автор

Thank you, SO MUCH! Huge help. Wish I watched the full video the first time... Got caught 180 degrees out of alignment the first time while doing the timing chain. Never would have figured this out without your help.

matthuber
Автор

SUCCESS! I had scratched a mark on the distributor at the mounting screw, and using your video I was able to reinstall it successfully and line it up. Truck started right up on the first try. I checked the timing light later and found that I was at 8°BTDC.

theirongiant
Автор

Thank you, I was able to start my brother's truck and actually drive it since it t was last worked on 5 years ago. Had no power.

SUPERHAWKv
Автор

With the cover off you can tell if your on the compression stroke by looking at the pin on the cam shaft if the pin is on top then it's where it should be when you replace the distributor and the rotor will be at the number one plug.

scottrichards
Автор

Yes, although, I really don't like to stick anything in the spark plug holes and I try not to remove the spark plugs any more than I have to due to the aluminum threads of the head and the steel threads of the plug. #1 plug isn't really a problem but the #4 plug is in at an angle back there that makes it easy to cross-thread if you're not careful.

WheeliePete
Автор

Good video man i am replacing the timing chain due to a broken guide. There was nothing left and grooved the cover pretty good. It had a single chain and actually should have had the dual.

I forgot to set everything to TDC before i took it apart. I did take pictures of everything though. When i took my distributor out i did mark the head and distributor. The rotor was at 5 o'clock when I pulled the distributor. When i put the chain and everything back together I aligned the mark with the 2 bright chain links on the cam gear at 12 o'clock. The crank gear was at 6 o'clock and aligned with the single bright chain. But your video did confirm that I was NOT at TDC it was 180 degrees out and on the exhaust stroke.

So I know now how to exactly put everything in TDC with out any doubt, and I can move forward. I was taking a break and doing a little reading because it's been 15 years or so since i have done one of these.

So you have clearly explained the proper way for TDC. I know some people pull the first spark plug and wait to feel air pushing on your finger. I like checking the cam a lot better. Now i can move forward with no questions and have a properly timed and installed double row chain i got from LC Engineering with steel guides. I am so excited to see how much better my truck is going to run. So when i go back to the park that destroyed my truck last time I can kick its ass lol. Keep the videos coming and Thank you sir very much.

jerrystringerjr
Автор

@lspagettiz First check to make sure you have the distributor in on the right tooth of the dist. drive gear. (Install it with the valve cover off to see the engagement of the dist. drive gear to the cam gear.) If that's not the problem you are probably off one tooth on the timing chain. Firt you have to figure out which way (left or right) you are off and then you take off the cam gear with the chain, hold the chain and work the chain one tooth backwards or forwards on the gear.

WheeliePete
Автор

First, make sure you are clamping the signal pickup for the timing light to the #1 spark plug wire. You have to disconnect the vaccum lines to the distributor (and cap them), or if you have an EFI engine you need to jumper the computer plug in the einge bay to disable advance. If you are doing all of that and the marks still aren't lining up, your dist. drive gear may be off a tooth (pull distributor, set crankshaft to 0 deg. and reinstall the distributor) or your chain is off a tooth.

WheeliePete
Автор

Thanks. This works with the 3TC also. Purchased the car not running. The distributor was pointing to 3rd on TDC. Good video.

RonnieMondragon
Автор

Don't forget to make sure you are trying to set the timing with the advance disabled. With the fuel injection you have to jumper the inspection port to stop the advance, and with carbureated rigs you have to disconnect and cap the vaccum hoses.

WheeliePete
Автор

Thanks, I really want to detail my 20r in my 1979 celica, I have have been taking parts out, cleaning and painting them and putting them back on. I have also been cleaning the oil that had been spilling out of the engine through bad seals. Now I know how to remove and but back the distributor how you are suppose too.

ironwolf
Автор

Great help, thank you very much for your time and knowledge. Greetings from Costa Rica.

Eagle
Автор

THANK YOU SO MUCH! All of the other videos I saw did not properly address video is gold!!!

riptus
Автор

to find TDC #1 remove the #1 spark plug.. turn with a ratchet .. when you feel no compression resistance you are coming up on the #1 compression stroke.. stop the damper at the base timing mark.. see the emission label or manual.. install your distributor as seen above.. install the bolt but not all the way tight.. turn the housing to bring the center of the pickup coil pole piece into perfect alignment with one of the 4 pole pieces of the reluctor on the distributor shaft..

the pickup coil is under the cover on the left side of the distributor.. the pickup coil is where there is a coil of wire looped in the plastic with a metal blade extending thru. .. the reluctor is the 4 bladed device on the distributor shaft that the ends of the blades /pole pieces go past the blade/pole piece on the pickup coil. this allows you to get it really close and you can lock the distributor in place to get the engine started on the first try.. the procedure above works on almost any motor except chevy vortec motors and a few fords with TFI ignitions..

waynep
Автор

Damn theres alot more than what i thought i just wanted to replace te O ring on my distributor for my 1995 4runner it looks likenit leaks from there thanks for your video bro

DanielAlvarez-xlqy
Автор

Thanks, Pete. I had to remove the distributor and PS pump to change the middle radiator hose after it cracked and pissed coolant everywhere. I accidentally bumped the rotor after removal and thought, "shit, now what?" I saw the "rotor" symbol stamped inside the distributor. I can see the piston through the plug hole and the crank is at 0°, but the engine won't turn over. Therefore, I must be 180° off and I will try fixing it tomorrow. Thanks again!

theirongiant
Автор

@WheeliePete To loosen the P/S tensioner pulley you loosen the center nut on the pulley, and then you turn the bolt head to the left of the pulley. That bolt head runs the pulley up and down a track that allows you to tension the belt. You might just want to pick up a basic manual for the car at an auto parts store. it will describe what to do. It's hard to explain, but really easy once you're doing it...

WheeliePete
join shbcf.ru