filmov
tv
How to Create a Data Source in Microsoft Word 2010
Показать описание
In this tutorial you will specifically learn how to create a Data Source in Microsoft Word 2010.
Most of the time you will need to use content from an address book directly on letters or envelopes. Just so that you don't have to go through the hassle of opening two different applications simultaneously MS Word 2010 offers with a way of creating a data source and directly pasting information from it on to your letters and other word documents.
In this tutorial you will specifically learn how to create a Data Source in Microsoft Word 2010.
Step # 1 -- Creating a Table
In order To create a data source, you will firstly need to type out the information you would like to use. Let's suppose you want to insert the data in a tabular format. To be able to do so, you must initially go to the insert tab and click on the option titled 'Table' and select a particular table format from the list given. In this case, for example, you have selected the 6x1 table.
Step # 2- Completing information in tables
Once you have added a table according to your preference, you will need a heading on each column in order to assign it to a specific set of data. You must now add a table in the first row which will comprise of various fields such as, first name, last name, address, city, state and zip code. In order to insert a new row, all you must do is hit the tab key on the left hand side of your keyboard. Furthermore, you will now have to provide details of various recipients under the given fields in your tale.
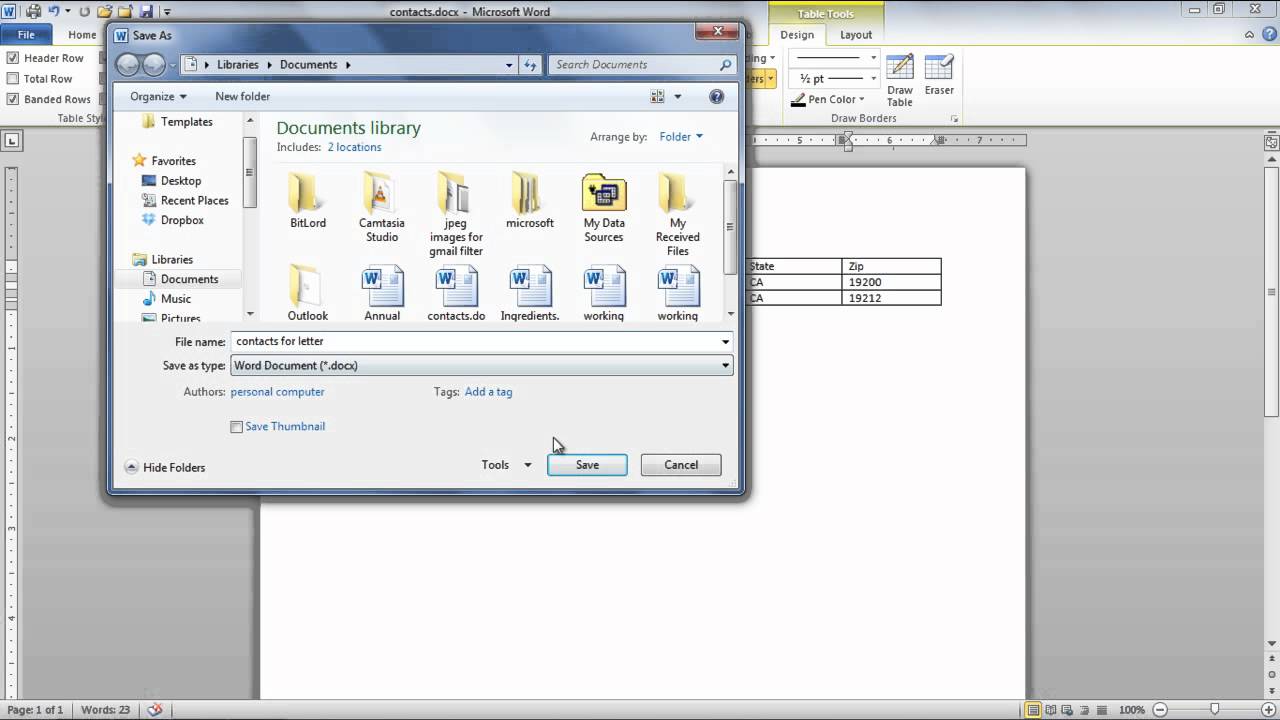
Once you are done inserting all the required data, you will need to save it. Click on 'save' and assign this document a title or name. Let's suppose, you saved this file under the name 'contacts for letter' and saved it in 'word document' type.
Step # 3- Starting Mail Merge
In order to start Mail Merge, you must Open a blank document, and go to the 'Mailings' tab. Here you will find the 'Start Mail Merge' option ,where you will be required to click on the drop down arrow given on the same tab. You will now need to Select the first option given here titled 'Letters' since we are working on letters.
Step # 4- Editing the recipients list
Now you will need to insert contact information for recipients whom you wish to send the letter in question to or use a previously created contacts list. You must click on the button titled 'Select Recipients' and select 'Use Existing List'. You can choose the required list from the various previously created contact lists, and click 'open' in order to view the file.
Step # 5 -- Using Mail Merge Recipients
Once you have clicked on the option 'Use existing list', a new button will appear in the mail merge options titled 'Edit Recipients list'. In order to view the data entered for various contacts, you are required to select this option. You can now select specific contacts that you would like to add in the list of recipients for the letter being sent out via mail merge.
Most of the time you will need to use content from an address book directly on letters or envelopes. Just so that you don't have to go through the hassle of opening two different applications simultaneously MS Word 2010 offers with a way of creating a data source and directly pasting information from it on to your letters and other word documents.
In this tutorial you will specifically learn how to create a Data Source in Microsoft Word 2010.
Step # 1 -- Creating a Table
In order To create a data source, you will firstly need to type out the information you would like to use. Let's suppose you want to insert the data in a tabular format. To be able to do so, you must initially go to the insert tab and click on the option titled 'Table' and select a particular table format from the list given. In this case, for example, you have selected the 6x1 table.
Step # 2- Completing information in tables
Once you have added a table according to your preference, you will need a heading on each column in order to assign it to a specific set of data. You must now add a table in the first row which will comprise of various fields such as, first name, last name, address, city, state and zip code. In order to insert a new row, all you must do is hit the tab key on the left hand side of your keyboard. Furthermore, you will now have to provide details of various recipients under the given fields in your tale.
Once you are done inserting all the required data, you will need to save it. Click on 'save' and assign this document a title or name. Let's suppose, you saved this file under the name 'contacts for letter' and saved it in 'word document' type.
Step # 3- Starting Mail Merge
In order to start Mail Merge, you must Open a blank document, and go to the 'Mailings' tab. Here you will find the 'Start Mail Merge' option ,where you will be required to click on the drop down arrow given on the same tab. You will now need to Select the first option given here titled 'Letters' since we are working on letters.
Step # 4- Editing the recipients list
Now you will need to insert contact information for recipients whom you wish to send the letter in question to or use a previously created contacts list. You must click on the button titled 'Select Recipients' and select 'Use Existing List'. You can choose the required list from the various previously created contact lists, and click 'open' in order to view the file.
Step # 5 -- Using Mail Merge Recipients
Once you have clicked on the option 'Use existing list', a new button will appear in the mail merge options titled 'Edit Recipients list'. In order to view the data entered for various contacts, you are required to select this option. You can now select specific contacts that you would like to add in the list of recipients for the letter being sent out via mail merge.
 0:03:16
How to Create Data Entry Forms in Excel - EASY
 0:18:31
Create a Data Model in Excel
 0:00:44
Excel Quick Tips - How to create a data table using keyboard shortcuts
 0:08:08
Create Excel Database and Data Entry Form. Excel Magic Trick 1690.
 0:14:52
How to create a data entry form in Google Sheets [with multiple databases]
 0:34:30
How to Create a Data Entry Form in Excel
 0:08:19
Create a data entry form in Google Sheets
 0:06:15
Create a Simple Data Entry Form: Enter Data Using a Form in Google Sheets & Apps Script
 0:00:39
How to create a doughnut chart in excel! Easy trick for data! #charts #msexcelfullcourse
 0:00:50
How to Create Data Types From Workflows | Bubble Quick Tip
 0:22:30
How to Easily Create an Data Entry Form in Excel | No VBA
 0:10:10
How to Create an Excel Data Entry Form in 10 Minutes Using Python (No VBA) | Easy & Simple
 0:08:13
Create a Data Entry Form: Google HTML Service and Google Sheets
 0:07:24
Create a web-based data management system
 0:05:03
Create Database and Data Entry Form in Excel
 0:01:51
How to Create a Data Source in Microsoft Word 2010
 1:25:36
How to Create a Data Entry Form in Excel With Add, Modify, Delete and Reset (Step-by-step Guide)
 0:03:18
Let ChatGPT create Dummy Data for your Excel Projects, Sample Tables, and more!
 0:17:37
Create the Perfect Data Analyst Resume | Free Templates!
 0:16:00
How to Create a Data Governance Plan (the 30/60/90 days plan)
 0:10:19
How to Create an Online Data Entry Form that can Perform CRUD Operations on Google Sheets
 0:18:51
How to Create a Data Entry Form in Microsoft Power Apps - A Tutorial
 0:21:18
How to create your first data science project
 0:06:34
How to Create HTML Data Entry Forms in Google Sheets
Комментарии