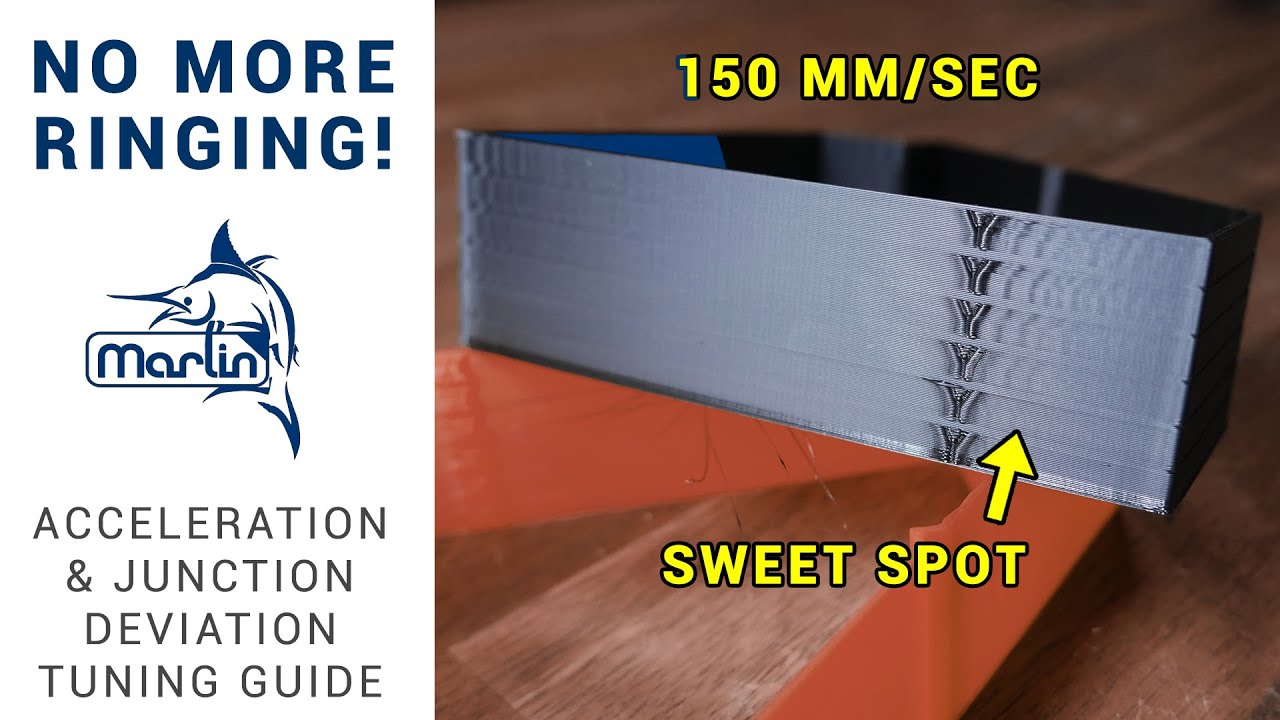
Remove ringing by tuning acceleration and junction deviation - step by step guide

preview_player
Показать описание

Tuning your 3D printer acceleration is the next step in getting the most of your machine. With this and junction deviation, you can find a nice compromise between speed and surface quality, eliminating ringing. In this video I calculate and tune to match a very high print speed, but this works the same for any feedrate.

Testing the fastest an extruder/hot end combo can push through filament is pretty interesting, and I may repeat this test for future upgrade videos.

Resources:
My test piece on Thingiverse:

Software:

Marlin references:

Take a look around and if you like what you see, please subscribe.

Рекомендации по теме
Комментарии
Автор

Just when you think you're done messing with your printer, a video like this comes up.

id
Автор

FYI: I highly respect your videos. I am not a 3D printer expert, but I have over 30 years experience in manufacturing. I have been factory trained with 6000 watt lasers, plasma cutters, flame cutters, 3 axis, 4 axis, and 5 axis machining centers, etc. Used Catia, Siemens NX, and my favorite Solidworks. Newly loving the absolute best.... for free for home use ... Fusion 360. You seem to get that you have to rerun all calibrations when you make a change. A simple nozzle change can affect kerf, temperature adjustments, motion adjustments, etc. Kudos. Also, your sharing of knowledge is just awesome. I only ask that you NEVER... change or alter your opinion based on reward. Keep it real. Thanks.

trevorwesterdahl
Автор

This video really puts into perspective how far printers have come. In just 3 years you can now get printers that will run reliably well over 300 mm/s and have a volumetric extrusion rate well over 20mm³/s

DJ.
Автор

Thanks for mentioning us - really aprechiate it

martinpirringer
Автор

Michael, thanks for this awesome tutorial. I've fine-tuned my Anycubic I3 MEGA-S using this method and now it just FLIES!!!! (I can reasonably print @ 100mm/sec!!!)


I always enjoy your videos. Thanks for sharing!

MrDemento
Автор

Of course you can adjust the printer firmware to reduce ringing but most of your accelleration happens in the infill. So reducing your firmware accelleration will slow your printer down more than needed. I use the reduced acceleration and jerk just for the contours and expecially the outer layer and I limit them in the slicer instead of firmware. This way I can speed up the infill and improve the aesthetics of the shell

rosserobertolli
Автор

+1 for using Bathurst to explain corner speeds.

yeahnah
Автор

Tip: When using Slic3r or PrusaSlicer u can use conditional gcode right in the Programm, instead of editing the gcode in a text editor. Example for 0.2: {if layer_num == 0} M204 P400
{elsif layer_num == 25} M204 P800
{elsif layer_num == 50} M204 P1200
{elsif layer_num == 75} M204 P1600
{elsif layer_num == 100} M204 P2000
{elsif layer_num == 125} M204 P2400
{endif}

u could use "layer_z" instead of "layer_num" for Millimeters

apep
Автор

Cannot get over how consistently you have been pumping out all this content over the years. With such detail, ease of explanation and pure quality. Hats off to you and many thanks for constantly being there for me since I started my printing journey years and years ago!

musikmaker
Автор

You're a really good teacher. I've stumbled upon your channel just recently and it has quickly become my go-to channel for at least calibration related questions. Although I have already been printing for years, I have still learned a lot.

danielb.
Автор

For those using Prusa Slicer use that "Before Layer Change gCode" in printer Settings tab;
{if layer_z == 5}M204 P400{endif}
{if layer_z == 10}M204 P800{endif}
{if layer_z == 15}M204 P1200{endif}
{if layer_z == 20}M204 P1600{endif}
{if layer_z == 25}M204 P2000{endif}
{if layer_z == 30}M204 P2400{endif}

JanKopanski
Автор

G91, then G1 E50 F360 yields consistent results. In fact, at 200c w/ Overture PLA (Red) I get up to G1 E200 F1580 before I get any inconsistencies in my extrusion, even then it's just one click and she's going again. Titan (clone), v6 (clone) hotend with aluminum block and 40w 24v heater. I'm moving on, as I can't see my extruder being the limiting factor.

Thank you for the great tutorial and the amazing website!!

therealmakmillion
Автор

As usual great video. But you know what I'd like to see is pick a 3d printing issue and work on that. It would help people so much. There's so many terms that new people might not know. Like
1.under extrusion this is what it looks like this is how to try and solve it.
2. Layer shifts is what it looks like this is what to look for
3. Ghosting and so on. The reason I ask this is because I watch so many videos and they will talk about said things but never what it looks like or where to look to fix.

toddcoello
Автор

It would be very interesting to see how this tuning could be adapted to Klipper. As Klipper runs on a Raspberry PI and sends only the final commands to the printer board, that should get rid of the pauses/process chugging. There's tests you can do on Klipper for Pressure Advance - but getting speed, acceleration and jerk tuned as well would be fantastic.

colintate
Автор

FINALLY a good video about junction deviation. I've been waiting for this.

Apophis-enpi
Автор

Another excellent video. BUT, as a newbie, I got nothing out of it. You might as well been speaking Chinese to me. You guys have to remember that a LOT of us are not programmers. Anyway, keep up the good work, I just wish you had "For Dummies" series.

tommyc
Автор

Just use Cura to manage the acceleration and jerk in the profile. I have an sidewinder x1 tuned in at 500/7 for print and 1000/8 for travels moves. Works flawlessly!

Lampecap
Автор

Almost done assembling a DIY i3 style printer and in preperation, I'm finally am getting around to properly calibrating my first printer which I've only had for almost 5 years. Can't wait to see what happens to my insane ringing since upgrading to a 32-bit mainboard and marlin 2.0. I'm looking at klipper but I'm so excited to finally be following along with a bunch of your calibration videos! Thanks for so much great content!

Archnemesis
Автор

You're fucking awesome. Thank you for teaching me so much so quickly. Been just upgrading along side your videos playing, making me really uplifted from a deep depression of not making anything for a decade.

fuck_chinanobrain
Автор

You are creating the most useful content for the 3D printer users on youtube! Thank you.

LincolnWorld