filmov
tv
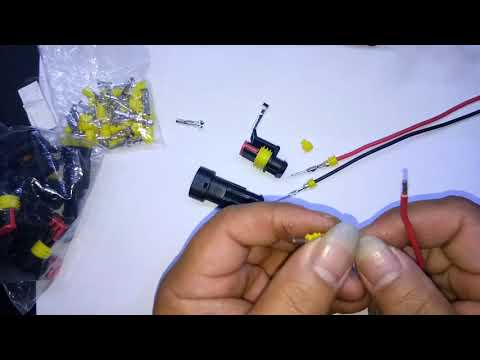
How To Crimp Weatherpack Connectors With Seal-All / Delphi Crimper

Показать описание
🚨🚨🚨 You asked and I delivered, here's a closer look at the process:
Plus, the manuals and pictures for doing this job:
👇👇👇 Connector and Tool links below: 👇👇👇
If you're looking for THE BEST connector for your application, whether it be automotive, motorsports, powersports, motorcycles, aircraft or marine. Look no further than Delphi Weatherpack connectors. The ones I'm using are of the Seal-All aviation brand, but they say "Delphi" right on the latch.
It's a simple job, but it does help to have some special tools to make sure it's done correctly. (Links below. 👇) But when you're done, you're left with a connector that will outlast any solderless or others on the market. In this case, spend the extra $$$ and KNOW it will hold up.
⏱ Timestamps: ⏱
00:19 Tool Overview
00:41 Connector Overview
01:54 Wire Prep
02:52 Silicone Seal Install
03:16 Terminal Install
03:32 Crimper Use
03:51 Crimp Seal
04:36 Soldering Terminals
05:01 Terminal Install into Connector Shells
06:06 Pin Removal/ Terminal Release Tool Use
👍👍👍 Thanks for watching! 👍👍👍
🛠 Featured Product Links ⚙️
Self Adjusting Wire Strippers:
(NOTE: I don't recommend the orange pair seen in the video. I do however recommend either pair offered from Klein Tools or Irwin with a slight edge to the Klein.)
Seal-All Brand Connectors:
Single-
Seal-All Terminal Kits:
Seal-All Crimper
Seal-All Pin Removal Tool
🎥 Stock Footage Attributions 📸
#weatherpack #leftseatlife #crimper #wiring #automechanic #experimentalaircraft #sonex #revmaster #diy #homebuilt #kitplane #lightsportaircraft #lightsport #aviation #generalaviation #lsa #wirestripper
🔔🔔 Subscribe today for more wrenching and adventures with small planes. Thank you!: 🔔🔔
🛩 Make your own flying videos, it's easy! 🎬
👉 This is the equipment and software I use:
⚖️ Legal Disclaimer ⚖️ - Some links found in the description box of my videos may be affiliate links, meaning I will make commission on sales you make through my link. This is at no extra cost to you to use my links/codes, it's just one more way to support me and my channel. Any commissions earned will be turned into AVGAS and adventure!
 0:05:25
🔎 Weather Pack Connector Assembly CLOSE UP 🔍 DIY Crimping Terminals How To
 0:07:43
Waterproof Connections a Step-By-Step Guide (make your own)
 0:06:56
How To Crimp Weatherpack Connectors With Seal-All / Delphi Crimper
 0:03:59
QuikGuide: How To Crimp and Assemble Weather Pack Connectors
 0:16:43
Weather-Pack Connector Basics | Wiring Wednesdays
 0:04:50
Weather pack (waterproof) Connectors Assembly without using special tools
 0:01:40
How to crimp the weather pack terminals & connectors
 0:08:32
Weather Pack Connectors, Assembly Instructions, Disassembly, Crimp Tool
 0:04:06
How Pros Use Crimp Connectors, how to use crimp connectors, the right way
 0:04:03
how to use Crimping tool for Weather Pack Terminal & Seal
 0:05:06
Professional Crimping of Weather Pack Terminals
 0:01:35
IWISS IWS 1424B WEATHER PACK METRI PACK CRIMPING TOOL
 0:13:39
How to Crimp Weather Pack Connectors
 0:08:16
Step-by-Step Guide: How to De-pin Connectors like a Pro
 0:13:26
Waterproof Wire Connectors
 0:06:10
how to crimp weather pack wire connectors
 0:00:44
Weather Pack Terminal Crimping and Connector Assembly Instructions
 0:05:25
How to Crimp a Weather Pack Connector, Tools List and Detailed Demo on Yamaha ATV Connector
 0:06:26
You Need This Tool - Episode 51 | Weather Pack Connectors And Tools
 0:00:43
QuickGuide: How To Crimp Open Barrel Terminals
 0:12:09
How to use Deutsch DT Connectors and Why I use them one everything!!!
 0:07:31
IWISS Crimping and Assembling a Packard Weather Pack Connector and Open Barrel Terminals
 0:01:26
JST Connector Crimping
 0:39:26
Cost-Effective Crimping | Affordable Connectors AND Tools [GOLD WEBINAR]
Комментарии