filmov
tv
Install Hyper V on Windows 11

Показать описание
Learn how to quickly and easily install Hyper-V on Windows 11 in this step-by-step tutorial. Hyper-V is Microsoft's powerful virtualization platform that lets you create and run virtual machines directly on your PC. In this video, we'll guide you through activating Hyper-V through Windows Features and PowerShell, and verifying your installation. Perfect for beginners and advanced users alike, follow along to get started with virtualization today!
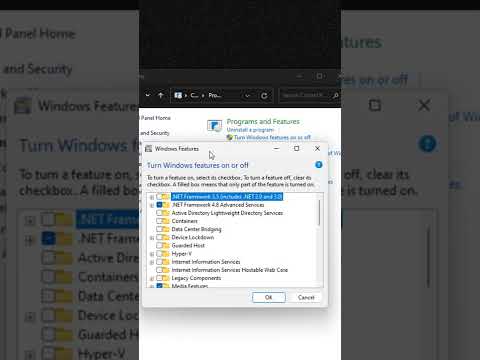
Step 1: Enable Hyper-V via Windows Features
Click on Start, type Turn Windows features on or off, and open it.
Scroll down and find Hyper-V.
Check the box next to Hyper-V (expand and ensure both "Hyper-V Management Tools" and "Hyper-V Platform" are selected).
Click OK, and Windows will install necessary components.
Restart your PC when prompted.
Alternative using PowerShell (Admin):
Open PowerShell as administrator.
Run the following command:
Enable-WindowsOptionalFeature -Online -FeatureName Microsoft-Hyper-V -All
Restart your PC when prompted.
Step 2: Verify Installation
After reboot, click Start, type Hyper-V Manager, and open it.
If Hyper-V Manager opens, installation was successful.
Hyper-V is now installed and ready to create and manage virtual machines.
 0:01:46
Installing Hyper V on Windows 10 Home
 0:11:20
Windows Hyper-V Virtual Machine Tutorial
 0:00:35
How To Enable Hyper-V in Windows 11 (Desktop & Laptop)
 0:04:21
How to Install and Enable Hyper V in Windows 11 Home | Hyper-V Missing
 0:10:23
How to Create Free Virtual Machine on Hyper-V with Free Windows 10?
 0:07:46
How To Install Windows 11 on Hyper-V Virtual Machine [FULL GUIDE - 2023]
 0:21:43
How to Setup Hyper V on Windows
 0:05:28
How to Enable and Install Hyper-V in Windows 11 Home [v24H2]
 0:03:39
How to Install Hyper-V on Windows Server 2012 R2
 0:11:08
How to setup/install Hyper V in Windows 11?
 0:08:16
Installing Windows 10 using Hyper-V!
 0:17:44
How to install Hyper V on Windows 10 Pro
 0:09:39
TUTORIAL: Install Hyper-V and a Virtual Machine on Windows 11
 0:03:32
How to Enable and Install HYPER-V in Windows 11 HOME 24H2 - Easy
 0:02:09
How to install Hyper V in Windows 10
 0:05:15
How to install Hyper-V on Windows 10 Pro - Easy Steps (HD)
 0:03:22
(Easiest Way) Enable Hyper-V in Windows 10/11 Home or Pro Edition - 2023
 0:13:07
Install and Configure Hyper-V on Windows Server 2025
 0:02:23
How to Install Microsoft Hyper-V in Windows Server 2022
 0:07:23
Microsoft Hyper-V Server: How to install and config
 0:10:06
Install macOS on Hyper-V on Windows PC
 0:09:16
Installing Windows Server 2022 as a Virtual Machine in Hyper-V
 0:00:31
How to Enable Virtualization on Windows 11
 0:01:24
How to Install Hyper-V on Windows 10 | Enable Hyper-V manager
Комментарии