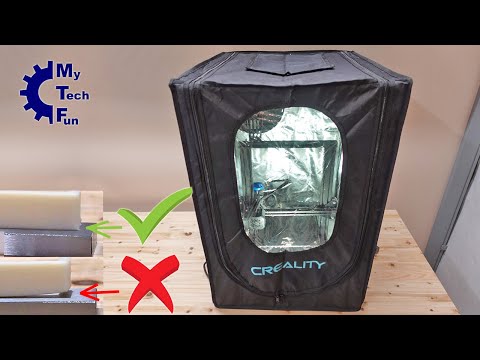
Review of 3D Printer Enclosure made by Creality for Ender 3 size 3D printers

preview_player
Показать описание
This is a test of Creality Small 3D Printer Enclosure designed for Ender 3 size printers. This equipment is necessary if we want to print ABS, ASA to prevent wrapping of the object. In this review I am measuring temperatures of the air inside, stepper motor temperatures, measuring the noise, testing is it really flame retardant. Test prints are from ASA and ABS. ASA object was printed perfectly. ABS had some minimal wrapping, but room temperature was only 15°C, inside 35°C.

Product page on Creality website:

Mentioned video, where I used those specimens: 3D printed object inside a car temperature test

Contents:
0:00 About enclosures
2:16 Unboxing
2:37 Assembling
5:03 Inserting 3D printer
6:32 Measuring temperatures
8:38 3D printing ASA
12:44 Another ASA printing
13:37 ABS 3D printing
15:16 Noise test
15:35 Flame test
15:59 Final words

Support my work over Patreon:
or over PayPal:
Рекомендации по теме
Комментарии
Автор

Tip, use a cheap baby monitor inside that connects to your wifi. I just watch everything from my phone anytime anywhere as long as you have internet signal.

dknight
Автор

I've been using a cheap photo studio tent for my Alfawise U20 for a year now. I put the power supply in there too for maximum heating of the tent. I've been using this setup for a year now and I've been printing ABS and ASA with absolutely no issues with 100°C bed and 250°C nozzle. It cost me around 10 to 20 bucks, one of the best purchase of my life.

TheThunderwars
Автор

A very good review. Thank you so much for devoting the time and effort of making this video. I ordered enclosure based on your review.

pupdaddymail
Автор

Nice, this video convinced me to get this instead of making my own 2020 extrusion enclosure. You could flip the whole unit to see the first layer better by having the window at the bottom, but you'd let all the heat out as you open it.

ZoneKei
Автор

Nice review.
It is a great addition. I've had the large version of this for a few months for my CR10S Pro. Like you mentioned - It instantly solved all of my ABS/ASA/Nylon printing issues for larger prints. I could not get these to stick to the bed (tried glass, glue, PEI etc etc) and now they almost stick too well even on glass. Warping is also gone even for PLA. Best upgrade to my printer setup I've done.

As for inside temps - the power supply (Meanwell) fan runs all the time now. My PSU is rated at 50C at full power (500W) and 70C at 50% power so this should all be fine. The other electonics (main board and display) should be ok at 50-60C. I have used this setup with a max ambient temp of 30C so far (inside got to 40C) but summer is coming here in Australia. 40C ambient is imminent and I'll be interested to see hot the inside gets - I may have to open thay ventilation flap at the top. The larger enclosure has the cable entry point at the rear which is more sensible I think. My RaspPi sits outside with the USB cable just going inside. It has no heatsink and would overheat inside I would imagine.

Handy tip for lighting: I use a mains powered 10W LED floodlight (from the hardware store) facing straight up and the rear of the enclosure and use a Pi connected Web Camera at the front. The shiny internal walls reflect well and my remote camera video image is awesome with no shadows. No need for fancy strip lighting and such.

marcop
Автор

Very well done review, I see their are some mods that need be done when I make my own. Thank you for donating your Precious time in making the video.

scottallen
Автор

Great video mate 👍 I got one of these a couple of weeks ago and am loving it. It helps cut down some of the high pitch noise, and I deadened mine further by sticking some 10mm heat proof car sound proofing foam inside (the foil covered type). My ambient temp is around 23 degrees and measuring the temperature near the top of the enclosure I get up to 40 degrees (nased on a bed temp of around 70 degrees). One thing to be careful of is any PLA parts you've customised the printer with can warp in the heat (I need to re-print my Raspberry PI case in ASA now so it doesn't melt). BTW Octoprint with a Raspberry PI and a PI Camera is a good solution for being able to see inside, you will may need to add some internal lighting to get the light levels up for the camera. Definitely well worth the purchase IMHO - well made and really easy to setup.

EricTViking
Автор

I've been using the same enclosure for some time now and still can't understand why there is a flap on the right side but not the left - this makes accessing the extruder for filament changing a real pain! A small hole on the left would also allow filament to be fed in from an external filament dryer. Anyway thankyou for all your work on these videos.

JJHamster
Автор

I got the larger version for printing Nylon and Polycarbonate with an ender 3v2. Running a all metal hotend at 280c and a bed of 100c. Ambient air around the enclosure is 22c 50% humidity. Inside the chamber I got it to settle in at a toasty 40c and 10% humidity with just the printer and an hour of preheat. So far prints with nylon have been pretty good. Ideally I would want to get it even higher than that. I am working on relocating my MOBO, PSU, and LCD outside of the chamber with a custom wiring harness and adding another controlled heat source. Hopefully I don't kill any steppers but I think they will be okay below 70-80c.

dot_boi
Автор

Greetings from Brazil!

I moved my screen outside, the cable was just the right size.I printed a stand for it.
I also moved my Raspberry Pi outside. And I would recommend moving the spool holder to the middle of the rail, it seems it will avoid the spool from rubbing into the enclosure.

Still haven´t tested it with ABS/ASA, will do it in this weekend.

Fun fact: I bought my enclosure about the same time as you made this video, but I left it stored for over a year LOL. I only assembled it now that I am putting my 'definitive" 3D printing space together, as fot the last year I was using my guests room for that. :D

ubiratamuniz
Автор

Hello, by the way, it should be said that in some printers overheating of the electronics causes the motors to lose steps

syty
Автор

I am SO glad you mentioned the smell! This happens to me all the time. Because it is closed, the smell gets concentrated, so the smell hits like a truck when you first open the enclosure.

spongebobbatteries
Автор

This is a very helpful video because I'm not experienced with 3D printing but currently thinking about buying/using the Ender-3 S1 Pro with ABS and ASA.
Thank you very much.

g
Автор

I use the same enclosure for my Ender 3S1 Pro. It barely fit inside with the controller removed and placed to the side. My PLA sticks to the bed like a champ now and no more warping. I use a small wi-fi camera inside to check on progress. I do plan to modify and make a bracket for the bottom of the printer to vent the electronics with air from outside instead of the hot air inside the enclosure.

TheRCmecanic
Автор

I got this and it worked fine although not needed for PETG and PLA but I noticed after another upgrade I eventually got jamming or filament breaking at the extruder on longer prints. I realised later the extruder stepper motor was getting hot and my upgrade to Creality's Aluminium extruder was absorbing the heat and causing filament to soften and deform then get stuck or break on Just something to note, was a big headache to find.

dprintingchannels
Автор

Thank you for the review, much appreciated. This information is very helpful and you butterfly knife skills where a nice bonus keep up the good work.

longslowdrivechannel
Автор

I've been thinking about a tent for my Ender 5, but was trying to justify the cost. Looks like it may be worth it.
I like the idea of a camera inside to monitor first layer as it could zoom to get a better view than naked eye, but could also print a small mount and hold the door just partly open during the first layer print. As heat rises not too much would be lost if it was only opened a little bit to monitor :).
Thank you so much for this video

EsotericArctos
Автор

seems kinda pricey for a cute little printer tent! Cant argue with those results thought! Airflow is the biggest thing you need to minimise! I use both my printers in Ikea Lacks that are against the corners of a room, I have one side blocked with a removable panel made from chipboard I got in the ikea Spares section, and the front I only cover with some fabric or something when I'm printing warp-happy filaments! works great!

ale
Автор

The temperature probe is not on the actual stepper motor at 8:35, thats why it just reads the air temperature. Stepper motors get around 70-80 degrees celcius when operational!

WWalleYY
Автор

You should state in the video title that it's an Ender 3 *V2*. I was searching specifically for this, to see how well it fits inside, so thank you!

lucasbeyer