filmov
tv
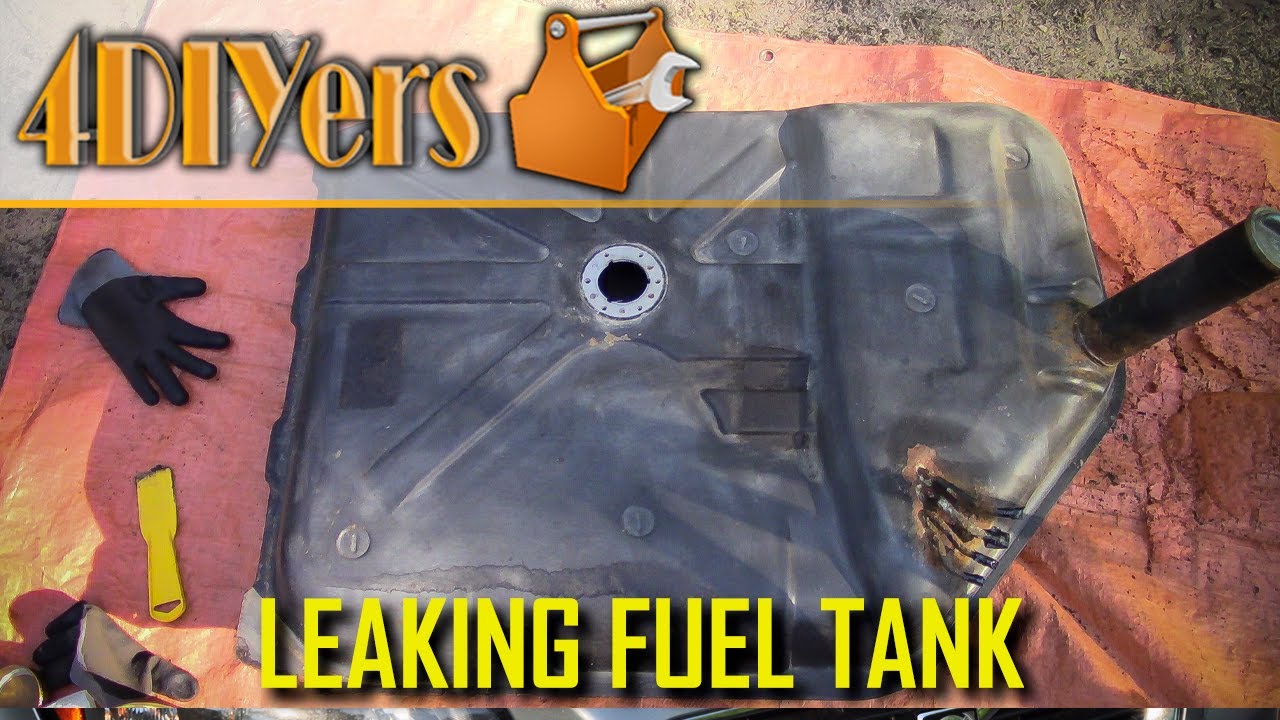
How to Repair a Leaking Metal Fuel Tank Without Welding
Показать описание
How to repair a leaking metal fuel tank without welding. I haven’t tried this method on a plastic fuel tank, but this procedure can possible be used on that as well. Unfortunately on my 1984 BMW 733i I am experiencing a fuel tank when the tank is full. At first I expected this to be a faulty rubber line, but unfortunately that wasn’t the case after it was removed. #oemtools #bmw #rustrepair
Amazon links for various products used in the video for both USA and Canada:
USA
Canada
Tools/Supplies Needed:
-tank sealant (PR-1422 CLASS B FUEL TANK SEALANT SEMKIT - B2)
-grinder
-primer (etching and filler)
-sandpaper
-sandblaster
-rust converter
-paint
-degreaser
-polyurethane film
-foam vibration pads
Procedure:
Remove the tank from the vehicle, removal procedures will vary. Using a gas can, I put a rag over the filler hole to strain any dirt out the fuel. If you are refinishing the whole tank, remove any coating, fuel pump, and any other items.
An old trick is running exhaust fumes through the tank, I let the fumes run for about an hour. The longer it airs out, the better. In addition to this, the tank can also be washed out with soap and water. Or it can also be filled with argon which is used for mig welding when cleaning up those rusty areas. Using a heat gun and a plastic scraper, remove the wax coating. Then use a degreaser to clean the surface.
The most efficient was to remove rust in these hard to reach areas is using a media blaster. If you don’t have access to sanding blasting equipment, you can use a surface sander too with 80 grit sanding discs. While I can strip the whole tank to bare steel, it really isn’t need. Others areas which has rust will be address and repaired accordingly.
Sand those areas where the rust was with 220 grit sandpaper. Use a wax and grease remover to clean up the tank again, removing any dust or contaminants on the surface. Apply etch primer to the bare metal, 2-3 coats are needed. If rust is left on some areas, a rust converter can be used to remove or neutralize the rust. Follow the products instructions for the application process.
Here I have an aircraft grade fuel tank sealant. This is a two part product, the activator is in the long tube. Mix the activator as per the products requirements.
Apply the sealant to the leaking areas, smoothen it out using a stick or by hand. Work times will vary depending on the protect along with it's cure time. Make sure you’re far enough past the leaking areas to provide a strong bond and this will provide and excellent seal.
Once hardened, I used 220 grit to sand out the sealant, again I’m not trying to make this repair completely hidden but I also want it to look responsibly clean. The rest of the tank will be sanded with 400 grit sandpaper to provide a bond for the new paint. For irregular shapes, a 400 grit scuffing pad can be used.
Clean the tank and wipe it down with a degreaser.
Apply a filler primer over the etch primer, 2 to 3 coats are needed. Once the primer has dried, sand the tank down using 400 grit sandpaper and abrasive pads.
Clean the tank again using a degreaser before paint is applied. Paint choices can vary, I am using a farm equipment implement paint which is extremely durable. Tape off any areas as needed, then apply the paint.
After the paint has dried, the vibration and squeak coatings will need to be replaced.
Thank you to all those who watch my videos and support my content. Don't forget to subscribe to my channel for future tutorial videos and like my video if you found it helpful. New videos are always being uploaded every week!
© 4DIYers 2013
All Rights Reserved
No part of this video or any of its contents may be reproduced, copied, modified or adapted, without the prior written consent of the author.
 0:08:36
How To Fix a Leaking Stopcock Quickly and Easily | Plumbing DIY
 0:03:42
How to fix dripping leaking mixer tap
 0:01:04
How To Fix a Leaking Toilet
 0:03:26
How to repair a leaking above ground pool
 0:03:08
Absolute Solution to Leaky Faucet! Your Faucet Will Never Leak Again
 0:10:31
The ULTIMATE Leaky Copper Pipe Fix Guide | GOT2LEARN
 0:03:30
How to repair a leaking outside tap
 0:09:54
FIX LEAKING COPPER PIPE - PINHOLES - Plumbing Tips
 0:01:01
HP 2000 15 Months old, Freon Leak. Called no warranty. Thermo king will not touch 😬 where 2 fix??...
 0:02:55
How To Fix A Dripping or Leaky Double Handle Faucet
 0:10:44
How to fix a leaking dripping outdoor tap
 0:02:21
How to Repair Cracked or Leaking Pipes Without Cutting or Threading
 0:08:02
How To Fix A Leaking Outdoor Faucet | Easy DIY Fix!
 0:05:25
EASY FIX! Kitchen Faucet Leaking? How to fix a leaky kitchen faucet in 1 minute
 0:05:25
Aquaponics leaking pipe fix - Fixing a leak using epoxy (JB Water Weld)
 0:04:00
How To Repair A Leaking Windshield (Andy’s Garage: Episode - 84)
 0:01:55
How to Repair Leaking Gutters | The Home Depot
 0:02:01
How to fix a leaking gutter joint - OSMA Rainwater
 0:06:57
3 ways to fix leaking roof and gutters - DIY
 0:03:36
Few Know this EASY TRICK to STOP Leaking Valves INSTANTLY
 0:00:26
How to Repair Leaking Metal Pipe
 0:03:40
How to Fix a Leaky Toilet | How to Stop a Running Toilet Tank | The Home Depot
 0:07:15
FIX LEAKING COMPRESSION PIPE FITTING - pipe leak?
 0:06:46
How to Fix a Leaking Tap | DIY with Curran Plumbing & Jason Hodges
Комментарии