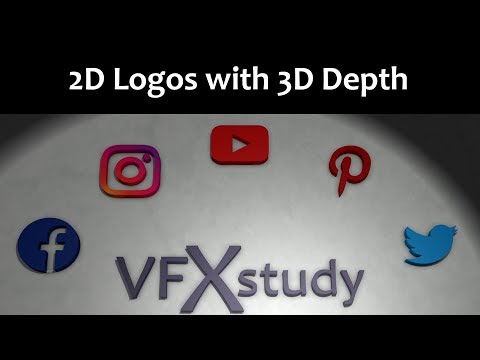
Add 3D Depth to 2D Logos and Images with Resolve & Fusion

preview_player
Показать описание
Use stacked image layers to create a 3D effect from a 2D logo or image in DaVinci Resolve / Fusion. Polish the scene with 2D post-processing effects like ambient occlusion and depth blur.

Download the Fusion template:

twitter: @VFX_study

New Resolve & Fusion tutorials every Sunday morning, 11 am GMT.
Рекомендации по теме
Комментарии
Автор

You make very in depth tutorials! I think you should have way more views than you have currently! Anyone willing to learn 3D in DaVinci should watch your videos. Even though they are long, they are all worth it! Thanks for sharing your knowledge and keep up the good work!

TechVideoStack
Автор

Thanks for sharing your time and expertise!

ecofriend
Автор

Thanks for making this! Helped me out a lot!

stayanddrown
Автор

Fantastic video, thank you so much. Very easy to follow. Can't wait to use some of these nodes that I didn't even know existed!!

JasonandaCamera
Автор

Very nice! I'm surprised DR does not do this out of the box with solid Z sides of user selected color(s) or simply inferring color from 2D side. I keep looking for some other approach, perhaps something using recent changes to DR... but every tutorial I encounter either copies your video or takes an approach that seems quite involved, not the auto-magic approach that Text 3D provides (but for images). By the way, videos I've seen which copy your approach have all been created recently after your video so congrats on leading the way... and for being good enough that others creators copy you! 👍

enthusiast
Автор

Thanks for the tutorial! It helped me figure out why I couldn't connect 3D nodes to 2D ones.. I was missing the renderer3d node xd

Andriuha
Автор

Really interesting tutorial, thanks for sharing!

dereklindo
Автор

This is all native from just an image, if you need more Depth control consider the font hack that lets you "type" your "image" as text and allows easier usage of stuff like bender 3D(3Bn). WSL or bmd forum should have posts on it?
Roughly: convert image to svg to a font, font added to system. Use text-3D(3Txt) node with font set to the custom font.


Considerations:
search "convert image to font" to learn the process,
use something like calligraphr service for alot of characters.
May need to convert to SVG no matter what, optionally go black&white, remember transparency, and a large font set can be very slow.

For stuff like social media icons there are several *opensource* projects that have them as brand icon fonts (fontawesome, fontello on github). Though you may have trouble finding the character code, unicode value, or ligature, however most services may generate a zip with a demo html file to literally copy and paste between programs.

TheNewton
Автор

Great usage of stacking planes in 3D, same technique can be used for doing long shadows,
I'll have to remember to also try abusing camera projection to fake pseudo extrusion with stacks.
This would be so much easier if the weld tool was able to bridge the gaps but alas.

TheNewton
Автор

Hi Bernd, Please do a tutorial on the AmbientOcclusion and the DepthBlur nodes. Thanks,

AryMir
Автор

Thanks for the tutorial!
I tried it in a different way for a project (5 png on top of each other with some space in the Z axis, with a light to cast shadow, and trying to simulate a "multi-layer 3d logo"), but the shadows are so jaggy. I'm sure I'm missing an option to activate.

TransformX
Автор

Ok sold. LIke and SUbs . Thx for the knowledge

rrcreative
Автор

Hi Bernd, Great stuff, thanks. More guidance on Ambient Occlusion would be great but I'm also hoping you'd find time to do something on Materials/Textures and how they work with Bumpmap and CookTolerance/Phong etc. I always seem to struggle with resolution and sizing! Thanks!

g-d-v-p
Автор

Came here wishing there was something like a "solidify modifier" :(
That said. For a simple scene like this, even if you never used Blender before, it will probably be a lot easier to get a great result. (Resolve will be easier to get an ok result like this, but I can't imagine how much work it'd take to get close to the default Principled BSDF of Blender + some free HDRi).

..
Автор

What does the 3d extrude tool do? This seems like such a convoluted way to do something so simple and the more duplicates you do the worse the render. This isn't even a work around thing in After Effects. This shouldn't be so difficult.

artgarfunkelsgingerfro
Автор

Hallo Bernd! Klasse Video! Mir hat noch gefehlt, wie du die Animation...also das herauswachsen der Logos aus dem Boden animiert hast. Kannst du das noch erklären?

JohnFranklin
Автор

so, ive done same as you say on your video.. but i have a Big Question ofr you pal.... After all that.. Were or How im Supposed to do to render this image in to Chroma Key Rotating Image? Because when i tried to rotate, the image, It does.. nor Not all the Images but just the ones created whit Z Offeset... hope you Respond... because you just show us how to make all that.. but not to render the 3d image... or make it to rotate

ocult
Автор

Hey Bernd, great tutorial! thank you for sharing! would love something on the differences of nuke and fusion, and how to find the appropriate similar tools in fusion. As i'm learning a node based compositiing, I keep trying to do something and can't find the tool in fusion.
Thanks you again for sharing your info

BUONCO
Автор

Thank you for this video! I have an issue that I can't, for the image I have, have just the image and not also the black background that the 2D image is on. Is there a way to strip out just my image from the black background? Hope that makes sense...

byz
Автор

I cannot move around the object with my mouse in the preview like you do. When I move my mouse it moves the object and not the view. How can I do it like you do please ? thks !

simoncortes