filmov
tv
How to Enable or Disable System Icons on Taskbar in Windows 7 and Windows 8
Показать описание
How to Enable or Disable System Icons on Taskbar in Windows 7 and Windows 8
How to Enable or Disable System Icons on Taskbar in Windows 7 and Windows 8
Through Local Group Policy Editor
1. Open the all users, specific users or groups, or all users except administrators Local Group Policy Editor for how you want this policy applied.
2. In the left pane, click/tap on an expand User Configuration, Administrative Templates, and Start Menu and Taskbar.
3. For the Clock Icon - In the right pane, double click/tap on Remove Clock from the system notification area to edit it.
A) To Disable the Clock Icon - Select (dot) Enabled and click/tap on OK.
B) To Enable the Clock Icon - Select (dot) Disabled or Not Configured and click/tap on OK.
4. For the Volume Icon - In the right pane, double click/tap on Remove the volume control icon to edit it.
A) To Disable the Volume Icon - Select (dot) Enabled and click/tap on OK.
B) To Enable the Volume Icon - Select (dot) Disabled or Not Configured and click/tap on OK.
5. For the Network Icon - In the right pane, double click/tap on Remove the networking icon to edit it.
NOTE: To make sure that this icon works properly you should also have the Network Connections, Network List Service, Network Location Awareness, and Network Store Interface Service Services set to Started and Automatic.
A) To Disable the Network Icon - Select (dot) Enabled and click/tap on OK.
B) To Enable the Netwok Icon - Select (dot) Disabled or Not Configured and click/tap on OK.
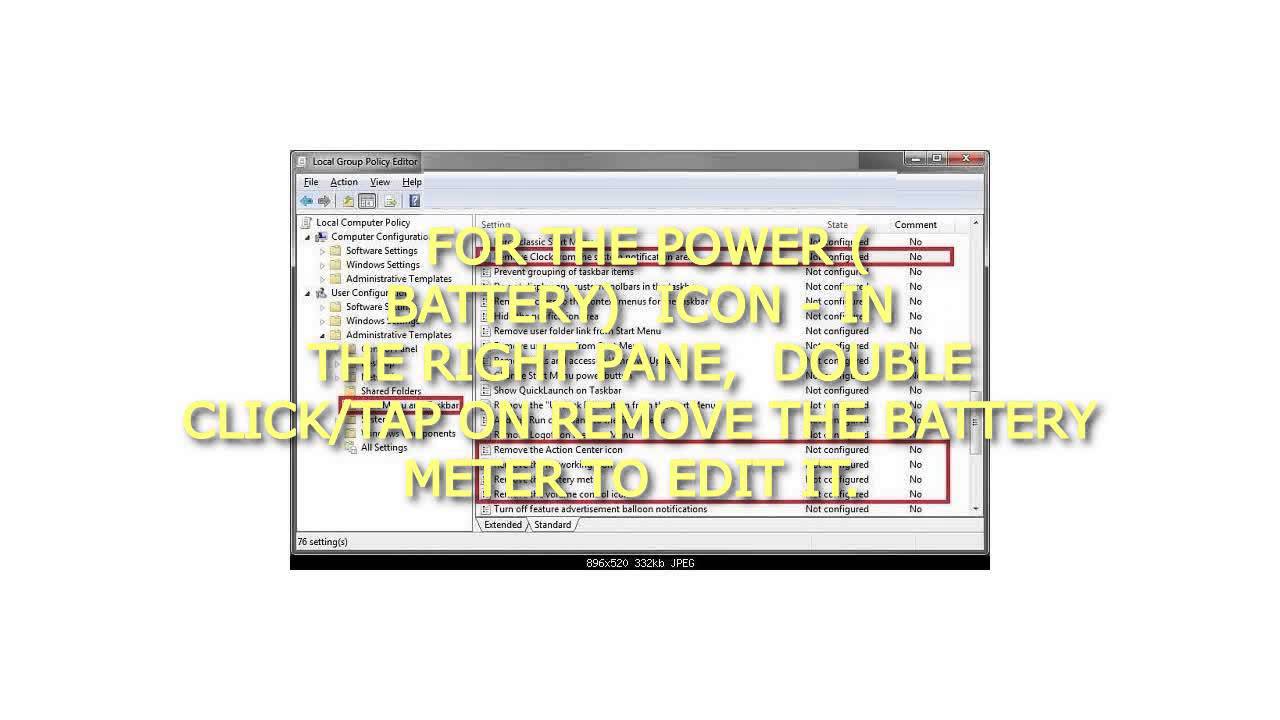
6. For the Power (battery) Icon - In the right pane, double click/tap on Remove the battery meter to edit it.
NOTE: This will remain grayed out, even when enabled, unless your computer is a laptop or has a UPS battery backup connected to it.
A) To Disable the Power Icon - Select (dot) Enabled and click/tap on OK.
B) To Enable the Power Icon - Select (dot) Disabled or Not Configured and click/tap on OK.
7. For the Action Center Icon - In the right pane, double click/tap on Remove the Action Center icon to edit it.
A) To Disable the Action Center Icon - Select (dot) Enabled and click/tap on OK.
B) To Enable the Action Center Icon - Select (dot) Disabled or Not Configured and click/tap on OK.
8. When done, close the Local Group Policy Editor.
9. Log off and log on, or restart the computer to fully apply.
How to Enable or Disable System Icons on Taskbar in Windows 7 and Windows 8
How to Enable or Disable System Icons on Taskbar in Windows 7 and Windows 8
Through Local Group Policy Editor
1. Open the all users, specific users or groups, or all users except administrators Local Group Policy Editor for how you want this policy applied.
2. In the left pane, click/tap on an expand User Configuration, Administrative Templates, and Start Menu and Taskbar.
3. For the Clock Icon - In the right pane, double click/tap on Remove Clock from the system notification area to edit it.
A) To Disable the Clock Icon - Select (dot) Enabled and click/tap on OK.
B) To Enable the Clock Icon - Select (dot) Disabled or Not Configured and click/tap on OK.
4. For the Volume Icon - In the right pane, double click/tap on Remove the volume control icon to edit it.
A) To Disable the Volume Icon - Select (dot) Enabled and click/tap on OK.
B) To Enable the Volume Icon - Select (dot) Disabled or Not Configured and click/tap on OK.
5. For the Network Icon - In the right pane, double click/tap on Remove the networking icon to edit it.
NOTE: To make sure that this icon works properly you should also have the Network Connections, Network List Service, Network Location Awareness, and Network Store Interface Service Services set to Started and Automatic.
A) To Disable the Network Icon - Select (dot) Enabled and click/tap on OK.
B) To Enable the Netwok Icon - Select (dot) Disabled or Not Configured and click/tap on OK.
6. For the Power (battery) Icon - In the right pane, double click/tap on Remove the battery meter to edit it.
NOTE: This will remain grayed out, even when enabled, unless your computer is a laptop or has a UPS battery backup connected to it.
A) To Disable the Power Icon - Select (dot) Enabled and click/tap on OK.
B) To Enable the Power Icon - Select (dot) Disabled or Not Configured and click/tap on OK.
7. For the Action Center Icon - In the right pane, double click/tap on Remove the Action Center icon to edit it.
A) To Disable the Action Center Icon - Select (dot) Enabled and click/tap on OK.
B) To Enable the Action Center Icon - Select (dot) Disabled or Not Configured and click/tap on OK.
8. When done, close the Local Group Policy Editor.
9. Log off and log on, or restart the computer to fully apply.
How to Enable or Disable System Icons on Taskbar in Windows 7 and Windows 8
 0:01:34
 0:01:17
 0:00:21
 0:00:24
 0:00:42
 0:01:31
 0:01:14
 0:00:18
 0:01:53
 0:00:27
 0:04:20
 0:02:07
 0:01:36
 0:00:54
 0:01:37
 0:02:19
 0:06:08
 0:02:31
 0:01:22
 0:00:43
 0:00:39
 0:00:55
 0:03:27
 0:00:29