filmov
tv
How to create a Grouped Bar chart using a dimension in Tableau
Показать описание
In this silent video, you'll learn how to create grouped bar charts, also known as side-by-side bar charts, specifically using a dimension.
- - - - - - - - - - - - - -
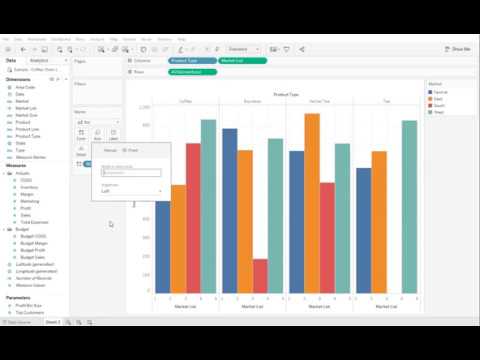
1. Create a calculated field similar to:
CASE [Market]
WHEN "Central" THEN 1
WHEN "East" THEN 2
WHEN "South" THEN 3
WHEN "West" THEN 4
ELSE 4.5
END
2. Drag "Product Type" to the Columns.
3. Right-click "Market List" and select Convert to Dimension.
4. Right-click "Market List" and select Convert to Continuous.
5. Drag "Product type" and "Market List" to Columns.
6. Drag "Inventory" to the Rows.
7. On the Marks card, on the drop-down list of view types, select Bar.
8. Drag "Market" to Color.
9. Click the Size mark card.
10. Select Fixed so that Tableau Desktop automatically adjusts the size to minimum and the maximum default data.
Related solutions:
- - - - - - - - - - - - - -
- - - - - - - - - - - - - -
1. Create a calculated field similar to:
CASE [Market]
WHEN "Central" THEN 1
WHEN "East" THEN 2
WHEN "South" THEN 3
WHEN "West" THEN 4
ELSE 4.5
END
2. Drag "Product Type" to the Columns.
3. Right-click "Market List" and select Convert to Dimension.
4. Right-click "Market List" and select Convert to Continuous.
5. Drag "Product type" and "Market List" to Columns.
6. Drag "Inventory" to the Rows.
7. On the Marks card, on the drop-down list of view types, select Bar.
8. Drag "Market" to Color.
9. Click the Size mark card.
10. Select Fixed so that Tableau Desktop automatically adjusts the size to minimum and the maximum default data.
Related solutions:
- - - - - - - - - - - - - -
 0:12:43
 0:02:35
 0:01:09
 0:01:30
 0:03:59
 0:01:57
 0:07:55
 0:01:27
 0:01:49
 0:02:41
 0:01:50
 0:03:16
 0:02:05
 0:02:50
 0:08:13
 0:09:59
 0:01:45
 0:01:57
 0:01:36
 0:02:33
 0:10:12
 0:05:09
 0:04:25