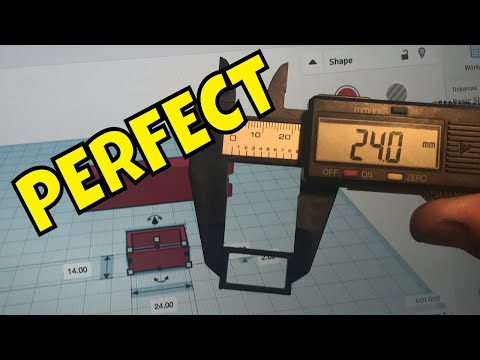
How to 3D Print Dimensionally Accurate Parts

preview_player
Показать описание
I ran into a problem this week with a 3D-printed part that came out slightly too small and didn't fit. This is a common problem with 3D printers. Today we'll take a look at the problem, talk about what causes it and show how to solve it.

Tools and supplies used in this video:
*This site contains affiliate links for which I may be compensated

Рекомендации по теме
Комментарии
Автор

cool video! One small trick, not sure if it is already mentioned here: measure the pin size with calipers, now *zero the caliper*, then measure the outside distance between pins - it'll give you the exact distance between pins.

arsengadzhikurbanov
Автор

Good reminder that it's all fun and games when printing big-busted winged figurines - until you need to print something practical.

JohnJones-oymd
Автор

For precise features, we usually CAD those features in a very thin, quick, proto print to get them accurate. Then the full size part. This saves lots of iterative printing time and waste material. Also for threads, snap fits, flex fits, and anything that fits something from "the real world" or even another printer.

solosailor
Автор

Just so you guys know if you are using PLA and your parts are slightly to big (or your holes are slightly too small) your issue may be solved by increasing your horizontal expansion offset. Basically the PLA is expanding just a little bit due to the heat of melting it, so your parts will be just a little to big. The horizontal expansion offset can help fix this. You will need to do multiple tests seeing what value works best for you.

Kznk
Автор

The way you troubleshot this and your thought process driving your actions were outstanding. Well done

ja-nofx
Автор

It would be great if you could do a similar video, showing the full process of calibrating the printer for accurate dimensions and setup of Simplify 3D. Your way of explaining things is really good.

kpyhere
Автор

Great video. Just pulled my old Tarantulas printer out printed an insulated spacer had almost exact errors you had. Your video confirmed my method I was about to do this morning. I am electronic designer by trade, worked with lots good machinist over the years each taught me real world solutions just like this video series. Big thank you.

tomgburklin
Автор

Holy cow. I'm very new to 3d printing, only actually printing about a dozen things. They were always too small, and since all of this is new to me, and there is a plethera of new terminology, I've been scouring the interwebs trying to figure out why. I thought my printer was either broke, or there was some calibration sequence I needed to do. I had basically given up, frustrated that I had to manually model everything larger to compensate, since I had no idea what was wrong.

And then youtube dropped this in my lap. Thanks so much for taking the time to make this. No overly complicated terminology and a very simple solution. You saved my sanity!

I hope your tester came out well!

dougsholly
Автор

Love the “to my calibrated eye” ! I use that all the time. Nice clear and thorough explication of the shrinkage problem and how to fix it. I just bought a FDM printer and learning how to use it and that is an issue I have run up against. Thanks for the great video!

toddbuhmiller
Автор

You can change to a Z up orientation in Fusion 360 by clicking on your name in the upper right and selecting "preferences". In the general tab look for "default modeling orientation" and change it from "Y up" to "Z up"

chrisj
Автор

Great engineering level video thank you. “I’m using black because BLACK” 🤣

goesbysteve
Автор

I work in a 3d printing lab and we have had this same problem. I haven't thought of this solution so thank you this will save a lot of time and money.

hassanalthuwaini
Автор

What a tremendously presented study of shrinkage and the solutions thereof.

GeorgeIvanPare
Автор

in the beginning i thought, that you didn't calibrate your axis correct, but your solution and description are GREAT...
a new aspect to improve my parts. thx ;) hope that the software desire not too much manual changes in settings when changing filament OR temp!

automatic part-enlargement should be mandatory for filament-settings ... NOT after importing, but BEFORE PRINTING!

wolfganggosejacob
Автор

Thank you for sharing your experience with us and I really enjoyed the video presentation. It showed me how one should go about dealing with shrinkage.


Things that I noticed and hope you will continue to do include:

You don't assume too much of the experience or knowledge of your audience which I think is great.


You disclosed brand names of what you used (filament, 3D program, 3D slicer, spreadsheet, etc.) which I liked. It gives me ideas on how I can use them more effectively or in my environment. Your spreadsheet usage was particular interesting to me.


You scripting of your video was well done in that you presented what you wanted to do, demonstrated the problem (with lots of visual close up shots) on what happened, how you identified the problem, the possible solutions and the final solution that you settled on.
I thought that a visual inspection of the 3D object would have suggested that the problem was not in the hardware (i.e. 3D printer) but somewhere else since the printed object looked pretty good. But I do commend you for doing your 'due diligence' to make sure that you didn't miss anything as part of your problem analyze segment. As a side note, I thought that if I were looking for the actual shrinkage value due to the equipment & material, I would print the largest diameter rectangle that my printer to produce and measure the resultant print. The deviation between designed & actual dimension would be the most accurate.


But back to the video.
The pacing was sometimes fast, especially when not familiar with the application or situation but I was able to follow it. The video presentation was professionally done, with great video framing & sound reproduction. Thank you especially for taking the time to do a great presentation.

Finally, I do want you to know that I appreciate the time & effort that you put in producing the video and encourage you to continue to do so.


Take care and stay safe,


Pat Young

pyoung
Автор

Nice example. Thanks for taking the time to show that. Using Siemens NX, I like to add manufacturing specific features like this at the end of the model history, and place these features in a named feature group. That way I model the part as it should be, and then have a group of features for 3D printing (or other manufacturing process) that can be suppressed or unsuppressed as a group. For example, I might enlarge holes slightly based on inaccuracy of the 3D print. Scaling the final part for shrinkage would be a feature in the feature group.

MarkLawry
Автор

I just wish all Youtube videos were as clear and concise as this. Great Job....!

TheTacktishion
Автор

To get the maximum precision, you should print a test piece at the largest size possible, that way, the shrinkage will be amplified making it easier to measure.

tiagotiagot
Автор

One of the best videos on this problem I’ve seen. Thanks man!

JGDeRuvo
Автор

Very interesting. I suppose the shrinkage changes based on the thickness and shape . . . . . if it were directly proportional, no matter what, printing a set of 12" "rulers with very fine scale marked, then compare to actual ruler and maybe that would tell you whether the shrinkage happens across the scale, or jsut in certain parts?. Love your videos, and the Fusion 360 has been far more useful than what pertain to be F360 tutorials. You make it far clearer than those other guys! Thanks!

zzmike
visit shbcf.ru