filmov
tv
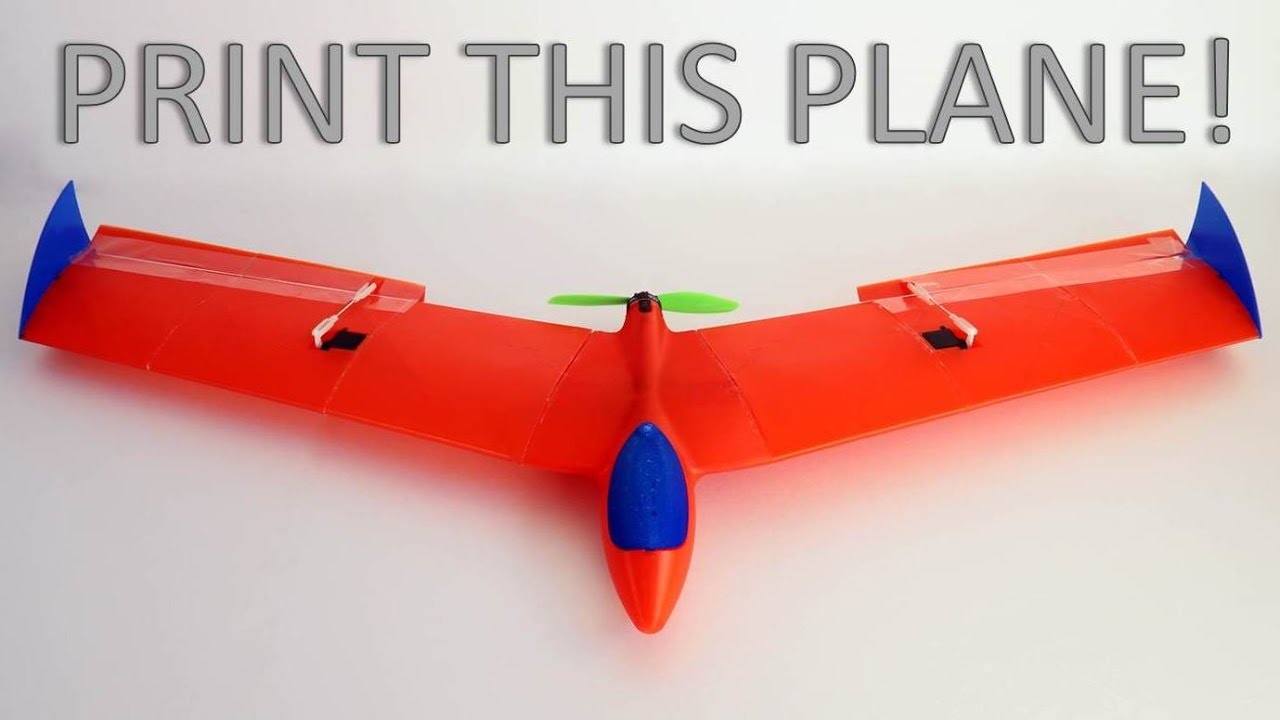
Print THIS Plane! (FREE .stl Files)
Показать описание
DISCLAIMER: I highly recommend that you have experience with flying model aircraft. This is not a beginner plane and will most like end in a failure if you are not familiar with flying model aircraft. Fly at your own risk.
Plane specifications:
Wingspan - 95cm
Root chord - 16.3cm
Tip chord - 11.5cm
Sweep angle - 15 degrees
Dry weight (no battery) - 468g
Flying weight - 670g
The CG position is marked on the bottom of the fuselage with 2 circle cut outs.
General Print settings:
Material - PLA (1.75mm)
Nozzle diameter - 0.4mm
Wall thickness - 0.5mm
Layer height - 0.2mm
Print settings for the wing sections:
Temperature - 215 degrees Celcius
Print speed - 25-30mm/s
Cooling fan - off
Infill - 0%
Top layers - 0
Bottom layers - 1 (for bed adhesion)
Outer layers - 1
Print settings for other parts:
Temperature - 200 degrees Celcuis
Print speed - 60mm/s
Cooling fan - on
Infill - 15%
Top layers - 3
Bottom layers - 3
Outer layers - 2
NOTE, the fuselage and canopy will require supports. I printed the canopy with the motor mount on the bed and supports from the bed to the rear of the wing. The canopy will require support for the overhang in the center and for the small tab. All other parts can be printed without support.
Electronics:
Other parts:
Push rod clevis (x4)
Please leave a like if you enjoyed the video and subscribe if you want to see more!
----------------------------------------------------------------------------------------------------------------------------------------
All aerial shots in my videos are filmed using racing drones which are designed and manufactured by myself. If you wish to find out more, please visit my website where you can purchase your own carbon fibre racing drone frames!
My Other Equipment:
Huge thanks to the following Patrons for supporting me:
Bernard Gauweiler
+2 others who have chosen not to be mentioned
----------------------------------------------------------------------------------------------------------------------------------------
Other Social Media Links:
----------------------------------------------------------------------------------------------------------------------------------------
 0:10:17
Print THIS Plane! (FREE .stl Files)
 0:09:34
Craycle FPV Ranger V2 Full Build | Free STL / Printed Kit
 0:28:23
Best 3D Printing Ideas in 2022 - 3D Printed Trends (Part 2)
 0:00:55
3D Printing is SLOW?| FLSUN V400
 0:10:14
How Easy is 3D Printing ACTUALLY? (Ender 3 S1 Review)
 0:06:09
6 BEST 3D Printing Design Software to create the MOST EPIC 3D Objects!
 0:07:51
5 Best 3D Printing Websites for Downloading Designs
 0:12:49
3D Printed WORM GEAR - Can u Really Use Them? (PLA vs PETG vs ABS)
 0:00:49
8k 3D Printers are Irrelevant
 0:06:38
Beginners Guide To 3D Printers In 2023
 0:11:57
3d printing LEGO compatible pieces at home? Testing with Flashforge Adventurer 4 - part 1
 0:15:12
Fully 3D Printing & Building a Morgan 3 Wheeler Model kit with a Creality Halot-One Plus
 0:24:56
DIY RC Plane Full Build - ft. FlashForge Guider 2s
 0:10:56
Top 8 Websites for Free 3D Models 2022
 0:15:06
Eclipson Model A - Time-lapse Build & Maiden Flight (Free .STL File)
 0:13:50
Epic DIY RC Piper Cub Full Build & Flight
 0:06:03
3D printed Spitfire RC plane body - FREE STL parts
 0:20:45
How to Print Thin Wall - Planeprint | Big Bobber
 0:21:18
2 Awesome Airplanes 1 BIG Difference
 0:17:45
Giant RC Airliner BUILD | FLIGHT | CRASH all in 1 video
 0:14:18
How to Assemble Eclipson Model A RC Airplane - LW-PLA
 0:00:29
3D printed dragon flight test
 0:19:37
How to Build Eclipson Model C 3D Printed Bush Plane - LW-PLA
 0:01:40
Ranger Mini | 3D Printed RC Plane - Free STL Files!
Комментарии