filmov
tv
How to Integrate Active Directory With Fortigate Firewall & LDAP Configuration

Показать описание
To integrate Active Directory with Fortigate Firewall and configure LDAP, follow these steps:
1. Log in to the Fortigate Firewall web interface using your admin credentials.
2. Go to "User & Device" and then "Authentication" in the left-hand sidebar.
3. Click on "LDAP Servers" and then click the "+" button to add a new LDAP server.
4. Fill in the required information in the LDAP server settings:
- Name: Give a name for the LDAP server.
- Server IP/Name: Enter the IP address or hostname of your Active Directory server.
- Port: Set the LDAP port number (default is 389).
- Distinguished Name (DN): Enter the DN of the bind user, which is used to access the Active Directory server. For example, "CN=Administrator,CN=Users,DC=domain,DC=com".
- Password: Enter the password for the bind user.
- Timeout: Set the desired timeout value for LDAP server connection.
5. Click the "Test Connectivity" button to verify the connection to the Active Directory server.
6. Under "Common Name Identifier", select the appropriate attribute from the drop-down menu. Generally, "sAMAccountName" is used for most Active Directory installations.
7. Under "Distinguished Name Identifier", select the attribute that uniquely identifies users in your Active Directory. Usually, "userPrincipalName" or "sAMAccountName" is used.
8. Optionally, you can map the user groups in Active Directory to Fortigate Firewall user groups. This will allow you to apply different policies based on user groups. To do this, click on the "Map Groups" tab and select the appropriate group mapping settings.
9. Once you have configured the LDAP server settings and group mappings, click "OK" to save the settings.
10. Next, you need to configure the Fortigate Firewall to use the LDAP server for authentication. Go to "User & Device" and then "Authentication" in the left-hand sidebar again.
11. Click on "Authentication Rules" and then click the "+" button to create a new authentication rule.
12. Configure the authentication rule settings:
- Name: Give a name to the authentication rule.
- From: Select the source address or address group that you want to apply the authentication rule.
- To: Select the destination address or address group that you want to apply the authentication rule.
- Users: Select the LDAP server that you configured earlier.
- Schedule: You can set a schedule
to specify when the authentication rule should be active.
13. Optionally, you can configure additional settings such as authentication timeout, authentication method, and authentication fallback.
14. Click "OK" to save the authentication rule.
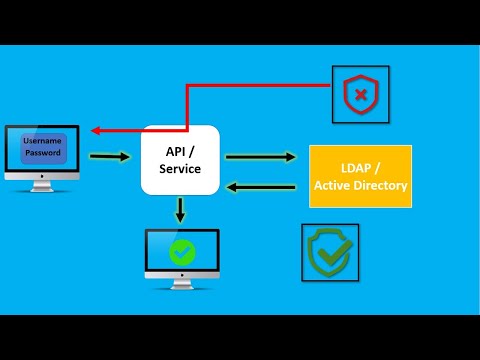
15. Now, when users connect to the Fortigate Firewall, their credentials will be validated against the Active Directory server configured in the LDAP settings. If the credentials are valid, access will be granted according to the configured authentication rule.
Note: It is important to ensure that the Fortigate Firewall has network connectivity to the Active Directory server and that the required ports are open between them. Additionally, make sure the bind user account has the necessary permissions to read user information from the Active Directory.
1. Log in to the Fortigate Firewall web interface using your admin credentials.
2. Go to "User & Device" and then "Authentication" in the left-hand sidebar.
3. Click on "LDAP Servers" and then click the "+" button to add a new LDAP server.
4. Fill in the required information in the LDAP server settings:
- Name: Give a name for the LDAP server.
- Server IP/Name: Enter the IP address or hostname of your Active Directory server.
- Port: Set the LDAP port number (default is 389).
- Distinguished Name (DN): Enter the DN of the bind user, which is used to access the Active Directory server. For example, "CN=Administrator,CN=Users,DC=domain,DC=com".
- Password: Enter the password for the bind user.
- Timeout: Set the desired timeout value for LDAP server connection.
5. Click the "Test Connectivity" button to verify the connection to the Active Directory server.
6. Under "Common Name Identifier", select the appropriate attribute from the drop-down menu. Generally, "sAMAccountName" is used for most Active Directory installations.
7. Under "Distinguished Name Identifier", select the attribute that uniquely identifies users in your Active Directory. Usually, "userPrincipalName" or "sAMAccountName" is used.
8. Optionally, you can map the user groups in Active Directory to Fortigate Firewall user groups. This will allow you to apply different policies based on user groups. To do this, click on the "Map Groups" tab and select the appropriate group mapping settings.
9. Once you have configured the LDAP server settings and group mappings, click "OK" to save the settings.
10. Next, you need to configure the Fortigate Firewall to use the LDAP server for authentication. Go to "User & Device" and then "Authentication" in the left-hand sidebar again.
11. Click on "Authentication Rules" and then click the "+" button to create a new authentication rule.
12. Configure the authentication rule settings:
- Name: Give a name to the authentication rule.
- From: Select the source address or address group that you want to apply the authentication rule.
- To: Select the destination address or address group that you want to apply the authentication rule.
- Users: Select the LDAP server that you configured earlier.
- Schedule: You can set a schedule
to specify when the authentication rule should be active.
13. Optionally, you can configure additional settings such as authentication timeout, authentication method, and authentication fallback.
14. Click "OK" to save the authentication rule.
15. Now, when users connect to the Fortigate Firewall, their credentials will be validated against the Active Directory server configured in the LDAP settings. If the credentials are valid, access will be granted according to the configured authentication rule.
Note: It is important to ensure that the Fortigate Firewall has network connectivity to the Active Directory server and that the required ports are open between them. Additionally, make sure the bind user account has the necessary permissions to read user information from the Active Directory.
 0:15:25
 0:07:55
 0:05:39
 0:30:57
 0:14:19
 0:03:01
 0:04:32
 0:08:45
 0:23:08
 0:14:26
 0:03:47
 0:11:43
 0:18:24
 0:11:17
![[Configuration Guide]Active Directory](https://i.ytimg.com/vi/niDEifI7MtQ/hqdefault.jpg) 0:05:54
0:05:54
 0:01:58
 0:03:24
 0:06:51
 0:01:24
 0:00:50
 0:06:19
 0:05:18
 0:02:17
 0:10:28