Learn Network Cable Management Inside Rack From Scratch

preview_player
Показать описание
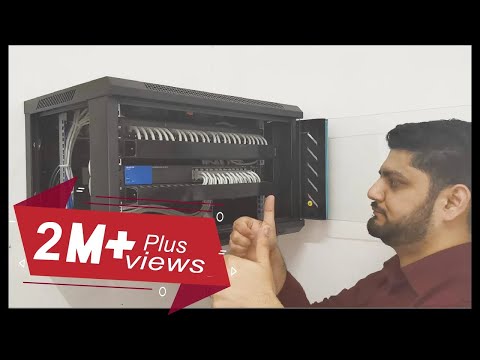
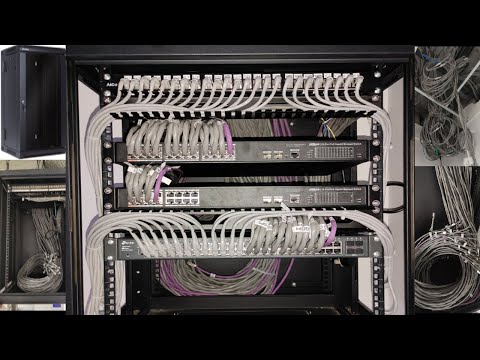
Hello everyone this is Hafiz with you and welcome to my channel.. As you can see this video is about building a network cabinet from scratch it is very important to build your network cabinet properly. If you don’t have a good network cable management strategy in place, not only your racks will look unorganized, but it can make maintenance more complicated, so i recorded this video from scratch so you can have an idea how to professionally setup network cabinet.

Next Video My Wireless Project with Ubiquiti Devices

Thanks for watching the video :

1. Network Cable Bundle Organizer:

2. Cable Manager:

3. Network Cabinet:

4. Mic i used to Record the sound for this Video :)

5. Laptop i Use

==== How to make an Ethernet Network Patch Cable RJ45 ====

~~~~~~~~Follow Us~~~~~~~~

----------------------------------------------------------------------------------------------

----------------------------------------------------------------------------------------------

#NetworkCableManagement #RackManagement #BroExperts
Рекомендации по теме
Комментарии
Автор

Nice looking cabinet. However, I have several suggestions. First, do not use zip ties. Second, you are putting equipment in the cabinet randomly, without taking care of U units. Distances between those square holes are there for a reason. Between each U unit, which consists of 3 square holes, there is narrow interspace. Between holes which are part of certain U unit, there is wider interspace.
All pieces of equipment that you have installed has a height of 1U unit, and they have two holes on each side that will fit with top and bottom holes of U unit. If you will not install equipment exactly into U units you will have problems with screws that will not screw. This problem will be even more serious when you will be installing rack servers with rack rails that will not fit because of rails' bolts that will not overlap with rack holes. Later you will have to leave spaces just like in the video, to make things straight again.

perkowskipiotr
Автор

I have 2 rules for myself when I do cabling, 1) always use shortest possible cables; and 2) only use velcros, no cable ties.

taihap
Автор

Just as a suggestion: do not use zipties. They will likely damage the rubber coat of the cable. Use velcro or something comparable. This also makes it far easier to add/replace/remove cables from the bundle.

alphaprot
Автор

Good job! 2 suggestions I could make. Use flush cutter instead of scissor to cut zip tye.. otherwise the small sharp plastic left can cut someone badly! Also you should install equipments in theirs respecting U, do not left single hole at top and space by 3 holes if needed. installing another equipment will be much easier!

DrLoveQc
Автор

Best video I've seen that actually shows how patch panels work in practice. Didn't realise there was that interface at the back that your twisted pairs went into until now.

even
Автор

Neat tool, I try to get 0.10m patch cables these days and go PP, Switch, PP and flood patch, I dont like cables down the back or sides of the switches as they more often than not vent their heat in those spaces.

Zerkbps
Автор

Great vid!!!

Some tips for efficiency during install & as well as over time for maintenance:

1) Velcro not cable ties (both inside and outside of the cabinet)
1.1) Adding extra cables will take forever unless you make a new bundle over time.
2) The cut-off ends of the zip-tie can be very sharp, and cut you, a co-worker or could damage new cabling installed. More reason to use Velcro.
3) Use a strain relief bar behind the patch panel. This allows an easy to access gap between each cable IDC. As you are currently showing, you will work over the cables & have zero room to easily access 1x cable.
4) Rather do not use a traditional patch panel & instead get a patch panel that takes RJ45 inline couplers. Then you just make a standard RJ45 termination VS a punch down.
5) In such a small rack, space is expensive. Rather use very short cables and only occupy 2U vs 4u.

6) Create the service look behind the vertical rails. If you put a device with more depth in there, you might damage the cables.
7) Install a premade RGB strip & leave it on the company colour(s).

zadekeys
Автор

After 5 years, it is still very instructional as are so many of the comments.

DavidM
Автор

Great to see the constructive criticism, wish they could make their video with all the recommendations they made.

drew
Автор

I like your video and your installation, but I would do it a bit other way:
1. USE VELCRO STRIPS INSTEAD OF ZIP TIES. I wrote this with Caps Lock on because you overtightened these ties, deforming and damaging the cables. I've seen way too many "it sometimes work and sometimes not" network troubles caused by this. Zip ties are awesome, but not when used like this. You'll also find out velcro (or similar) strips are reusable, so it's easier to keep it nice and clean over time with adding/replacing/removing cables and everything. I am well aware many people here wrote this already, please see their comments as well.
2. Install the cabinet so that the tube coming through the wall ends in the cabinet, not below it. This makes it cleaner (less dust in the cabinet) and nicer to look at. I also find it more comfortable to work with. Other people already mentioned this.
3. These patchcords are going wild in the back, possibly affecting the cooling of the switch. I usually route them in a conduit on the side, so they aren't getting in switch's airflow.
4. I heavily prefer modular patch panels with individual keystones. It is a bit more expensive, but I found it better in certified Cat6 and above installations.
5. Include a plan, legend or some other aid to know which cable is which. I usually put it on inside side of cabinet's door. I also always use racks with full metal doors, not glass ones.
6. Some color coding, maybe? If this only connects 24 computers or Wi-Fi APs together to some fiber or other uplink, having all the patchcords the same color is okay. If not, using for example green for LAN, blue for SAN and so is a good practice - don't forget to document this in the aforementioned plans/schematics on the front door. Somebody else already wrote this, and I add - if there is more than one cabinet in the building/campus, use the same color-code everywhere.
7. Ensure proper cooling of switches, router and/or other devices in the cabinet. There should be good airflow, unobstructed by wild cables (this reminds me, how did you store spare length of incoming cables?) or other stuff withing the cabinet.
8. Use air filters to make sure the cabinet isn't collecting all the dust in the room, even if it is a dedicated server room or something.


TL;DR: You have done well. It isn't perfect, but I'd still recommend you to a relative - just please use velcro strips instead of zip ties, or at least don't tighten them this much.

michaelkael
Автор

Use a modular patch panel with a lacing bar make troublshooting easier. use printed labels.
Velcro. Test all cables

jerrymiller
Автор

I hate cabling without labeling, even if it seems too excessive now, it will definitely help the next engineer to replace the failed switch

sergeyzelyukin
Автор

best video I have ever seen, quick and very neat!

josan
Автор

The second cable punched in a wrong way - you should put brown wire first then white and brown..., using velcro is better than ties..., if you want to use ties you need to cut it all, don't leave a small piece it works as a knife latter when you work inside the rack...

mazen
Автор

This approach won’t work on large installations, this method is mainly for small installations or home networks where the switch has the same amount of keystones available and order isn’t important When cabling large organisations only x switches may be available and rooms are blanket cabled, or budget restraints, leaving many of them redundant, it’s important split each room down into port, room, floor and even riser number, and wire in sequence this will aid when equipment, iP phones, wan access points, door access points, fire sensor equipment or ip cctv are added, only Velcro tied in 10 cables at a time and label, as cables can be damaged in building work this easier replacement, also in some organisations they insist on two switch setup above or below each keystone bank to separate vlans for Poe or public access points, the exact details should be discussed in network planning with the client

ramman
Автор

Nice work! I would have installed the cabinet so it would cover the hole in the wall, where the cables come out.

tavarescarlos
Автор

Such a cable bundle organizer is better known as a "cable comb". Really nice job though! The only remark I have is about the zipties/tiewraps. Cut them off flush, it looks little bit neater. (with a cutting tool, not with scissors)

GerbenWijnja
Автор

Nice work. Use a side cutter to cut the cable ties flush to prevent any injuries.

enchantingendlers
Автор

When you split a cable to terminate on patch panel you should keep the wires slightly up not pointing down on the video you are trying to terminate and get wires cut and you have to crimp 4 to 5 times before the wires get cut if you leave the wires pointing up when you terminate the wires it will be cut 1st time and not make the gaps on patch panels big

palkatawde
Автор

Great video. Cam someone help me with estimation? I want to as to how many rolls of cables, patch panels are required in a specific project? Any videos on these?

akhildev