filmov
tv
[4 Ways] How to Format SD Card To FAT32 in Windows 10/11 | 32/64/128GB Supported|Easy Tutorial|2024

Показать описание
📌Timestamp
00:00 Video Intro
00:32 Method 1: Format SD card using Disk Management (32GB Supported)
01:29 Method 2: Format SD card using the File Explorer (32GB Supported)
02:22 Method 3: Format SD card via the Command Prompt (32GB Supported)
03:20 Method 4: Format 64/128GB SD Card to FAT32 with PowerShell (64/128GB Supported)
04:00 Bonus: How to Recover Data from Formatted SD Card?
Method 1: Format SD card using Disk Management (32GB Supported)
Step 2: Locate your SD card partition and right-click on it. Choose “Format” from the context menu.
Step 3: Make sure that the “Perform a quick format” option is checked.
Step 4: Choose your desired file system FAT32 and allocation of unit size, then click the OK button. You should see that the formatting process begins right away.
Method 2: Format SD card using the File Explorer (32GB Supported)
Step 1: Connect your desired SD card to your computer.
Step 2: Open the File Explorer using its icon in the taskbar, or by pressing the Windows + E keyboard shortcut.
Step 3: Click on “This PC” from the left-side panel.
Step 4: You should be able to see your SD card listed as a device. Right-click on it, then choose “Format.”
Step 5: A new window should become visible on the screen. Here, you can choose your desired file system (NTFS or FAT32 for 32GB SD cards, or exFAT for 64GB SD cards.)
Step 6: Click on the “Start” button to beging the formatting process.
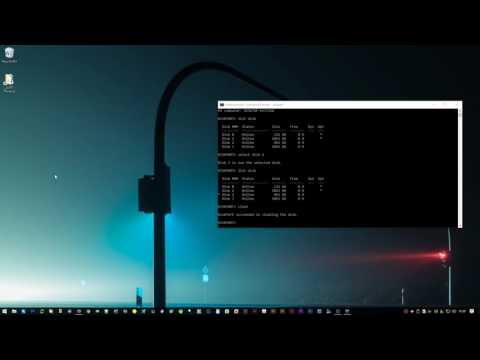
Method 3: Format SD card via the Command Prompt (32GB Supported)
Step 1: Type "cmd" in the search box. Right-click on Command Prompt and choose "Run as administrator”.
Step 2: In the command prompt window, type "diskpart" and hit “Enter”.
Step 3: Type "list volume" to list all the available drive volumes on your computer and press “Enter".
Step 4: Now choose desired sd card volume by entering this command “select volume #. (# is the number of your disk volume make sure to replace the letter of your sd card drive)
Step 5: Now type this final command “format fs=fat32 quick" and press "Enter" to format the sd card with FAT32.
The above 3 methods work for a 32 GB SD card, but if you want to format a 64/128GB SD card to FAT32, keep watching.
Method 4: Format 64/128GB SD Card to FAT32 with PowerShell (64/128GB Supported)
Step 1: Press Windows+X. Select PowerShell (admin) from the drop-down and run PowerShell as administrator.
Step 2: In the PowerShell dialogue box, type a command i.e. format /FS: FAT32 X: and click Enter.
Step 3: The formatting action will start and would be completed in approximately one hour.
Bonus: How to Recover Data from Formatted SD Card?
If you accidentally formatted an SD card and lost important data, Tenorshare 4DDiG is your best bet to recover any lost files from a formatted SD card.
Tenorshare 4DDiG is a professional data recovery software that can recover any formatted, deleted, lost, corrupt, or damaged files from Windows, Mac, SD cards, USB flash drives, external devices, digital cameras, etc. It supports 1000+ data types including photos, videos, audio, documents, and more with simply 3 steps. To recover data from a formatted SD card with 4DDiG:
Step 1: Download and install the program on your system. Connect the formatted SD card to your system and launch the software. After your SD card is detected by 4DDiG, select it and click Scan to proceed. To fast your scanning, you can also choose target file types from the upper-right corner.
Step 2: Now, 4DDiG will start scanning the formatted SD card to find lost files. After the scanning, you can switch from Tree View to File View to find your desired files.
Step 3: Find your target files? Just click Recover to save them to a different partition. This is how to recover data from a formatted SD card.
----------------------------------------------------------------Follow Us------------------------------------------------------------
Subscribe to our YouTube channel and there are more tech tips and tricks for you.
![[4 Ways] How](https://i.ytimg.com/vi/t72n6vOlGSw/hqdefault.jpg) 0:05:36
0:05:36
[4 Ways] How to Format SD Card To FAT32 in Windows 10/11 | 32/64/128GB Supported|Easy Tutorial|2024
 0:02:53
How To Reset Windows 10/11 | How To Format Laptop (2022)
 0:00:32
How to format your APA 7th ed reference list default
 0:04:17
Completely format hard drive removing all partitions (including OEM)
 0:11:55
How to format your paper in APA style in 2024
 0:11:43
How to Format a Resume for Success in 5 Easy Steps | Indeed Career Tips
 0:01:47
Chromebooks: How to Factory Reset (Format) Back to Factory Defaults
 0:05:49
5 Best Ways To Format a Drive on Windows 10 and Windows 11 | Guiding Tech
 0:08:37
Opening Finale MusicXML Files in Dorico and Musescore 4
 0:02:27
How to format a new HDD or SSD [Windows 10]
 0:05:16
APA v6 Format in Word - in 4 Minutes V2
 0:05:21
5 WAYS - How to Format SD Card to FAT32 [Any Size] | Convert NTFS to FAT32 without Data Loss
 0:04:52
How to Format Paragraphs and Alignment in Microsoft Word 2021/365
 0:00:55
How To Format A Hard Drive For Mac
 0:01:09
Erase and format a USB flash drive on a Mac
 0:00:24
Change number in date format | Excel formulas | Text Function
 0:00:17
How to Fix, Repair, or Format a Corrupted Storage Device
 0:00:05
short on email writing format in english//short for email writing format//email writing format //
 0:04:24
How to Format and Reinstall Windows 10 | Factory Reset Windows 10
 0:03:43
How to Format USB Drive for your TV
 0:01:34
Excel Quick Tip: Two Ways to Use the Format Painter
 0:09:25
PROVEN 3 Sentence Cover Letter - Best Cover Letter Format & Examples
 0:06:15
Can't Format USB Drive in Windows 10
 0:00:48
Excel Pro Trick: Format numbers in Correct Date Format in Excel with TEXT function in Excel formula
Комментарии