filmov
tv
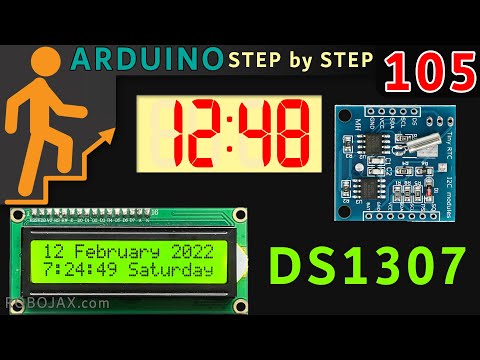
7 projects Build LED LCD Alarm Clock using DS1307 with Arduino | Lesson 105

Показать описание
In this lesson we learn how to use DS1307 Real-time clock module to build Arduino clock. In this lesson we learn about 7 projects.
Project 1: Basic DS1307 Clock with Arduino
Project 2: DS1307 Alarm with Buzzer and Relay
Project 3: DS1307 Alarm with Relay and AC Bulb
Project 4: LED Seven Segment Clock using DS1307
Project 5: Unlimited Alarm with Relay
Project 6: LCD Clock using DS1307
Project 7: LCD Clock with Alarm
The best thank you for me is to not to skip ads and Subscribe 🔔 to my channel, like 👍 the video It is greatly appreciated. 🔔 😊.
I will reply to all Subscriber's 🔔 questions. So make sure to Subscribe.😊 .
**** Purchase DS3017 module from ***:
*** Purchase HT16K33 4 Digit LED display from ***
*******Purchase this LCD1602 I2C from:******
*** Purchase Arduino Start Kit ***
****** Purchase Authentic Arduino Uno from ****
Download Arduino code for this video:
Use Chapters from timeline or click on the time
00:00 Introduction
3:48 Schematic for DS1307 module explained
6:04 Datasheet for DS1307 explained
8:43 Project 1: Basic DS1307 Clock with Arduino
9:09 Project 1: Wiring explained
9:43 Project 1: Arduino Code Explained
15:21 Project 1: Demonstration
17:40 How to set the time
19:27 Setting 12/24 hours AM, PM
22:03 Project 2: DS1307 Alarm with Buzzer and Relay
22:19 Project 2: Wiring
23:06 Project 2: Arduino Code Explained
28:37 Project 3: DS1307 Alarm with Relay and AC Bulb
31:23 Project 3: Demonstration
32:27 Project 4: LED Seven Segment Clock using DS1307
34:38 Project 4: Arduino Code Explained
44:34 Project 4: Demonstration
48:21 Project 5: Unlimited Alarm with Relay
49:34 Project 5: Wiring for 1 channel relay
50:21 Project 5: Arduino Code Explained
58:32 Project 5: Demonstration
59:28 Project 6: LCD Clock using DS1307
1:00:05 Project 6: Wiring explained
1:00:51 Project 6: Arduino Code Explained
1:07:48 Project 6: Customizing LCD Details
1:12:42 Project 6: using LCD2004
1:13:15 Project 7: LCD clock with Alarm
1:13:35 Project 7: Arduino Code Explained
1:21:02 Project 7: Wiring
1:22:53 Project 7: Demonstration
1:23:42 Project 7: Demonstration with LCD2004
Tutorial by Ahmad Shamshiri form Canada
****************************
****************************
Power Supply I use:
Get other projects code and learn Arduino
#robojax #robojaxArduinoCourse #robojaxClock
**** AFFILIATE PROGRAM ****
 1:27:04
7 projects Build LED LCD Alarm Clock using DS1307 with Arduino | Lesson 105
 0:00:19
Testing a CHEAP LCD Display! #engineering #arduino #electronics
 0:00:44
7inch 1024x600 IPS LCD Screen With HDMI LCD Controller Board
 0:00:43
Esp32 mini computer #diy #ideas #arduino #esp32 #viralvideo #innovation #lcd #satisfying #learning
 0:00:10
lcd display using arduino
 0:00:09
Magic!!! 7 segment LED controlled by Arduino #electronics #arduino #engineering
 0:29:35
DIY : ) How to make small portable display TFT 7-inch LCD AT090TN10 with HDMI, AV and VGA input
 0:00:11
LED Matrix - Arduino Project for Beginners #arduino #engineering #diy
 0:12:41
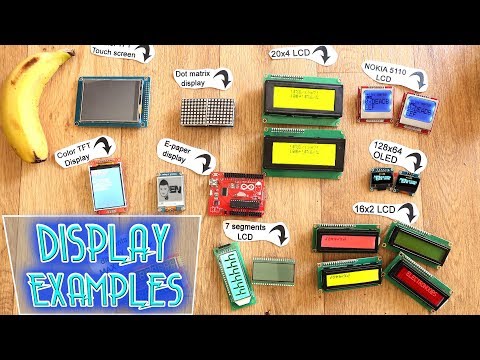
Display examples - which one to use?
 0:00:10
Maximizing Your Arduino Project with 2.4 TFT LCD Shield - Unpacking Tour 😲😍😉 #diy #lcd #arduino #how...
 0:00:21
Moving eyes 0.96 OLED #oled #display #eyes #eye #project #moving #move #electro #e #electronics
 0:00:18
Animated eyes on arduino and oled display
 0:00:17
When The Quiet Kid Does Your Homework 💀 #electronics #arduino #engineering
 0:00:09
'Arduino Servo Motor 7-Segment Display | Counting from 0 to 9' #dcmotor #smart #aielectric
 0:00:10
Interactive ad display using 7-segment LEDs and a 555 timer IC! #sale #DIY #electronics #display
 0:10:01
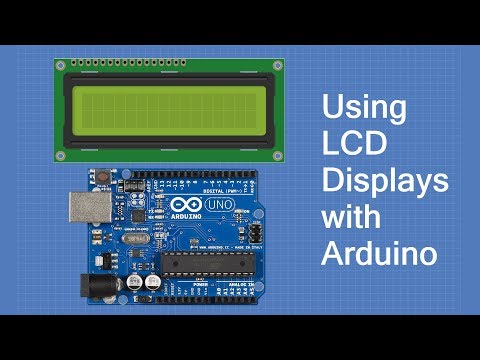
How to Use an LCD Screen with an Arduino (Lesson #21)
 0:13:45
Building a USB-C touchscreen monitor (new for modern devices)
 0:00:13
This Clock Fan looks like Real Magic 🤯
 0:00:07
LED 7 Segment Arduino Project for Beginners #arduino #electronics #electrician #engineering #diy
 0:46:23
Using LCD Displays with Arduino
 0:00:08
Arduino Keypad Project with 7Segment LED Display #arduino #electrician #electronics #engineer #diy
 0:00:21
IR Infrared Sensor Connection & Testing • Sensor Module #shorts #sensor #trending
 0:00:09
automatic street light on | arduino project | arduino IR sensor project | #diy #experiment #arduino
 0:03:53
Arduino Tutorial: LED Sequential Control- Beginner Project
Комментарии