filmov
tv
How to plough a field - basic instructions

Показать описание
The aim of ploughing is to scoop up an 8" deep by 12" wide piece of earth and turn it over 180 degrees, burying any crop residue or weeds in the process. This results in loosened soil which can be made into a seed bed.
Make sure you have adequate oil, coolant, fuel etc. In your tractor. Also, check your tyre pressures -- this should all be obvious! Ensure that the field to be ploughed is free of plant material that could clog up the plough -- it should be mowed close to the ground and the cuttings allowed to dry, reducing their bulk. Don't plough on wet ground or allow your wheels to spin as this will damage the soil structure. It is advisable to have good tyres and a tractor with a diff. Lock, or better
Connect the plough to the three point linkage and make sure that the 'check chains' are nice and loose but not so loose that the plough hits the back tyres when it swings from side to side. This adjustment is made in case you hit a large rock, enabling the plough to skid sideways rather than breaking anything on the tractor.
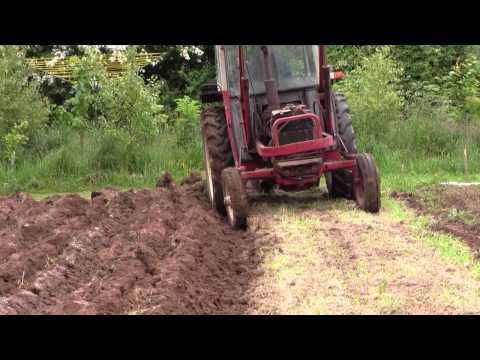
The tractor that we use is a 52 Hp International harvester 454 and the plough is a Ransomes, Sims and Jefferies TS 59M.
Starting at the right hand side of the field, drop the plough onto the ground with the 3 point linkage, drive the tractor 6 foot forwards and then inspect the results. The first cut is always more difficult as there is no adjacent furrow for the turf to fall into. This wont make much sense at the moment, so don't worry about it! Assuming you are using a 2 furrow plough, you'll eventually want the two rows of upturned turfs to be fairly similar in size, however, in the first cut this is difficult, if not impossible. The initial aim is just to create one neat, straight furrow about 8" deep in the ground.
Hot tip: Put up some marker poles to guide you on the first furrow - never use a cow in your neighbour's field as a marker reference.
Drive the tractor back to the start of the first furrow and position the right hand wheels in the furrow itself, lower the plough and drive 6 foot forwards and inspect the results. You'll probably need to make adjustments to the plough to get good results.
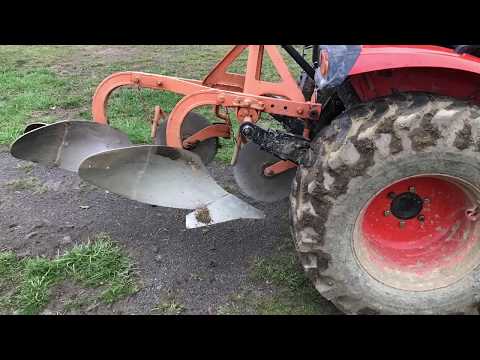
The first adjustment is the depth wheel and this should be set to get an 8" furrow -- don't try to get any deeper than your plough is designed for or else the turfs will not fold over neatly. If you don't have a depth wheel, you'll just have to use the tractor hydraulic depth control.
The next adjustment is the top link which will alter the angle of the plough to the ground. If you lengthen the top link, the back plough will be lowered and create a deeper furrow, but if you lower it too much it can send the plough pointing upwards and it will not dig into the ground properly. You may then need to re-adjust the depth wheel until the whole plough is working properly. Do these two adjustments and plough a 6 foot section until you have a perfect set of ridges and a nice clean 8 " furrow.
The second photo here shows that the left hand ridge is not turning over 180 degrees and so the top link needs to be extended to get the left hand plough deeper into the ground.
Ploughing is just the first step in cultivating the land and should be followed by further tillage such as rotovating or harrowing before planting. Also, try and have an expert on hand when you first try ploughing to save making too much of a mess!
 0:04:41
How to plough a field - basic instructions
 0:51:30
How to layout a field for plowing
 0:06:49
Plowing, Planting and Cultivating
 0:05:21
Ploughing and Soil Preparation in one Pass | Fendt 939 w/ MH Rotor-arm & Kverneland 7 furrow plo...
 0:10:10
how to start ploughing
 0:12:00
Ploughing , a beginners guide to setting up and ploughing a field
 0:03:45
Plowing vs Tilling - Which one is better for the soil?
 0:29:52
Beginners Guide To Ploughing Part 1 Plough Set Up And Tips
 0:05:51
Ploughing the croft
 0:06:30
Breaking Ground- a new experience learning to plow on the 8n
 0:35:13
Beginners Guide to Ploughing Part 2 Ploughing Headlands, Marking out, Starting new Field
 0:04:20
Deep Plowing - Why Farmers Plow their Field so Deep?
 0:15:21
First Day Of Plowing! The Best Job On The Farm
 0:04:39
How To Plow a Garden - Two Bottom Plow
 0:04:35
How to plow and till a vegetable garden area that’s never been plowed | John Deere Tips Notebook
 0:06:04
Grandads Match Plough
 0:02:48
How to finish your ploughing the correct way- Fergie class
 0:01:50
Ploughing field using bulls or Ox or animal
 0:40:01
A FEW HINTS and TIPS FOR PLOUGHING. NEW HOLLAND T7 and DOWDESWELL.
 0:07:53
How to plough headland ins and outs to leave a tidy finish
 0:19:58
TEACHING MY SISTER HOW TO PLOUGH
 0:07:55
Easy Plough Settings | #Kubota 2021
 0:09:19
Compact tractor plowing with a 2 bottom plow
 0:19:48
BEGINNERS GUIDE TO PLOUGHING PART 3 TIPS AND TRICKS PLOUGHING INS AND OUTS
Комментарии