filmov
tv
How to Use I2C LCD with Arduino | I2C Scanner Arduino | 16x2 LCD I2C Tutorial

Показать описание
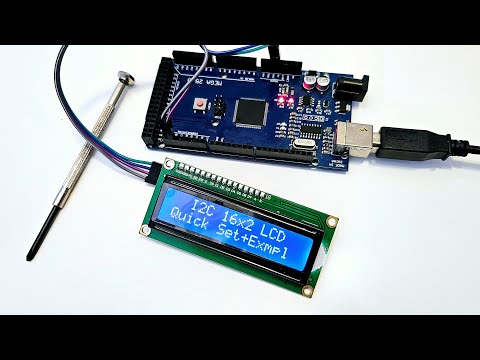
In this tutorial, we dive into the world of Arduino and I2C LCD displays. We connect a 16x2 I2C LCD display to an Arduino Mega and guide you through the process of scanning the address and programming it.
This video is perfect for those who want to learn about:
1. **Connecting an I2C LCD display to an Arduino Mega**
2. **Scanning the I2C address**
3. **Programming an I2C LCD display**
We start by explaining the necessary components: a display, an Arduino Mega, and some wires. We recommend using male to female jumper wires for easy connection.
Next, we delve into the color codings of the I2C display spec, explaining the purpose of each pin: ground, VCC (voltage), SDA, and SCL. We then guide you through connecting these wires to the Arduino Mega.
Once everything is connected, we move on to programming. We explain how to use an I2C scanner to find the I2C address and provide a link to the code in the description below.
After finding the address, we show you how to install the necessary library for the LCD display I2C from the Manage Libraries in the Tools. We then guide you through testing out the code from the Examples section and modifying it to suit your needs.
By the end of this video, you'll have a fully functioning I2C LCD display showing a custom message.
If you find this video helpful, don't forget to hit the like button and subscribe to our channel. Your support helps us create more content and reach more people.
Stay tuned till the end for a bonus tip on how to adjust the backlight of the LCD.
Thank you for watching. Have a great day!
#Arduino #I2CLCDDisplay #ArduinoMega #Programming #Tutorial
 0:09:02
How to Use I2C LCD with Arduino | Very Easy Arduino LCD I2C Tutorial | Arduino 16x2 LCD I2C Tutorial
 0:05:07
How to use a 1602 i2c Serial LCD Display with Arduino
 0:13:12
How to use LCD LCD1602 with I2C module for Arduino - Robojax
 0:05:09
Arduino Tutorial - 12. I2C Display (LCD)
 0:05:29
Arduino LCD I2C - Tutorial with Arduino Uno
 0:05:14
How to Use I2C LCD with Arduino | I2C Scanner Arduino | 16x2 LCD I2C Tutorial
 0:05:03
How to use i2c Lcd display with Arduino
 0:46:23
Using LCD Displays with Arduino
 0:07:07
How to use IIC I2C 2004 204 20 x 4 Character LCD with Arduino
 0:11:58
How to use I2C module for LCD | I2C interface module for lcd display with Arduino
 0:06:07
How to Connect an I2C Lcd Display to an Arduino Uno Tutorial
 0:10:11
How to Use ESP8266 NodeMCU with 16x2 LCD i2C Display
 0:16:18
How to use I2C in ESP32 || Interface LCD 1602 || Espressif IDE
 0:09:05
EASY Arduino LCD I2C Scrolling Text Animation | Scroll Text on LCD Display Arduino | I2C LCD Scroll
 0:06:55
ARDUINO 20x4 LCD i2c Tutorial | How to Print Text On LCD Display
 0:10:06
How to Use 16x2 i2C LCD Display With ESP32 | With Program Explanation
 0:07:46
{916} i2c LCD configuration with Arduino UNO in Tinkercad
 0:01:15
How to use I2C LCD with Arduino Uno
 0:06:31
LCD display with Arduino using I2C module
 0:02:54
How to connect an I2C LCD Display to an Arduino NANO
 0:06:02
LCD1602 I2C Address for Arduino explained
 0:14:41
How Did I write the I2C-LCD Library || Explained
 0:14:50
I2C 20 x 4 LCD Display on Arduino
 0:07:43
(16x2) LCD display with Arduino || without I2C module || Simple tutorial
Комментарии