filmov
tv
How to Solder Sub C Batteries with Tabs?

Показать описание
Step 1: Preparation: Start by cleaning the battery terminal and the tab with a small amount of soldering flux. This step will ensure a clean, corrosion-free surface that will lead to a stronger bond.
Step 2: Pre-tinning: Pre-tinning is applying a thin layer of solder to the parts you intend to join before the actual soldering. This step helps in creating a reliable connection. Heat your soldering iron and touch the solder to the tip to melt it. Apply this melted solder to the battery terminal and the tab.
Step 3: Soldering: Once your parts are pre-tinned, it's time to solder them together. Position the tab onto the battery terminal. Then, press the heated soldering iron onto the joint. The heat will melt the pre-applied solder, creating a strong bond.
Step 4: Cooling and Inspection: After soldering, allow the joint to cool naturally. Once cooled, inspect the joint to ensure it is robust and well-formed. A good solder joint will be shiny and smooth.
 0:00:16
How to Solder Sub C Batteries with Tabs?
 0:00:46
How to solder the sub c battery
 0:06:53
Salvage a Sub C 6v NiHm Rx pack - Big soldering iron needed!!
 0:01:00
How to solder properly, even with poor tools #soldering #electronics #microscope #arduino
 0:00:50
How to Hand Solder a Perfect THT | JBC Soldering
 0:00:20
How to solder 18650 Li-Ion batteries
 0:01:13
6000mah sub c size ni-mh battery ebay test
 0:01:15
Effective Electric Soldering Flux Paste for Stronger, Faster, Neater Solder Joints Soldering Tips
 0:04:52
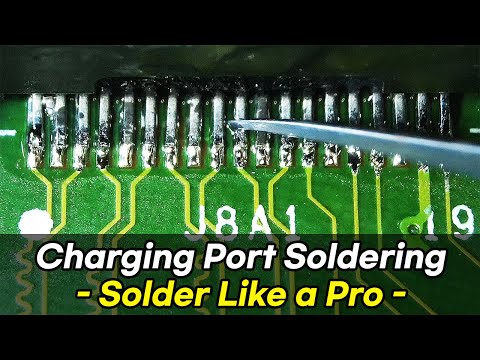
How to Solder Charging Port like a Pro (Easy Tutorial & Guide!)
 0:00:17
The correct way to use tin soldering iron.
 0:02:27
banggood 100Pcs Solder Tab for Sub C 14500 18650 Battery Cell
 0:01:36
How to solder Ni Cd batteries??
 0:22:03
HOW TO SOLDER! (Beginner's Guide)
 0:00:14
How to replace the micro usb charging connector? #microusb #mobile #charging #soldering
 0:00:59
1000°C Mini Soldering Iron from Ordinary Batteries
 0:00:12
how to replace mini b usb port #soldering #desoldering #shorts
 0:00:58
5000°C Mini Soldering Iron from Ordinary Batteries
 0:00:15
USB PORT Soldering ! USB PORT REPLACEMENT
 0:00:16
Without Flux There Would be No Good Solder Connection!
 0:00:11
How to unsolder USB Type-C without damaging it. #diyua
 0:01:00
How to solder TP4056 and USB-C port for li-po battery charger | Complete guide and tips
 0:00:14
How To Use Solder Paste | Short Video #soldering #shorts
 0:00:14
Semi-automatic Type C USB connector cable soldering machine
 0:00:57
1000°C Mini Soldering Iron from Ordinary Batteries
Комментарии