filmov
tv
How To Fix the Hardware Problems Were Detected Error in the Windows Memory Diagnostic Tool [Guide]

Показать описание
How To Fix the Hardware Problems Were Detected Error in the Windows Memory Diagnostic Tool [Guide]
The Windows Memory Diagnostic (WMD) tool is a free memory testing tool in Windows systems that performs a series of tests on your computer's RAM (Random Access Memory) for any memory-related problems.
This error is often triggered after a blue screen of death (BSOD) or the system freezing issues. The reason for the error can vary and include faulty memory slots and memory sticks. It can also be a false positive due to a Windows OS glitch. Check for Overclocking Issues or Run the Hardware Troubleshooter.
Command Used In This Tutorial:
1. Command Prompt
1. Press the Win key and type cmd.
2. Right-click on Command Prompt and select Run as administrator. Click Yes if prompted by the User Account Control dialog.
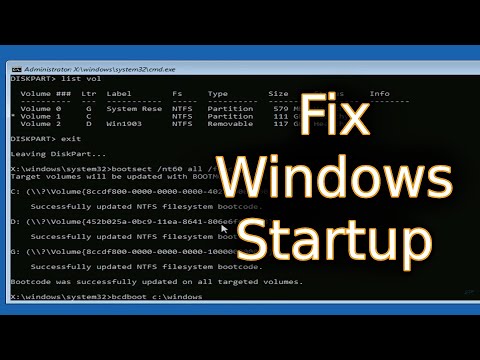
3. In the Command Prompt window, type the following command and press Enter:
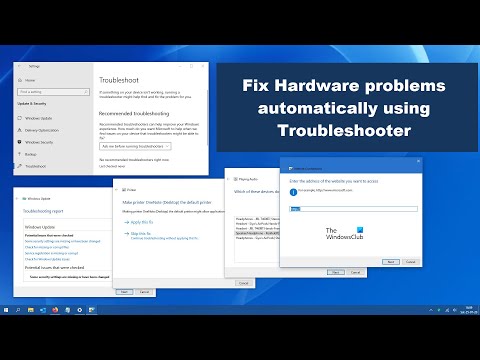
4. In the Hardware and Devices dialog, click Next. By default, the troubleshooter is set to apply any repairs available. To disable automatic repair, click Advanced and uncheck the Apply repairs automatically option.
5. It will scan your computer for issues, which may take a few minutes. If an issue is detected, select to automatically apply the repair.
6. If the suggested problem is unrelated to memory, you can skip it to see the next problem. The troubleshooter will detect additional issues. If an issue is found, apply the fixes and check for any improvements.
Issues addressed in this tutorial:
windows memory diagnostics tool hardware problems were detected
windows memory diagnostic hardware problems were detected
windows memory diagnostic shows hardware problems were detected
windows memory hardware problems were detected
how to fix hardware problems were detected windows 11 memory diagnostic
fix memory hardware problems detected
how to fix hardware problems were detected to identify and repair these problems
memory diagnostics hardware problems were detected
how to fix windows memory diagnostics hardware problems were detected
fix hardware problems were detected to identify and repair
windows memory diagnostic results hardware problems were detected
The Windows Memory Diagnostic tool is a built-in utility for checking RAM modules for memory related issues. The error ‘Hardware problems were detected’ is often caused by outdated driver issues, failed hardware components, corrupt system files, RAM stick failures, and other system crashes.
If all of your hardware components are fine and no solutions work, all you can do is reinstall the windows or repair install. If it turns out to be ineffective, the last resort is to take it to a certified PC technician to perform some advanced checkups and detect the hardware component causing the error.
Thank you for watching this tutorial! I hope you found the information valuable and that it helps you on your journey. If you have any questions or suggestions, please leave them in the comments below. Don't forget to like and subscribe for more content like this. Stay curious, keep learning, and we'll see you in the next video!
Disclaimer: This channel doesn't promote any illegal contents, all content are provided by this channel is meant for educational purposes only and share my knowledge with everyone that is totally Legal, informational. And followed all the Youtube community guideline rules. The videos are completely for Legal.
#windowstutorials #how #windows11
The Windows Memory Diagnostic (WMD) tool is a free memory testing tool in Windows systems that performs a series of tests on your computer's RAM (Random Access Memory) for any memory-related problems.
This error is often triggered after a blue screen of death (BSOD) or the system freezing issues. The reason for the error can vary and include faulty memory slots and memory sticks. It can also be a false positive due to a Windows OS glitch. Check for Overclocking Issues or Run the Hardware Troubleshooter.
Command Used In This Tutorial:
1. Command Prompt
1. Press the Win key and type cmd.
2. Right-click on Command Prompt and select Run as administrator. Click Yes if prompted by the User Account Control dialog.
3. In the Command Prompt window, type the following command and press Enter:
4. In the Hardware and Devices dialog, click Next. By default, the troubleshooter is set to apply any repairs available. To disable automatic repair, click Advanced and uncheck the Apply repairs automatically option.
5. It will scan your computer for issues, which may take a few minutes. If an issue is detected, select to automatically apply the repair.
6. If the suggested problem is unrelated to memory, you can skip it to see the next problem. The troubleshooter will detect additional issues. If an issue is found, apply the fixes and check for any improvements.
Issues addressed in this tutorial:
windows memory diagnostics tool hardware problems were detected
windows memory diagnostic hardware problems were detected
windows memory diagnostic shows hardware problems were detected
windows memory hardware problems were detected
how to fix hardware problems were detected windows 11 memory diagnostic
fix memory hardware problems detected
how to fix hardware problems were detected to identify and repair these problems
memory diagnostics hardware problems were detected
how to fix windows memory diagnostics hardware problems were detected
fix hardware problems were detected to identify and repair
windows memory diagnostic results hardware problems were detected
The Windows Memory Diagnostic tool is a built-in utility for checking RAM modules for memory related issues. The error ‘Hardware problems were detected’ is often caused by outdated driver issues, failed hardware components, corrupt system files, RAM stick failures, and other system crashes.
If all of your hardware components are fine and no solutions work, all you can do is reinstall the windows or repair install. If it turns out to be ineffective, the last resort is to take it to a certified PC technician to perform some advanced checkups and detect the hardware component causing the error.
Thank you for watching this tutorial! I hope you found the information valuable and that it helps you on your journey. If you have any questions or suggestions, please leave them in the comments below. Don't forget to like and subscribe for more content like this. Stay curious, keep learning, and we'll see you in the next video!
Disclaimer: This channel doesn't promote any illegal contents, all content are provided by this channel is meant for educational purposes only and share my knowledge with everyone that is totally Legal, informational. And followed all the Youtube community guideline rules. The videos are completely for Legal.
#windowstutorials #how #windows11
 0:23:31
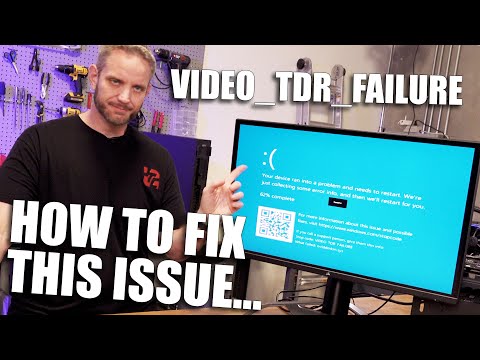
Troubleshooting Common Hardware Problems - CompTIA A+ 220-1101 - 5.2
 0:00:42
How to fix a dead HDD
 0:01:47
How to test for hardware failures in a computer
 0:02:55
Fix Windows Hardware and Devices problems with Troubleshooter
 0:09:46
'Repair Shop' Destroys Gaming Laptop - Can I Fix it?
 0:02:32
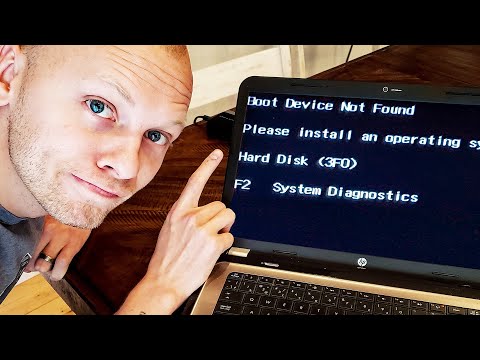
How to Fix Boot Device Not Found Hard Disk 3F0 Error - HP Laptop
 0:00:24
how to fix an overheating GPU #shorts
 0:01:00
Can I Fix A PS5 That Sony Wouldn't Fix?
 0:02:46
How To Fix HP Laptop Keyboard Not Typing Letters Windows 11
 0:00:14
Hard disk repair 1tb memory
 0:04:59
(7 Ways)How to Fix The Request Failed Due to a Fatal Device Hardware Error without Losing Data?
 0:15:01
I Bought 4 BROKEN Monitors - Let's Try to Fix Them!
 0:08:03
The Master Microfixer Teaching the World to Fix iPhones
 0:06:47
How to Fix The Request Failed Due to a Fatal Device Hardware Error?
 0:11:28
How to Make or Assemble Desktop CPU Step by Step At Home | How to Build a Computer with used Parts
 0:00:15
another stick drift fix
 0:18:00
This serious issue was a simple fix... Here's how!
 0:02:39
How To Fix Dell Laptop No Bootable Devices Were Found! Possible Causes Could Be a Corrupt OS Image
 0:04:50
HP Laptop Fix - Boot Device Not Found - Hard Disk (3F0)
 0:11:39
7 Ways to Fix a Computer That Can't Find or Connect to Wifi (Windows 10 Laptops & Desktops)
 0:03:58
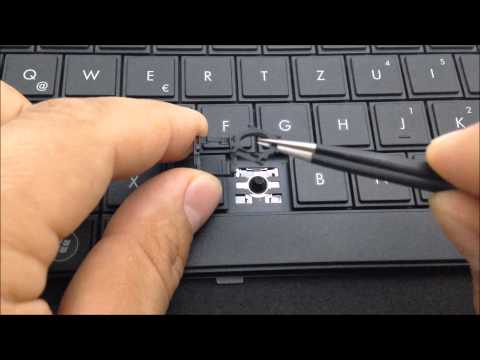
How to : Individual Laptop Keyboard Keys Fix Repair Installation Guide HP Compaq Pavilion HD
 0:15:10
10 Computer Hardware Problems with Solution. Become Troubleshooting Expert.
 0:03:37
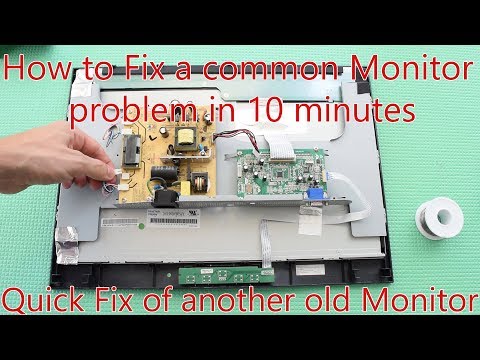
How to fix any Monitor with the most Common Problems. Fixing another ViewSonic Monitor in 10 minutes
 0:11:25
How to Fix Startup Repair in Windows 10 | System Reserved
Комментарии