filmov
tv
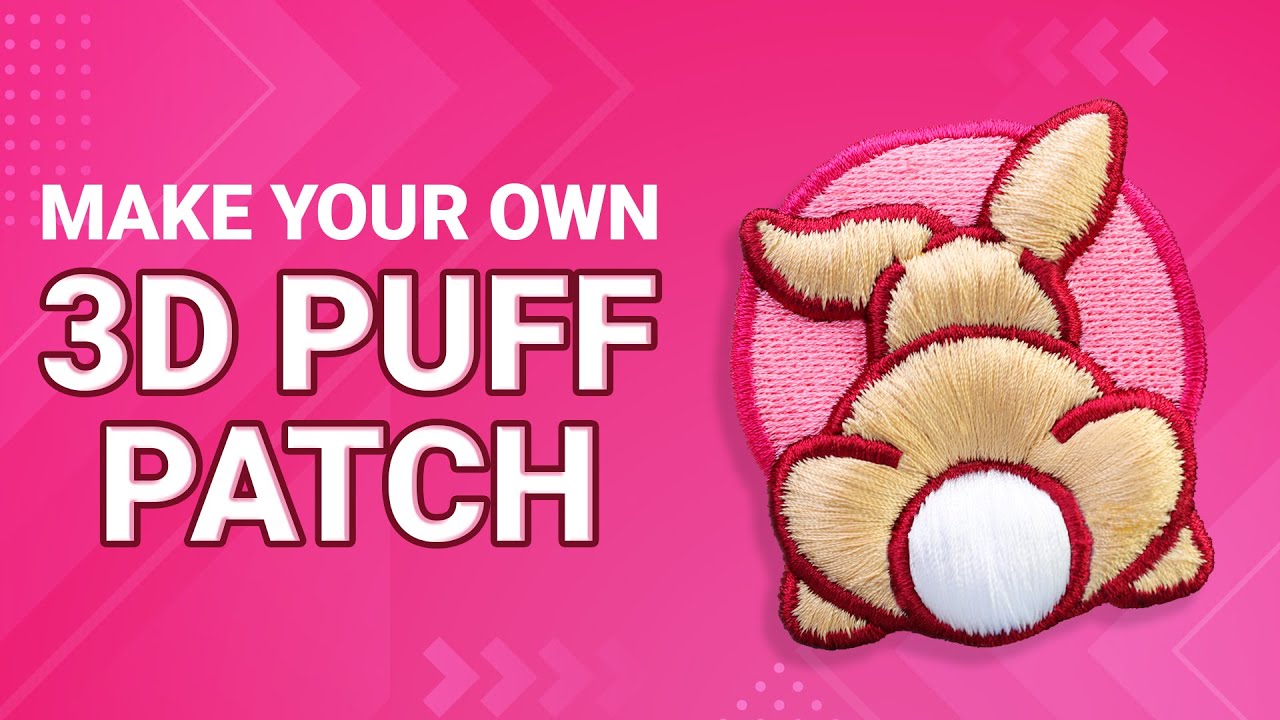
A Simple Guide to Digitizing & Embroidering 3D Puff Patches
Показать описание
Do you want to learn how to digitize and embroider a 3D puff patch from beginning to end? On this episode of Embroidery Hub, we’ll teach you how to use 3D puff technology to give your patches a whole new dimension. We’ll take you through the entire process step-by-step, from digitizing using Chroma software, to cleaning up the edges around your patch after embroidering. We’ll also show you how you can attach your patch to any garment you choose, as well as how much profit you can make from a project like this.
00:00 Intro
00:42 Materials
01:09 Digitizing demo
14:16 Hooping
14:38 Setting up design
15:35 Embroidery demo
16:04 3D puff foam process
17:59 Cleaning edges
18:18 Product reveal & profit potential
We begin this tutorial by going over the materials you’ll need for your rabbit 3D puff patch, including thread, needles, stabilizer and hoops. We also talk about why we decided to use Ricoma’s MT-1501 embroidery machine for this particular project.
Next, we get into the digitizing demo, so you can see how we digitize our image from start to finish. We explain why vector files are the easiest to work with, how to adjust the dimensions and opacity of your design, and much more. We go through the digitizing process for each part of our design, so you can follow along with us step by step.
Once we’ve digitized our design, we move on to the embroidery process. First, we hoop our stabilizer and make sure the backing is secure. We then show you how to set up your design on your machine, and how to use 3D puff foam to give dimension to your project! Lastly, we show you how to clean up your edges using a lighter, and go over how to attach your patch. We also talk about how much profit you stand to make from this project.
 0:07:29
Machine Embroidery Digitizing Is ACTUALLY Simple! Here is Why.
 0:24:18
Digitizing a Simple Embroidery Design Using Wilcom | Beginner's Guide to Embroidery Digitizing
 0:21:21
Embroidery Digitizing 101 🎓 | Essentials EVERY Embroiderer Should Know 🧵 | Master Your Software...
 0:19:55
A Simple Guide to Digitizing & Embroidering 3D Puff Patches
 0:08:40
The Do's & Don'ts of Digitizing for Embroidery
 0:26:38
A SIMPLE Guide to Digitizing & Embroidering a Patch for a Dad Cap
 0:31:02
Digitizing a Simple Logo for Machine Embroidery - Step by Step Tutorial
 0:00:10
Digitizing on an iPad! Full tutorial out now 💙 #machineembroidery #digitizing #shorts
 0:40:37
AI Week 2025: GenAI for Intercultural Competence Needs
 0:12:02
Simple embroidery digitizing tutorial in Wilcom EmbroideryStudio
 0:11:32
Embroidery Digitizing Tutorial~ Hatch Software, Learn the Basics of Digitizing
 0:19:04
Learn How To Digitize Designs For Embroidery Machines 🤓 | Step By Step Digitizing Tutorial 🧵 | 👍🏽...
 0:07:01
How To Digitize A Simple LOGO | Wilcom Digitizing Tutorial
 0:11:41
TOP 5 Ink/Stitch Tips for Beginners | FREE Digitizing for Embroidery
 0:42:48
Digitizing Basics with Embrilliance StitchArtist
 0:00:33
Meet Photomyne: The best app for digitizing your negatives 🎞️
 0:00:31
Digitizing This Demo Tape: 'Demo 1990' by Blindside
 0:00:56
Check out this #henrytip on why you should do your own digitizing?
 0:01:01
#digitizing How to make your letters look professional
 0:00:16
How to do embroidery digitizing for a beginner
 0:00:26
Digitizing is THIS easy ⬆️⬆️
 0:00:16
designing and digitizing my own creation into an embroidery piece
 1:04:32
Digitizing Basics
 0:16:23
Master the Digitizing in 15 Minutes | ArcGIS In-Depth Tutorial
Комментарии