filmov
tv
ServiceNow: LDAP Integration
Показать описание
End-to-end walk-through of ServiceNow LDAP Integration
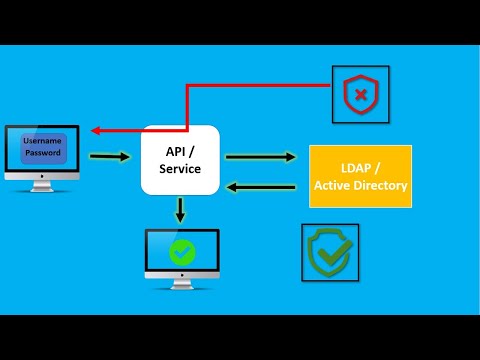
Before starting with this integration you need to collaborate with your Active Directory Team and gathered the details like
- LDAP Server URL
- Starting search directory or RDN
- Login distinguished name
- Login Password
- LDAP Attributes
- Filter to Import the right users
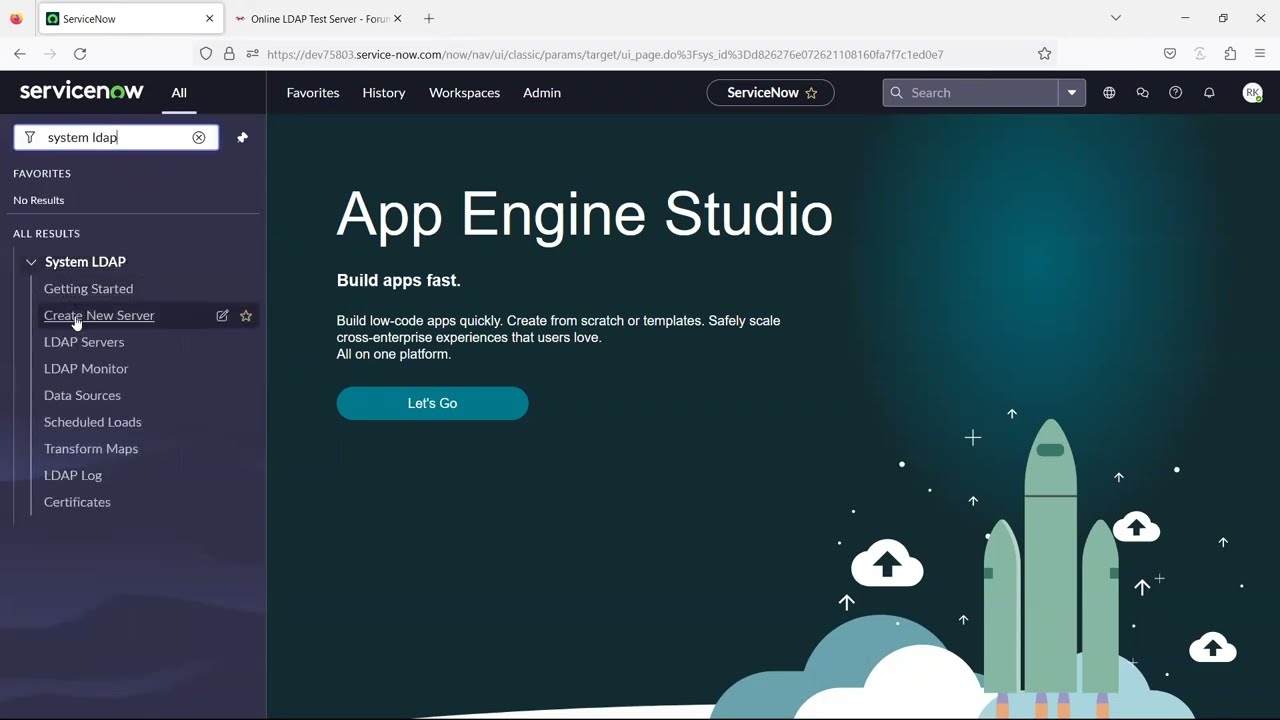
Go to ServiceNow Click on "Create New Server" module under "System LDAP" application menu
Select the "Type of LDAP server" as "Active Directory"
Enter a meaningful server name
As per the LDAP test Server used for this demonstration
"Starting search directory" as "dc=example,dc=com"
Click on Submit - LDAP Server is created.
Enter a Login distinguished name as "cn=read-only-admin,dc=example,dc=com"
"Login Password" as "password"
"Attributes" field is left blank as there are not many columns for this example, otherwise attributes to import has to be defined in order to avoid avoid exceeding the row size limit during the import process
Click on update and wait for the form to reload
Click on "Test Connection" under "Related Links"
Make sure ServiceNow is connected successfully to the LDAP server
You can notice two "LDAP OU Definitions" are created automatically
Click on "Users" from the related list.
Notice field RDN (Relative Distinguished Name) this is where ServiceNow begins its search for users
For this example, you may leave it blank
Update the filter field as "uid=*" meaning import all users with any UID
Click on update and wait for the form to reload
Click on "Test Connection" under "Related Links" and make sure ServiceNow is connected successfully to the LDAP server
Make a note of the Data Source name that is created automatically in the related List
Click on "Browse" under "Related Links" to view the imported users and you may also review the user attributes
Click on the "Transform Maps" module under the "System LDAP" application menu
Open "LDAP User Import" Transform map record
Update the "Field Mapping" as per the user data loaded from the LDAP Server
Click on the "Schedule Loads" module under the "System LDAP" application menu
Create a new scheduled data import
Give a meaningful name for the Scheduled data import
Select the data source that was automatically created earlier
Click on execute now to import the users
Click on the "Users" module under the "User Administration" application menu
If you want more helpful videos like this please let us know in the comments section
Thank you for watching
Before starting with this integration you need to collaborate with your Active Directory Team and gathered the details like
- LDAP Server URL
- Starting search directory or RDN
- Login distinguished name
- Login Password
- LDAP Attributes
- Filter to Import the right users
Go to ServiceNow Click on "Create New Server" module under "System LDAP" application menu
Select the "Type of LDAP server" as "Active Directory"
Enter a meaningful server name
As per the LDAP test Server used for this demonstration
"Starting search directory" as "dc=example,dc=com"
Click on Submit - LDAP Server is created.
Enter a Login distinguished name as "cn=read-only-admin,dc=example,dc=com"
"Login Password" as "password"
"Attributes" field is left blank as there are not many columns for this example, otherwise attributes to import has to be defined in order to avoid avoid exceeding the row size limit during the import process
Click on update and wait for the form to reload
Click on "Test Connection" under "Related Links"
Make sure ServiceNow is connected successfully to the LDAP server
You can notice two "LDAP OU Definitions" are created automatically
Click on "Users" from the related list.
Notice field RDN (Relative Distinguished Name) this is where ServiceNow begins its search for users
For this example, you may leave it blank
Update the filter field as "uid=*" meaning import all users with any UID
Click on update and wait for the form to reload
Click on "Test Connection" under "Related Links" and make sure ServiceNow is connected successfully to the LDAP server
Make a note of the Data Source name that is created automatically in the related List
Click on "Browse" under "Related Links" to view the imported users and you may also review the user attributes
Click on the "Transform Maps" module under the "System LDAP" application menu
Open "LDAP User Import" Transform map record
Update the "Field Mapping" as per the user data loaded from the LDAP Server
Click on the "Schedule Loads" module under the "System LDAP" application menu
Create a new scheduled data import
Give a meaningful name for the Scheduled data import
Select the data source that was automatically created earlier
Click on execute now to import the users
Click on the "Users" module under the "User Administration" application menu
If you want more helpful videos like this please let us know in the comments section
Thank you for watching
 0:34:44
 0:03:45
 0:07:13
 0:25:54
 0:16:05
 0:11:07
 0:18:29
 0:43:06
 0:15:11
 0:00:58
 0:14:19
 0:15:03
 0:06:56
 1:01:58
 0:43:59
 0:09:07
 0:03:49
 0:00:08
 0:14:10
 0:11:17
 0:25:59
 0:10:21
 0:00:16
 1:24:18