filmov
tv
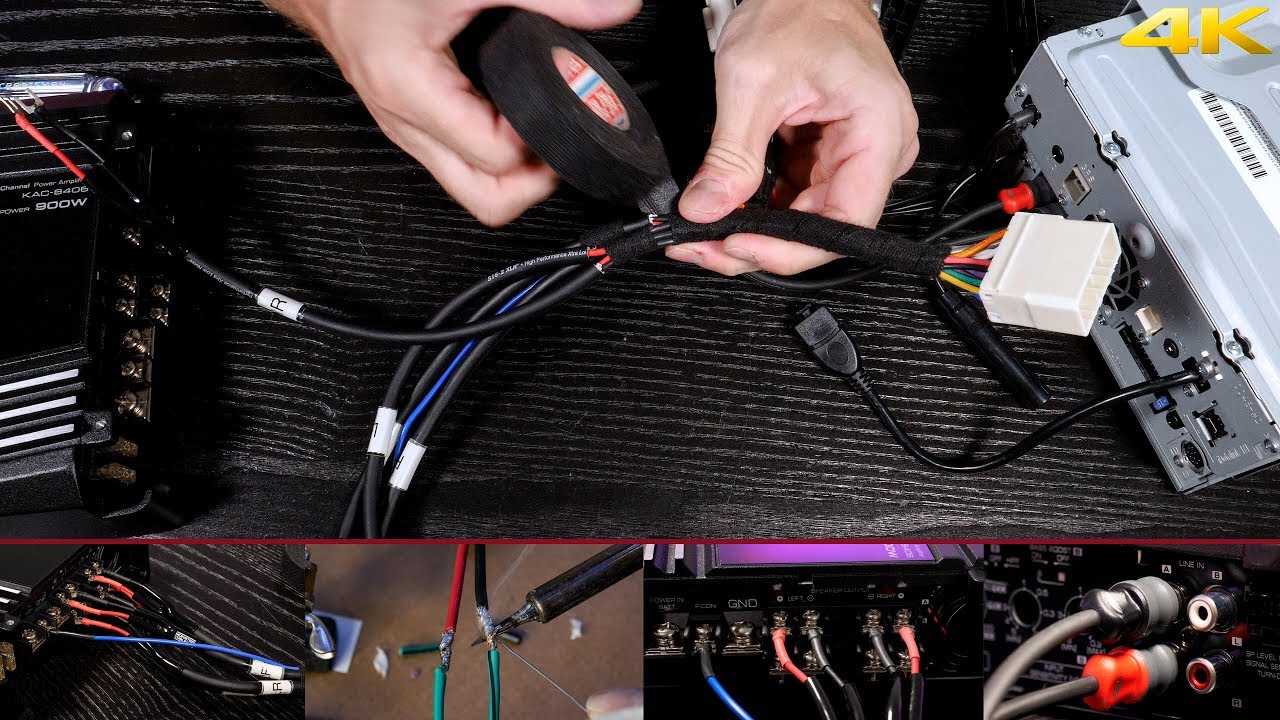
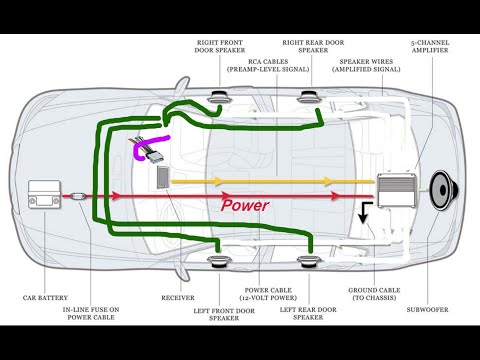
Wiring a 2 or 4 channel amp to your stock speaker harness without cutting the factory wiring
Показать описание
Lorenzo shows you how to wire your speakers to your factory wiring harness, being powered by the head unit's amplifier or an aftermarket Kenwood amplifier. He shows a 2 channel set up and a 4 channel setup!
Video Chapters:
00:00 We get started
00:25 Run Speaker Wires from Amp to Stock Head Unit
01:00 Wire Output of Amp to Wiring Harness
01:15 Pre-Install Layout
02:00 Disassemble Harness
02:35 Identify Front Speaker Leads on Harness
03:00 Label Speaker Wires
04:05 Strip Speaker Wires
04:40 Prepare Heat Shrink Tubing
04:55 Identify Positive and Negtive wires to Properly Match
05:10 Solder Front Speaker Connections and add Heat Shrink
06:00 Remote Turn On Lead - Do You Need it for Speakers, Amp, or Power Antenna
06:55 Lay Out Harness and Remote Turn On
07:15 Solder Spade Connection to Remote Turn On Lead
07:40 Insulate Unused Wires
08:40 Tape Up Finished 2 Channel Harness - Create T-Harness
09:55 Make 2 Channel Connection to Amplifier
10:25 Connect RCA's from Stereo to Amplifier
10:50 Completed 2 Channel System
11:05 Wire a 4 Channel System - Now Adding Rear Speakers
11:35 Disassemble Harness (AGAIN!)
11:45 Disconnect Rear Speaker Connections from Aftermarket Harness
12:00 Strip, Solder, Heat Shrink Rear Speaker Connections
13:20 Set Up New T-Harness with Tesa Tape
14:08 Make 4 Channel Connections to Amplifier, starting with Rear Speakers First
Parts:
Car Stereo Wiring Harnesses
Car Stereo Interfaces
Car Stereos - Single Din and Double DIN
Klein Tools Crimper
Tesa 3/4" Cloth Tape
Instagram: @qualitymobilevideo
Twitter: @qualitymobilevi
 0:15:38
Wiring a 2 or 4 channel amp to your stock speaker harness without cutting the factory wiring
 0:11:54
How to wire multiple subs to your amplifier | Crutchfield
 0:08:37
Wiring 2, 4, and 5 lead Pickups, the Basics(Response Video)
 0:03:56
SERIES vs PARALLEL: Speaker Impedance Explained
 0:06:07
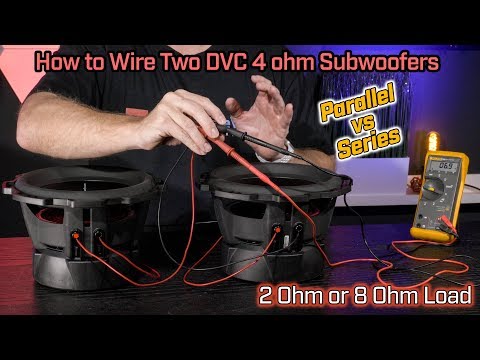
Wiring Your DVC 4 Ohm Subwoofer - 2 Ohm Parallel vs 8 Ohm Series Wiring
 0:06:38
Wiring Two Subwoofers DVC 4 Ohm - 1 Ohm Parallel vs 4 Ohm Series Wiring
 0:04:31
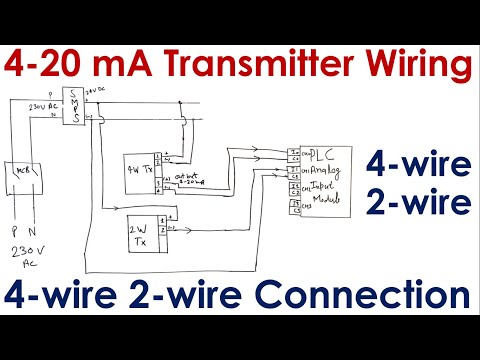
2 wire - 3 wire - 4 wire Transmitter wiring connections ||Transmitter Power Supply connection detail
 0:08:02
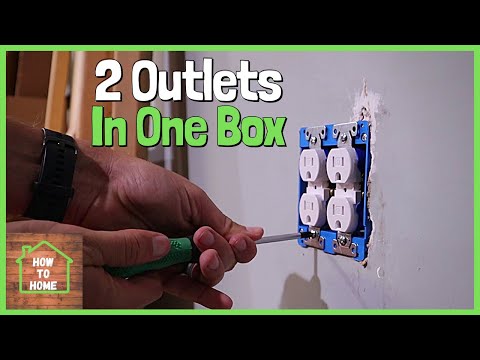
How to Wire 2 Outlets In One Box | Wiring a Double Receptacle the Correct Way
 0:01:00
DIY Duck Boat LED Lights with Milwaukee Battery Power
 0:12:34
FULL System Wiring! Mounting fuse, running all wires! - SQ Daily Driver Build Part 4
 0:04:36
4-20 mA Transmitter Wiring: 4wire Transmitter connection & 2wire Loop powered Transmitter connec...
 0:08:53
Wiring a Car Stereo and Speakers, Amp, & Sub made EASY for Beginners
 0:00:25
This video gives an idea of wiring Dual Voice Coil
 0:02:04
SPEAKER WIRING/SERIES AND PARALLEL
 0:07:05
Two Way Switching Explained - How to wire 2 way light switch
 0:04:12
Subwoofer Wiring: Wiring 2 SVC subs in Series and in Parallel
 0:00:41
Connect Your Wiring To Your Amp Like A PRO! | #shorts
 0:04:02
Subwoofer Wiring: Four 4 ohm SVC Subs in Series / Parallel
 0:05:51
Bi-Wiring Explained - How to Bi Wire Speakers
 0:01:41
Wiring Subwoofer with only One Pre-Amp Output?
 0:06:55
Wiring Two DVC 2 Ohm Subwoofers - 2 Ohm Parallel vs 8 Ohm Series Wiring
 0:17:02
SUBWOOFER WIRING EXPLAINED | DIY SUBWOOFER WIRING
 0:04:02
Subwoofer Wiring: Two 4 ohm DVC Subs in Parallel
 0:13:17
How to: Taramps 4 channel wiring tutorial
Комментарии