filmov
tv
SwiftUI Basics for Beginners (Learn iOS App Development with Xcode and Swift) - Part 1
Показать описание
🟢 LIMITED TIME OFFER - SAVE 37%
Practical iOS and macOS app development tutorials with SwiftUI in 4K
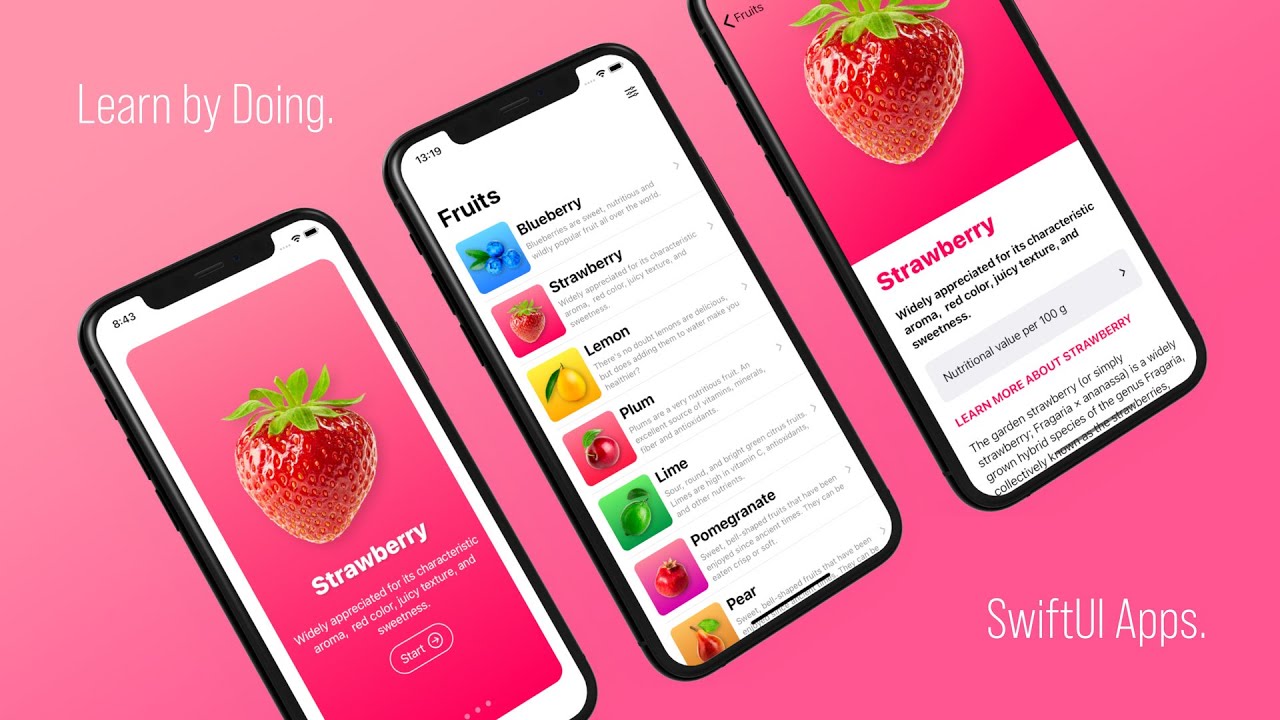
In this SwiftUI tutorial, we’re going to develop a gorgeous encyclopedia of fruits mobile application. This tutorial is best suited for total beginners who want to create a professional iOS app with the Xcode editor.
CHAPTERS
00:00 Introduction to iOS app development
00:30 Learning Objectives
01:27 Project Resources
01:51 Get familiar with the uploaded workbook
02:08 Get familiar with the SwiftUI project's folders
02:43 Launch the Xcode code editor
03:01 Let's create a new iOS project in Xcode
05:04 Make some initial settings for the iOS project
05:47 Add app icons manually from the assets catalog to the project
07:44 Drag and drop all of the previously pre-made app icons to the assets catalog
09:24 Add the images of the fruits to the SwiftUI project
10:27 Add the logo with the SVG file format to the iOS project
11:58 Learn how to create color set manually in Xcode
14:25 Add a bunch of color sets to the application
15:32 Get familiar with the new global Accent Color in iOS app development
17:22 Let's build and run the mobile app in Xcode's Simulator
18:14 Let's test the application's icons in the iPhone Simulator
18:27 Wrap-up and conclusion
This quick-start guide will help you to get familiar with iOS app development and the latest SwiftUI 2 framework using the recently updated Xcode editor.
LEARNING OBJECTIVES
The main learning objectives of this tutorial are the following:
1. We will learn how to create a new iOS project in Xcode.
2. Then, how to add graphic resources to this project.
3. After that, we will learn how to create a useful Onboarding screen with the new SwiftUI App Life Cycle and AppStorage.
4. Then how to create a data model and fetch data from the local data source using Swift 5 programming language.
5. Next, we’re going to learn how to create a list view and a detail view to display the fruits in the encyclopedia.
6. Finally, we’re going to develop a modern Settings screen using many new SwiftUI elements.
7. Building this eye-catchy application is a great start to get excited about all of the latest features that SwiftUI 2.0 provides for the app developers and much more.
SIMULATOR TEST
And? That’s all for this lecture. All we need to now is to launch the Simulator and test the app icons. On the redesigned toolbar select iPhone Pro as a target test device then by clicking on the Play button launch Xcode’s Simulator.
If it is a fresh new launch then it will take a while when the Simulator boots up. By the way, since the new SwiftUI App Life Cycle is chosen for this iOS 14 project therefore we do not have to create a Launch Screen using the old Storyboard technology.I find it worth to mention it before we wrap up this class.
And? Here it goes! The iOS app is already launched in the Simulator and there is the default welcome message on the screen. Since our main goal is to test the app icon, therefore, let’s close the app and check it on the Home Screen.
See, it’s perfect. What do you think about it? I think that it’s a great start. We not only set up a new iOS 14 project in Xcode 12 but we have already added all the necessary resource materials to it as well.
Besides all of that, we learned that starting from iOS 14 we can add SVG graphic files as vector resources to the project, and finally we can set the colors for the global Accent Color as well.
Awesome job so far! See you at the next class.
#SwiftUI #Xcode #Programming
Practical iOS and macOS app development tutorials with SwiftUI in 4K
In this SwiftUI tutorial, we’re going to develop a gorgeous encyclopedia of fruits mobile application. This tutorial is best suited for total beginners who want to create a professional iOS app with the Xcode editor.
CHAPTERS
00:00 Introduction to iOS app development
00:30 Learning Objectives
01:27 Project Resources
01:51 Get familiar with the uploaded workbook
02:08 Get familiar with the SwiftUI project's folders
02:43 Launch the Xcode code editor
03:01 Let's create a new iOS project in Xcode
05:04 Make some initial settings for the iOS project
05:47 Add app icons manually from the assets catalog to the project
07:44 Drag and drop all of the previously pre-made app icons to the assets catalog
09:24 Add the images of the fruits to the SwiftUI project
10:27 Add the logo with the SVG file format to the iOS project
11:58 Learn how to create color set manually in Xcode
14:25 Add a bunch of color sets to the application
15:32 Get familiar with the new global Accent Color in iOS app development
17:22 Let's build and run the mobile app in Xcode's Simulator
18:14 Let's test the application's icons in the iPhone Simulator
18:27 Wrap-up and conclusion
This quick-start guide will help you to get familiar with iOS app development and the latest SwiftUI 2 framework using the recently updated Xcode editor.
LEARNING OBJECTIVES
The main learning objectives of this tutorial are the following:
1. We will learn how to create a new iOS project in Xcode.
2. Then, how to add graphic resources to this project.
3. After that, we will learn how to create a useful Onboarding screen with the new SwiftUI App Life Cycle and AppStorage.
4. Then how to create a data model and fetch data from the local data source using Swift 5 programming language.
5. Next, we’re going to learn how to create a list view and a detail view to display the fruits in the encyclopedia.
6. Finally, we’re going to develop a modern Settings screen using many new SwiftUI elements.
7. Building this eye-catchy application is a great start to get excited about all of the latest features that SwiftUI 2.0 provides for the app developers and much more.
SIMULATOR TEST
And? That’s all for this lecture. All we need to now is to launch the Simulator and test the app icons. On the redesigned toolbar select iPhone Pro as a target test device then by clicking on the Play button launch Xcode’s Simulator.
If it is a fresh new launch then it will take a while when the Simulator boots up. By the way, since the new SwiftUI App Life Cycle is chosen for this iOS 14 project therefore we do not have to create a Launch Screen using the old Storyboard technology.I find it worth to mention it before we wrap up this class.
And? Here it goes! The iOS app is already launched in the Simulator and there is the default welcome message on the screen. Since our main goal is to test the app icon, therefore, let’s close the app and check it on the Home Screen.
See, it’s perfect. What do you think about it? I think that it’s a great start. We not only set up a new iOS 14 project in Xcode 12 but we have already added all the necessary resource materials to it as well.
Besides all of that, we learned that starting from iOS 14 we can add SVG graphic files as vector resources to the project, and finally we can set the colors for the global Accent Color as well.
Awesome job so far! See you at the next class.
#SwiftUI #Xcode #Programming
 1:19:31
SwiftUI Basics Tutorial
 0:30:53
SwiftUI Basics for Beginners (2020)
 0:58:14
Learn the Essentials of Swift in one hour
 0:02:25
Swift in 100 Seconds
 3:20:07
SwiftUI Tutorial for Beginners (3.5 hour FULL COURSE)
 10:32:30
Swift Programming Tutorial | FULL COURSE | Absolute Beginner
 0:19:02
SwiftUI Basics for Beginners (Learn iOS App Development with Xcode and Swift) - Part 1
 0:27:21
How to Make an App - Lesson 1 (2024 / SwiftUI)
 0:10:20
SWIFT UI Basic Explaination
 0:19:31
Build Your FIRST iOS App For Beginners (2024) – Tutorial
 3:00:49
How to Make an App in 8 Days (2024) - Full Walkthrough
 0:37:04
Create a weather app from scratch with this SwiftUI Crash Course
 0:38:15
SwiftUI Roadmap - How to learn SwiftUI for beginners tutorial - an overview from basic to advanced
 0:01:01
SwiftUI Basics for Beginners - Learn how to develop a popular iPhone application
 2:28:54
Learning SwiftUI – What are the basics? 📱
 0:00:56
Learn iOS App Development with SwiftUI Framework - Tutorial for Beginners and Advanced Developers
 0:06:43
Learn SwiftUI online for FREE | Bootcamp #0
 1:44:39
Learning SwiftUI, when you already know UIKit – The Basics of SwiftUI 📱 (free iOS tutorial)
 0:56:52
Xcode Tutorial - Step by Step for Beginners
 0:10:17
Let's create a Simple Login Screen for iPhone in Xcode (SwiftUI)
 1:37:56
Build an Expense Tracker App in SwiftUI - full course
 0:03:20
Learn SwiftUI From Scratch In This Free SwiftUI Bootcamp: FREE SwiftUI Tutorial Course
 0:10:38
Why I *highly dislike* iOS Development
 0:16:55
Swift: Build Your First App (2024) - iOS for Beginners
Комментарии