filmov
tv
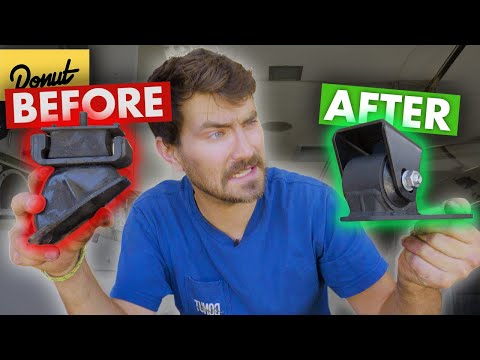
Replacing NA Miata engine mounts - Mazda Competition upgrade!

Показать описание
This video is the first of a new series on my 1991 NA Mazda Miata! I'm on a mission to go "OEM+" meaning I want to keep the original character of the car, but just improve it a bit in all the key areas and enhance the driving experience in the real world.
I was able to do this installation by myself in the driveway with a jack and a pair of jack stands. It was a bit tricky at times, and I had to remove or loosen a few engine components to get enough clearance, but in the end I was triumphant. My hope is that the things I learned along the way will be useful to you if you decide to tackle this job yourself.
I am happy with the new mounts, they are a subtle upgrade that help the car feel a little sportier, without ruining the comfort level. I would reccommend them if your old mounts are already worn out, and you want a small upgrade for a mostly street-driven Miata.
CHAPTERS:
0:00 - Intro
1:07 - Raising Car & Loosening Mounts
3:54 - Tips from Future Andrew
5:17 - Raising Engine & Removing RH Mount
6:48 - Replacing RH Mount
8:49 - Removing LH Mount
12:20 - Replacing LH Mount
14:51 - How to line everything up again!
17:40 - Torqing & Reassembly
18:50 - Driving Impressions & Conclusion
#miata #mazda #mx5 #mazdamiata #mazdamx5 #mazdaspeed
 0:22:38
Replacing NA Miata engine mounts - Mazda Competition upgrade!
 0:10:00
Moss Engine Mount Install II NA Mazda Miata
 0:10:07
Miata Gets Motor Mounts | Drive Smoother!
 0:13:22
Is Upgrading Your Engine Mounts Even Worth It?
 0:06:50
Miata Mazdacompetition Motor Mounts
 0:12:42
Best Motor Mounts for the Miata?! Innovative Mounts Install & Review
 0:07:33
Miata Gets Innovative 60DURO Motor Mounts
 0:04:25
How To Replace Miata Motor Mounts
 0:29:12
Choosing Engine Mounts for your Miata (FM Live)
 0:09:11
Stop Missing Shifts! AWR Motor Mounts Installation & Review
 0:15:09
YouTube's Most Clapped Out Miata Gets Motor Mounts and 99 Other Fixes
 0:07:44
Replacing MX-5 Engine Mounts - The Bodger's Guide
 0:06:04
Miata Engine Mounts (AWR) // Miata Track Build
 0:11:50
Motor Mount Shootout: AWR vs. Innovative, Which Is Best For You?
 0:07:42
How To Install Motor Mounts on a Mazda Mx5 Miata
 0:14:05
Miata Motor Mount Replacement, Spec Miata, Autocross, MX5, Track Car
 0:06:32
BEST MOD EVER FOR AN MX5! I.L Motorsport Engine Mounts Review // MIATA VLOG
 0:06:19
Installing Motor mounts on the Miata!
 0:08:18
Miata Innovative Engine Mounts
 0:10:13
AWR 1.6L Lowering Engine Mounts Mazda Miata | Best Mounts In The Business!!!
 0:13:54
Are Polyurethane Bushings Worth It?
 0:08:25
MIATA MOTOR MOUNTS - A BETTER CHEAPER ALTERNATIVE
 0:02:34
Replacing NA/NB Miata motor mounts
 0:12:21
Innovative Engine Mounts (FM Live)
Комментарии