filmov
tv
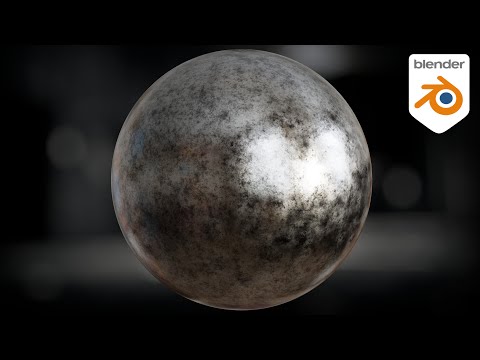
Blender - Metal Material Procedural Shader Method (Blender 2 8)

Показать описание
This is my thought pattern on creating node based procedural shaders in Blender, or any 3D software like it. This layer-based buildup and break-up approach has worked for me countless times. 20 minutes here could revolutionize your understanding of nodes and quick shader construction. If you're there already, there could be some gold nuggets here for you as well. This works in EEVEE and Cycles.
Images used for reference and educational purposes listed in this video:
Follow me on Instagram:
Images used for reference and educational purposes listed in this video:
Follow me on Instagram:
 0:29:17
Procedural Metal Materials (Blender Tutorial)
 0:09:45
Procedural Rough Metal Material (Blender Tutorial)
 0:01:09
Metal material in Blender
 0:09:40
Procedural Brushed Metal Material (Blender Tutorial)
 0:03:23
Create Realistic Steel Material In Under 2 Minutes | Metals In Blender (All Versions) Eevee & Cy...
 0:23:53
Procedural Worn Painted Metal Material (Blender Tutorial)
 0:02:03
Create a Scratched Metal material in BLENDER
 0:25:31
Procedural Scratched Metal Material (Blender Tutorial)
 0:13:19
Procedural Scratched Metal (Blender Tutorial)
 0:07:25
Procedural Galvanized Steel (Blender Tutorial)
 0:00:30
Making a Procedural Sci-Fi Material in Blender
 0:02:00
How to Create 3 Simple Metal Materials in Blender 2.8.2 | Tutorial
 0:03:18
Blender Tutorial - Procedural Metal Material In Under 2 Mins! (Easy Blender Tutorial)
 0:04:15
How to make brushed aluminum material in Blender, procedural metal texture
 0:10:20
Procedural Dirty Metal (Blender Tutorial)
 0:04:05
The RIGHT Way to do Edge Wear (in Cycles!)
 0:16:03
Blender Tutorial - Creating Realistic Procedural Brushed Metal
 0:12:20
3 Easy steps to make Realistic Materials
 0:15:11
How To Make Complex Materials Easily in Blender!
 0:15:31
Easy Sci-Fi Metal Greeble Material (Blender Tutorial)
 0:11:23
How to Create Professional Materials
 0:03:26
Blender shiny metal material and rough metal material with texture shader in Blender 4
 0:19:53
Procedural Battered Metal Material (Blender Tutorial)
 0:32:39
Let's Create a Procedural Rust Material (Blender Tutorial)
Комментарии