filmov
tv
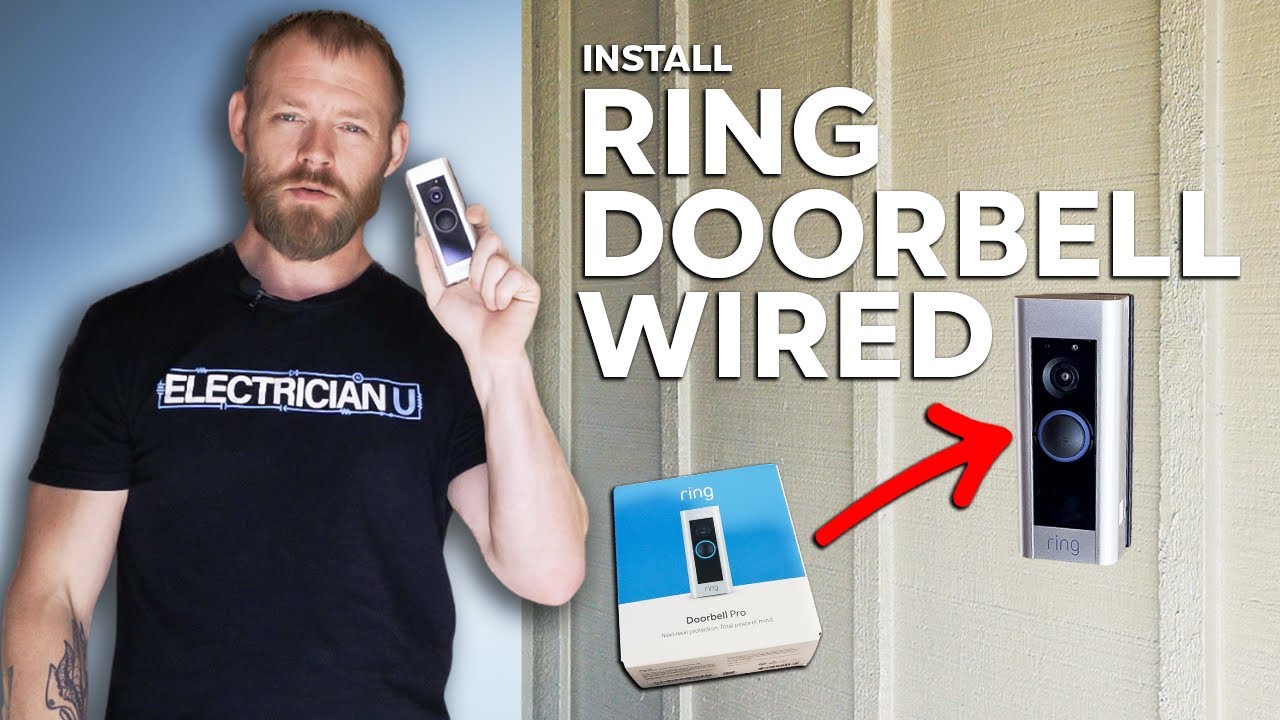
How To Install a Ring Video Doorbell Wired - From an Electrician
Показать описание
In this day and age where there are so many home security products available to us, as well as the option to install these things ourselves, how does it work? In the latest episode, Dustin takes us through the steps of installing a Ring Doorbell to an existing wired doorbell system.
🤘⚡️MEMBERSHIP⚡️🤘
JOIN ELECTRICIAN U - become a member and get:
FREE Continuing Education every year
FREE Practice Exams
FREE Monthly Video Courses
FREE Monthly Educational Newsletter
Premium Members-Only Content
Private Discord Channel
Monthly Members-Only Discord Chats
🎧🎹MUSIC AND VIDEO:🎹🎧
🎬✍️ART AND ILLUSTRATION:✍️🎬
As with installing anything, until you get well used to handling any particular item (and even then, after or when changing manufacturers) READ THE DIRECTIONS!! Most of us men tend to miss this part, but it is an important step that should be taken! Second thing to do is TURN OFF THE POWER. Last thing we want to do is get shocked! Also, since we are dealing with sensitive electronics, the power should be shut off, so we don’t burn anything up on the low voltage end.
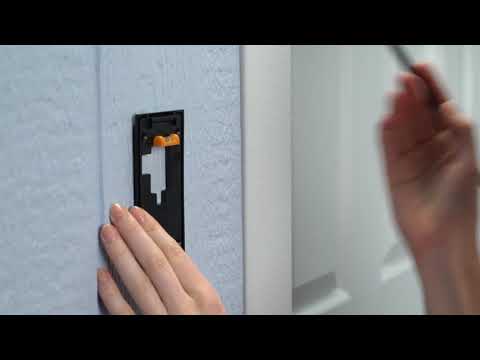
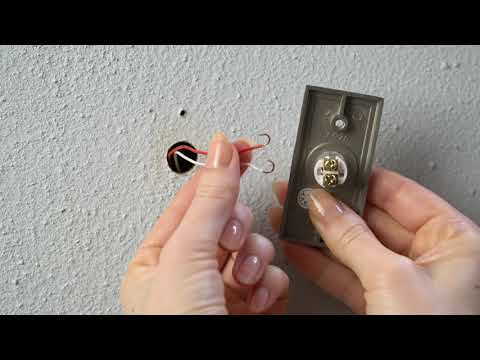
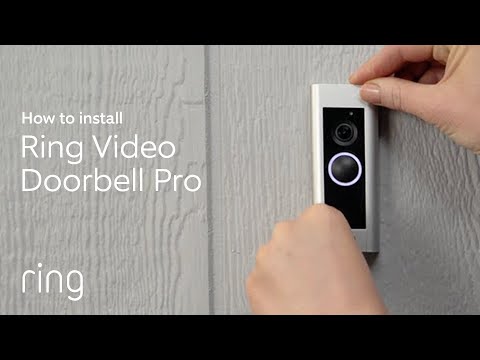
There are 3 general components to a doorbell system. The doorbell button, the transformer, and the chime. With the power off, remove the existing button on the wall at the door. Be super careful as the 2 wires at the button itself tend to be cut rather short, and we don’t want them falling back into the wall so we cannot use them! Once the button is removed, install the new mounting plate over the existing hole in the wall making sure to cover all the old surface area so there is no painting involved. Also, if you are using the angled back plate to kick the new camera away from the door itself, install the screws at a slight angle so they end up flush with the plate. Next, re-terminate the existing wires onto the screws of the new button, one wire per screw, and ensure that the wires aren’t shorted together. Don’t over tighten the screws but do make sure they are tight. Next item is to fasten the camera itself to the backplate with the provided screws. When you install the device, you want the camera at the top and button at the bottom, otherwise your image will be upside down. Once you have the camera mounted the last thing needed is to snap the cover onto the camera and use the provided screw to fasten the cover to the camera. This screw is usually on the bottom and will probably be a non-standard type head (not a Phillips or straight) so it cannot be easily removed.
Once the button installation sequence is completed, the next item to be done is to install the camera power pack to the existing doorbell chime. When you install the power pack to the chime, you want to be sure that you are not impeding the chime portion. You will need to look at the existing chime and find a place to install the pack. Once you have wired it into the existing chime and put the chime cover back on, the power can be turned back on.
The last item to do is to follow the manufacturer's instructions on linking the new bell to the Wi-Fi and your phone. You now should be good to go and can use the new doorbell!
We hope this video was instructional and provided the information needed to install a Ring Doorbell on your own! Please continue to follow Dustin and Electrician U as we are constantly adding new content regularly.
#electrician #electrical #electricity #ringvideodoorbellwired #ringcamera #bestdoorbellcamera2022 #howtoinstallringdoorbellwired #ringdoorbell4 #ringdoorbellwiredwithringchime #howtoinstallringdoorbell #horwtoinstallringdoorbell4 #ringdoorbellpro
🤘⚡️MEMBERSHIP⚡️🤘
JOIN ELECTRICIAN U - become a member and get:
FREE Continuing Education every year
FREE Practice Exams
FREE Monthly Video Courses
FREE Monthly Educational Newsletter
Premium Members-Only Content
Private Discord Channel
Monthly Members-Only Discord Chats
🎧🎹MUSIC AND VIDEO:🎹🎧
🎬✍️ART AND ILLUSTRATION:✍️🎬
As with installing anything, until you get well used to handling any particular item (and even then, after or when changing manufacturers) READ THE DIRECTIONS!! Most of us men tend to miss this part, but it is an important step that should be taken! Second thing to do is TURN OFF THE POWER. Last thing we want to do is get shocked! Also, since we are dealing with sensitive electronics, the power should be shut off, so we don’t burn anything up on the low voltage end.
There are 3 general components to a doorbell system. The doorbell button, the transformer, and the chime. With the power off, remove the existing button on the wall at the door. Be super careful as the 2 wires at the button itself tend to be cut rather short, and we don’t want them falling back into the wall so we cannot use them! Once the button is removed, install the new mounting plate over the existing hole in the wall making sure to cover all the old surface area so there is no painting involved. Also, if you are using the angled back plate to kick the new camera away from the door itself, install the screws at a slight angle so they end up flush with the plate. Next, re-terminate the existing wires onto the screws of the new button, one wire per screw, and ensure that the wires aren’t shorted together. Don’t over tighten the screws but do make sure they are tight. Next item is to fasten the camera itself to the backplate with the provided screws. When you install the device, you want the camera at the top and button at the bottom, otherwise your image will be upside down. Once you have the camera mounted the last thing needed is to snap the cover onto the camera and use the provided screw to fasten the cover to the camera. This screw is usually on the bottom and will probably be a non-standard type head (not a Phillips or straight) so it cannot be easily removed.
Once the button installation sequence is completed, the next item to be done is to install the camera power pack to the existing doorbell chime. When you install the power pack to the chime, you want to be sure that you are not impeding the chime portion. You will need to look at the existing chime and find a place to install the pack. Once you have wired it into the existing chime and put the chime cover back on, the power can be turned back on.
The last item to do is to follow the manufacturer's instructions on linking the new bell to the Wi-Fi and your phone. You now should be good to go and can use the new doorbell!
We hope this video was instructional and provided the information needed to install a Ring Doorbell on your own! Please continue to follow Dustin and Electrician U as we are constantly adding new content regularly.
#electrician #electrical #electricity #ringvideodoorbellwired #ringcamera #bestdoorbellcamera2022 #howtoinstallringdoorbellwired #ringdoorbell4 #ringdoorbellwiredwithringchime #howtoinstallringdoorbell #horwtoinstallringdoorbell4 #ringdoorbellpro
 0:02:45
How To Install Ring Doorbell
 0:01:45
How to Install Ring Video Doorbell (2nd Generation) - Wireless Install | Ring
 0:03:24
How to Install Ring Doorbell Wired | Ring
 0:02:28
How to Install Ring Stick Up Cam Battery (3rd Generation)
 0:07:16
How To Install a Ring Video Doorbell Wired - From an Electrician
 0:04:01
How to install the Ring Battery Doorbell Plus
 0:03:32
Ring Doorbell Pro 2 Installation (Wired)
 0:12:22
How To Install Ring Doorbell Wired
 0:05:57
boAt Smart Ring Active 😀 Android Pairing Steps and features explained !
 0:13:01
How To Install Ring Battery Doorbell Plus
 0:01:37
How to Install Ring Video Doorbell 3 or 3 Plus - Wireless Install
 0:37:04
Ring Video Doorbell - Complete Beginners Guide
 0:05:10
How to Install Ring Video Doorbell Pro | DiY Installation
 0:07:06
Easy Ring Doorbell Installation | Hardwiring a Ring Pro 2
 0:06:29
Ring Video Doorbell Installation Video
 0:02:37
How to Install Your Ring Video Doorbell 2nd Generation (Wired Install) | Ring
 0:02:00
How To Install Ring Alarm
 0:03:12
Piston Rings Installation Easily l How To Install Piston Rings
 0:03:58
How to Install & Setup Ring Spotlight Cam | Easy to Connect
 0:01:20
How to Install Ring Video Doorbell 2 (in Less than 15 Minutes!) | Ring
 0:04:41
How To Replace a Wired Doorbell with Ring Video Doorbell DiY Install | Ring
 0:03:07
How to Install Ring Video Doorbell 3 or 3 Plus - Wired Install
 0:11:15
How To Replace a Wired Doorbell with Ring Video Doorbell | DiY Install
 0:01:59
How To Mount Ring Stick Up Cam - Outdoor Installation
Комментарии