filmov
tv
How to set SLAs in the inbox in HubSpot
Показать описание
In this HubSpot tutorial, we will walk you through how to set SLAs in the inbox in HubSpot.
You can set service level agreements SLAs in the inbox to help reps prioritize incoming tickets based on their importance and ensure that they meet customer expectations.
Steps to follow:
Step 1. In this tutorial, we will show you how to do this.
Step 2. In your HubSpot account, click the settings icon in the main navigation bar.
Step 3. In the left sidebar menu, navigate to Inbox and click Inboxes.
Click the SLAs tab.
Step 4.To control when SLAs will apply to your team, click Manage when SLAs apply.
Step 5. In the dialog box, click Apply based on the dropdown menu and select an option:
Step 6. Working hours, or Calendar hours
Step 7.Once done, click save.
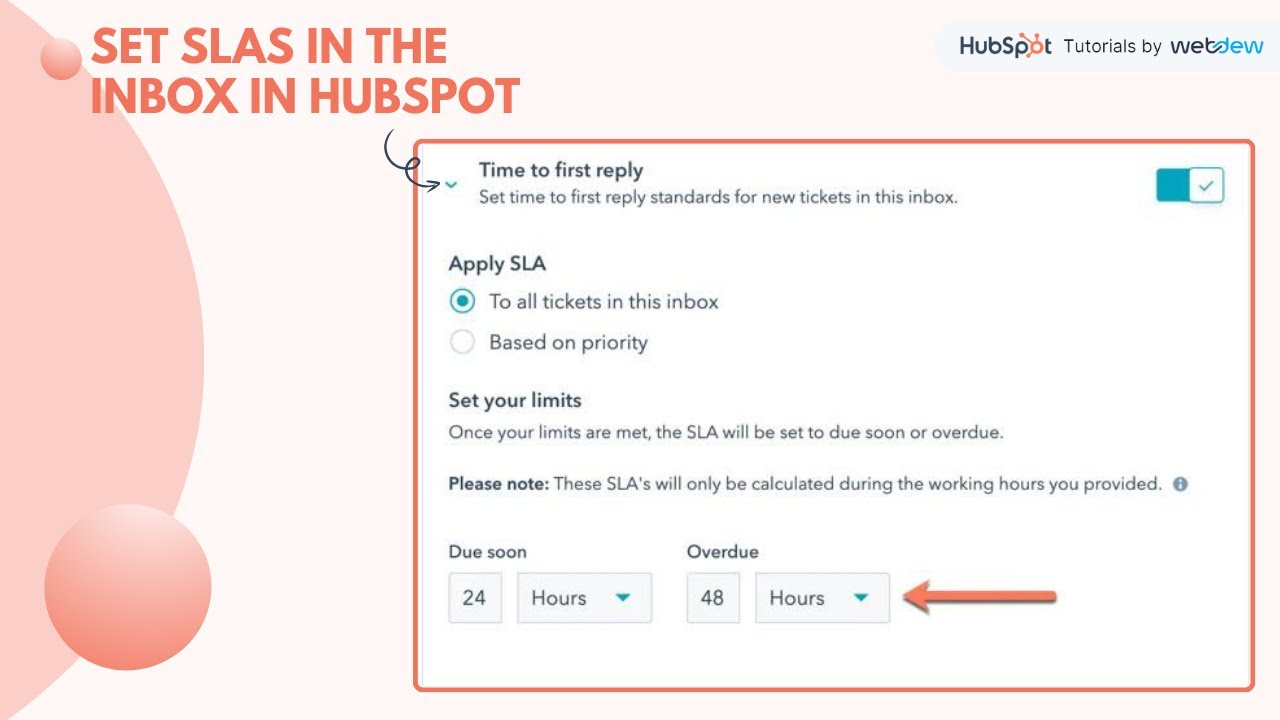
Step 8. To set an SLA based on the time, it takes a user to send a first reply to a message, click to toggle the Time to first reply switch on. The SLA can apply to all tickets in the inbox or based on ticket priority.
Step 9. In the Apply SLA section, the To all tickets in this inbox option will be selected by default.
Step 10. To apply the SLA based on ticket priority, in the Apply SLA section, select the Based on priority radio option.
Step 11. To set an SLA based on the time, it takes to close a ticket, click to toggle the Time to close switch on.
Step 12. With these SLA settings turned on, the SLA rules will apply to all new tickets moving forward. Any time you make changes to the SLA rules, the updated rules will only apply to new tickets that are opened.
Step 13. Once done with the settings, click save in the bottom left.
That’s how you can set SLAs in the inbox in HubSpot.
________________________________________________________________________
With webdew's HubSpot account setup tutorials, you will learn about General, Security, Notifications, Website, Inbox settings, and much more. All the videos that are shared on this Youtube channel will make you run through the HubSpot tool effortlessly.
Moreover, you will learn more about the HubSpot CRM, Marketing Hub, Sales Hub, Service Hub, Reporting, and Dashboards through our videos and see how you can use these tools to leverage HubSpot to benefit your business.
1. Go to the Webdew website and find the newsletter sign-up form.
2. Enter your email address in the designated field.
3. Click the “Subscribe” button to submit your subscription request.
4. You should receive a confirmation email shortly after, which will ask you to confirm your subscription. Follow the instructions in the email to complete the process.
Once you’ve successfully subscribed to the newsletter, you’ll receive weekly updates and tips on using HubSpot. Keep an eye on your inbox for the latest information and helpful advice.
Get Started with HubSpot with the Free CRM Sign-up:
You can set service level agreements SLAs in the inbox to help reps prioritize incoming tickets based on their importance and ensure that they meet customer expectations.
Steps to follow:
Step 1. In this tutorial, we will show you how to do this.
Step 2. In your HubSpot account, click the settings icon in the main navigation bar.
Step 3. In the left sidebar menu, navigate to Inbox and click Inboxes.
Click the SLAs tab.
Step 4.To control when SLAs will apply to your team, click Manage when SLAs apply.
Step 5. In the dialog box, click Apply based on the dropdown menu and select an option:
Step 6. Working hours, or Calendar hours
Step 7.Once done, click save.
Step 8. To set an SLA based on the time, it takes a user to send a first reply to a message, click to toggle the Time to first reply switch on. The SLA can apply to all tickets in the inbox or based on ticket priority.
Step 9. In the Apply SLA section, the To all tickets in this inbox option will be selected by default.
Step 10. To apply the SLA based on ticket priority, in the Apply SLA section, select the Based on priority radio option.
Step 11. To set an SLA based on the time, it takes to close a ticket, click to toggle the Time to close switch on.
Step 12. With these SLA settings turned on, the SLA rules will apply to all new tickets moving forward. Any time you make changes to the SLA rules, the updated rules will only apply to new tickets that are opened.
Step 13. Once done with the settings, click save in the bottom left.
That’s how you can set SLAs in the inbox in HubSpot.
________________________________________________________________________
With webdew's HubSpot account setup tutorials, you will learn about General, Security, Notifications, Website, Inbox settings, and much more. All the videos that are shared on this Youtube channel will make you run through the HubSpot tool effortlessly.
Moreover, you will learn more about the HubSpot CRM, Marketing Hub, Sales Hub, Service Hub, Reporting, and Dashboards through our videos and see how you can use these tools to leverage HubSpot to benefit your business.
1. Go to the Webdew website and find the newsletter sign-up form.
2. Enter your email address in the designated field.
3. Click the “Subscribe” button to submit your subscription request.
4. You should receive a confirmation email shortly after, which will ask you to confirm your subscription. Follow the instructions in the email to complete the process.
Once you’ve successfully subscribed to the newsletter, you’ll receive weekly updates and tips on using HubSpot. Keep an eye on your inbox for the latest information and helpful advice.
Get Started with HubSpot with the Free CRM Sign-up:
 0:09:38
 0:02:28
 0:01:11
 0:00:58
 0:08:05
 0:02:27
 0:08:01
 0:26:58
 0:06:01
 0:05:13
 0:15:47
 0:11:44
 0:00:34
 0:10:03
 0:15:53
 0:02:18
 0:01:37
 0:16:41
 0:01:11
 0:01:23
 0:04:59
 0:45:27
 0:00:56
 0:31:06