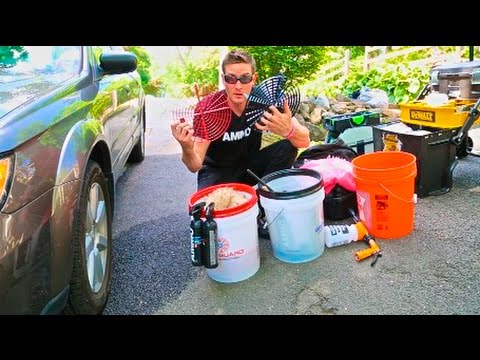
How To: 15 Stages To Detailing For Beginners

preview_player
Показать описание
In this video, we will walk you through 15 stages of detailing for beginners. Touching on many subjects from simple pre wash stages all the way through to decontamination and the ever more important protection stages. Remember you can pause and rewind the video at any time and follow along with the stages as you work on your own car.

Please Note, We do not advise following this tutorial for every wash. Once you have completed a detail on your vehicle you can follow up with regular maintenance washes.

Please if you have any questions on the methods used in this video or even suggestions on how you think other methods are better let us know in the comments below.

A few other helpful detailing videos:

You can find the products used in this video by visiting the links below.

Products Used in this tutorial:
Stage 2 - Prewash:
Stage 3 - Snowfoam:
Stage 4 - Wheels:
Stage 5 - Details:
Stage 6 - Wash:
Stage 8 - Decon:
Stage 9 - Polishing:
Stage 10 - Sealant:
Stage 11 - Glass:
Stage 12 - Wax:
Stage 13 - Trim:
Stage 14- Tyres:
Stage 15 – Finishing:

If you have any questions about the products or the routine in which we used, feel free to get in touch.

Don’t Forget to Like and Subscribe for more tutorial Videos.

Music:
Days In New York

Рекомендации по теме
Комментарии
Автор

OK for personal reference
1. Pre rinse (power wash)
2. Pre *wash* (bug & grime remover esp. Applied in front and near wheels)
3. Snow foam (apply liberally, allow to dwell then wash thoroughly incl. In between gaps)
4. Wheels (prepare bucket with wheel cleaning product and also a rinse bucket, apply wheel cleaner spray directly as well as tyre cleaner. Use wheel cleaning brush to agitate the face of the wheel as tyre side wall. Use a wheel 'whoolie' to clean the inside barrel of the wheel. Swill the wheels thoroughly, removing all product insuring none is left on the paint also
5.apply all purpose automotive cleaner to door shuts, badges and fuel filler interior. Use a *SOFT* bristled detailing brush to agitate. Swill the cleaned areas to ensure no product is left behind
6. Wash add car shampoo to wash bucket and lambs wool mitt and prepare a rinse off bucket. Ensure product is worked thoroughly and evenly through the mitt. Work top to bottom. Rinse in rinse bucket mitt after washing each panel. Rinse car ensuring no cleaning product is left behind
7. Using a plush cloth such as a chamois wipe down the car, either drag or pat dry
8. Decontaminate. Once car *IS DRY* apply tar remover especially in areas such as the front bumper, near the wheels and lower skirts. Heed the advice on the product's label and allow it to work for the directed time (a few minutes). Wipe clean with a microfiber cloth. It's is recommended to go around with wash mitt and remove the tar remover. Apply fallout remover to paint work and wheels in a similar fashion to the tar remover and allow to dwell for the time directed on the label (several minutes) remove the fallout remover. Once removed re-dry the vehicle. Once dry apply a liberal amount of clay bar lubricant to a single panel and begin to clay in a side to side motion, once one panel is done remove the clay lubricant with a microfiber cloth
9. Polishing. Using either a machine or by hand apply polishing compound on panel at a time (follow product label's instructions). Once applied and dry use a plush microfiber cloth to remove residue
10. Sealant. Place a small amount of sealant onto an applicator pad sparingly apply to each panel. Allow to cure for the time specified on the bottle. Using a microfiber cloth buff the panel to remove the residue
11. Glass. Apply glass cleaner directly to the glass and buff using a dedicated glass cleaning cloth, repeat by cleaning the interior
12. Wax. Apply a small amount of wax to an applicator pad. Using circular motions apply the wax evenly, one panel at a time or follow the products instructions on the label. Allow the wax to cure for the specified time. Buff the haze for the haze with a plush microfiber cloth
13. Trim apply a small amount of trim dressing to an applicator pad and spread evenly on the trim. Allow the dressing to 'flash' then buff using a clean microfiber cloth
14. Tyres. Apply tyre dressing/ tyre shine to applicator pad and apply evenly to the tyre sidewall. If needed buff any excess off.
15. Detailing. Apply a 'quick detailer to the panel and spread evenly using a microfiber cloth. Buff to a high shine finish using a plush microfiber cloth

tykiahjames
Автор

I shine my car like this and I'd continue to do so even if no one else but me was ever gonna see it. It's satisfying and enjoyable to take pride maintaining something you enjoy. Shining my car is when I do some of my best thinking. Nice to see someone else's routine - Thank you for the video 👍

ShaneLH
Автор

Great thing you did do... kept the sales to the description. You didn't pause every 5 seconds to tell the viewer what product you were using. This vid is very useful for any amateur to detailing. Way too much hate in the comments though. 3 bucket guy getting upset when he uses 3 buckets and still watched a beginner detail vid. lul. Thanks for putting this together.

mattsepter
Автор

Stage 16: keep the car parked for the rest of its life

ayushgupta
Автор

Legend has it, he's still washing his car

hashtag_thisguy
Автор

At step two I realised I was in over my head and had a panic poo.

DARBO
Автор

17 minutes of pure car cleaning heaven, the only after do I realise, this is considered for beginners.... can you imagine the 1000 steps for professional cleaning and all this was just outside the car, I think I need to sit down this is too much to take in.

Can I just hire you to do it for me??

danielwhyte
Автор

This detailing video is very detailed. As an amateur hobbyist detailer, I do skip or combine some of these steps.
I do the pre-wash after the wash with bug and tar remover. I try and use the product sparingly, rather than dousing the whole vehicle in it when only a few spots may need it.
I combine the snow foam and wash steps and just use an Ortho Dial N Spray Hose End Sprayer to douse the vehicle with a solution of Meguiar's car shampoo, let it set in, then lather with a wash mitt.
On the wheels I use a short bristle brush to get the spokes, the outer edges of the drums, and the sidewalls. I don't bother with wheel woolies. Occasionally I'll take off the wheels and clean them separately, using the same short bristle brush.
The details stage is one I've been skipping but probably should be doing.
For the decon stage, I just rely on the clay bar to pull up all the contaminants.
On the polishing stage, I focus only on the areas that need it (look for scratches, swirl marks), and I have a scratch repair kit from Turtle Wax. I keep a touch-up paint pen handy for deep scratches and rock chips.
I skip the sealant stage and just rely on the wax to provide all the protection.
The trim stage is another stage I've been neglecting but should be doing it.
I also skip the finishing stage, as I don't want to put chemicals on the wax if I don't have to.

johnbarron
Автор

I had to turn the music off after 4 minutes of the same riff.

jgn
Автор

Nice to see someone actually cleaning a dirty car

danielfl.
Автор

Excellent video I think a two bucket wash process was the only thing missed 👍

MarcByramPhotography
Автор

Finally a detailing video that's relatable on a dirty car, most of these videos feature a car that's as clean as it gets by my standards or either a 360 step 4 day restauration project.

JonasMollet
Автор

Products Used in this tutorial:
Stage 2 - Prewash:
Stage 3 - Snowfoam:
Stage 4 - Wheels:
Stage 5 - Details:
Stage 6 - Wash:
Stage 8 - Decon:
Stage 9 - Polishing:
Stage 10 - Sealant:
Stage 11 - Glass:
Stage 12 - Wax:
Stage 13 - Trim:
Stage 14- Tyres:
Stage 15 – Finishing:

TheDetailHunters
Автор

Detailing is so awesome when you have the correct tools and

mynsxt
Автор

I think this was a great video weather you’re learning how to detail or even someone who does this for work and just a bit rusty and haven’t touched a panel in a couple months. Step by step as long as you follow the instructions on each chemical along with the order this demonstration provides anyone can increase their skill level with consistent detailing. Also doing a back car for the demo I give a two thumbs up. 👏 great job.

davidmata
Автор

I’m glad there’s videos like this cause idk how else people would remember all these steps.

kiliabgonzalez
Автор

And this is the reason why car detailing can be expensive! Keep up the GREAT work :D

ivosilva
Автор

Nice car. Nice video. I’m glad you did a hand polish and wax. I did them for years until I finally bought a polisher but it’s nice to see someone taking the time to do it the good old fashioned way.

Roughdraft
Автор

personally I’m a fan of the 63 bucket technique and use freshly killed swans’ necks for the door jams .. Jokes aside great vid, most of us have probably spent so much money on cleaning products without the proper know how, thanks for taking the time to put this together

TheGilo
Автор

Nice video, but I'm goona be hearing that music in my sleep for weeks now...

midnightmystery